海运的博客

发个自己编译的OpenWRT官方稳定版加IPID/TTL固件下载

发布时间:September 14, 2012 // 分类:OpenWrt // 4 Comments

使用Openwrt官方源最新稳定版编译,添加IPID/TTL模块,适用于RG100AA和DB120。
linux内核版本:

Linux OpenWrt 2.6.32.27 #2 Fri Sep 14 17:12:10 CST 2012 mips GNU/Linux

编译安装的软件如下:

opkg list-installed
base-files - 43.35-r33081
bash - 4.2-2
busybox - 1.15.3-3.4
crda - 1.1.1-1
ddns-scripts - 1.0.0-18
dnsmasq - 2.55-6.1
dropbear - 0.53.1-6
gpioctl - 1.0-1
hotplug2 - 1.0-beta-3
ip - 2.6.29-1-2
iptables - 1.4.6-3.1
iptables-mod-conntrack - 1.4.6-3.1
iptables-mod-conntrack-extra - 1.4.6-3.1
iptables-mod-extra - 1.4.6-3.1
iptables-mod-filter - 1.4.6-3.1
iptables-mod-hashlimit - 1.4.6-3.1
iptables-mod-imq - 1.4.6-3.1
iptables-mod-ipopt - 1.4.6-3.1
iptables-mod-ipsec - 1.4.6-3.1
iptables-mod-nat - 1.4.6-3.1
iptables-mod-nat-extra - 1.4.6-3.1
iw - 0.9.22-2
kernel - 2.6.32.27-1
kmod-b43 - 2.6.32.27+2011-12-01-1
kmod-cfg80211 - 2.6.32.27+2011-12-01-1
kmod-crc-ccitt - 2.6.32.27-1
kmod-crypto-aes - 2.6.32.27-1
kmod-crypto-arc4 - 2.6.32.27-1
kmod-crypto-core - 2.6.32.27-1
kmod-fs-ext3 - 2.6.32.27-1
kmod-fs-ntfs - 2.6.32.27-1
kmod-fs-vfat - 2.6.32.27-1
kmod-ipt-conntrack - 2.6.32.27-1
kmod-ipt-conntrack-extra - 2.6.32.27-1
kmod-ipt-core - 2.6.32.27-1
kmod-ipt-extra - 2.6.32.27-1
kmod-ipt-filter - 2.6.32.27-1
kmod-ipt-hashlimit - 2.6.32.27-1
kmod-ipt-imq - 2.6.32.27-1
kmod-ipt-ipopt - 2.6.32.27-1
kmod-ipt-ipsec - 2.6.32.27-1
kmod-ipt-nat - 2.6.32.27-1
kmod-ipt-nat-extra - 2.6.32.27-1
kmod-mac80211 - 2.6.32.27+2011-12-01-1
kmod-macvlan - 2.6.32.27-1
kmod-nls-base - 2.6.32.27-1
kmod-nls-cp437 - 2.6.32.27-1
kmod-nls-iso8859-1 - 2.6.32.27-1
kmod-nls-utf8 - 2.6.32.27-1
kmod-ppp - 2.6.32.27-1
kmod-pppoe - 2.6.32.27-1
kmod-sched - 2.6.32.27-1
kmod-scsi-core - 2.6.32.27-1
kmod-switch - 2.6.32.27-4
kmod-textsearch - 2.6.32.27-1
kmod-usb-core - 2.6.32.27-1
kmod-usb-ohci - 2.6.32.27-1
kmod-usb-storage - 2.6.32.27-1
kmod-usb2 - 2.6.32.27-1
l7-protocols - 2009-05-28-1
libc - 0.9.30.1-43.35
libevent2 - 2.0.16-1
libgcc - 4.3.3+cs-43.35
libip4tc - 1.4.6-3.1
libiwinfo - 18.2
libiwinfo-lua - 18.2
liblua - 5.1.4-7
libncurses - 5.7-2
libnl-tiny - 0.1-2.1
libopenssl - 0.9.8x-1
libpcap - 1.0.0-2
libpthread - 0.9.30.1-43.35
librt - 0.9.30.1-43.35
libuci - 12012009.7-4
libuci-lua - 12012009.7-4
libxtables - 1.4.6-3.1
lrzsz - 0.12.20-2
lua - 5.1.4-7
luci-app-ddns - 0.10+svn9273-1
luci-i18n-chinese - 0.10+svn9273-1
luci-i18n-english - 0.10+svn9273-1
luci-lib-core - 0.10+svn9273-1
luci-lib-ipkg - 0.10+svn9273-1
luci-lib-lmo - 0.10+svn9273-1
luci-lib-nixio - 0.10+svn9273-1
luci-lib-sys - 0.10+svn9273-1
luci-lib-web - 0.10+svn9273-1
luci-mod-admin-core - 0.10+svn9273-1
luci-mod-admin-full - 0.10+svn9273-1
luci-proto-core - 0.10+svn9273-1
luci-proto-ppp - 0.10+svn9273-1
luci-sgi-cgi - 0.10+svn9273-1
luci-sgi-uhttpd - 0.10+svn9273-1
luci-theme-base - 0.10+svn9273-1
luci-theme-openwrt - 0.10+svn9273-1
mtd - 13
openssh-client - 5.9p1-4
opkg - 576-2
ppp - 2.4.4-16.1
ppp-mod-pppoe - 2.4.4-16.1
tc - 2.6.29-1-2
tcpdump - 4.1.1-2
tmux - 1.6-2
uci - 12012009.7-4
udevtrigger - 106-1
uhttpd - 28.1
uhttpd-mod-lua - 28.1
wireless-tools - 29-4
wpad-mini - 20111103-3
zlib - 1.2.3-5

IPID及TTL使用参数参考:Openwrt/Linux使用IPID和TTL模块防网络尖兵

RG100-AA通过TTL线刷OpenWRT系统

发布时间:August 23, 2012 // 分类:OpenWrt // No Comments

不小心RG100-AA成砖了,先尝试用TTL修复吧,不行再使用JTAG,USB-TTL PL-2303_HX_数据线驱动

黑=GND
白=RXD
灰=TXD

RG100-AA TTL连接图,从左到右依次为:VCC-GND-RXD-TXD
RG100A刷机TTL连接图.png
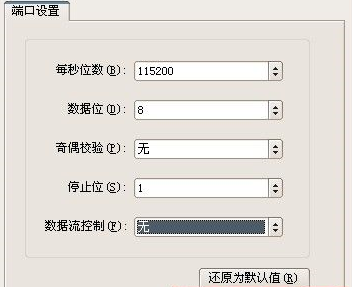
securecrt参数设置:
securecrt使用TTL连接刷机参数.png
以下开始刷机,按住路由reset键,然后开启路由电源,10秒左右松开reset键,进入CFE界面,输入e a回车清除flash信息,CFE登录账号和密码:

#https://www.haiyun.me
用户:telecomadmin 密码:telecomadmin
用户:telecomadmin 密码:nE7jA%5m 
帐号:admin       密码:8mCnC@bj 
帐号:bjcnchgw     密码:8mCnC@bj

清除信息后会重新启动进入CFE界面,将网络插入LAN4接口,通过浏览器打开192.168.1.1进入WEB升级界面,密码同上,上传OpenWRT固件刷机即可。
整个步骤securecrt显示如下:

Initializing Arena.
Initializing Devices.
Parallel flash device: name AM29LV320MT|S29GL128-A, id 0x2201, size 16384KB
Flash Layout: Boot[0,0xbe000000] Kern[1,0xbe020000]
              AuxFS[93,0xbeba0000] Misc[125,0xbefa0000] PSI[127,0xbefe0000]
Flash RootFS Partition Length: 12058624
CPU type 0x2A010: 300MHz, Bus: 133MHz, Ref: 64MHz
CPU running TP0
Total memory: 67108864 bytes (64MB)

Total memory used by CFE:  0x80401000 - 0x80529850 (1214544)
Initialized Data:          0x8041E730 - 0x80421050 (10528)


** Flash image not found. **


*** Break into CFE console ***

Board IP address                  : 192.168.1.1:ffffff00  
Host IP address                   : 192.168.1.100  
Gateway IP address                :   
Run from flash/host (f/h)         : f  
Default host run file name        : vmlinux  
Default host flash file name      : bcm963xx_fs_kernel  
Boot delay (0-9 seconds)          : 1  
Board Id (0-8)                    : 96358VW2  
Number of MAC Addresses (1-32)    : 11  
Base MAC Address                  : 00:1f:a3:65:55:8c  
PSI Size (1-64) KBytes            : 24  
Flash Block Size (1-128) in KBytes: 128  
Auxillary File System Size Percent: 25  
Main Thread Number [0|1]          : 0  

udp_send finished
No answer .auto boot ...
CFE> e a
Pleas longin:
user:telecomadmin
passwd:*************
login success
CFE> e a
Erase all flash (except bootrom)? (y/n):y
No image tag found.  Erase the blocks start at [1]
...............................................................................................................................

Resetting board...Boot Address 0xbe000000

Initializing Arena.
Initializing Devices.
Parallel flash device: name AM29LV320MT|S29GL128-A, id 0x2201, size 16384KB
Flash Layout: Boot[0,0xbe000000] Kern[1,0xbe020000]
              AuxFS[93,0xbeba0000] Misc[125,0xbefa0000] PSI[127,0xbefe0000]
Flash RootFS Partition Length: 12058624
CPU type 0x2A010: 300MHz, Bus: 133MHz, Ref: 64MHz
CPU running TP0
Total memory: 67108864 bytes (64MB)

Total memory used by CFE:  0x80401000 - 0x80529850 (1214544)
Initialized Data:          0x8041E730 - 0x80421050 (10528)


** Flash image not found. **

Board IP address                  : 192.168.1.1:ffffff00  
Host IP address                   : 192.168.1.100  
Gateway IP address                :   
Run from flash/host (f/h)         : f  
Default host run file name        : vmlinux  
Default host flash file name      : bcm963xx_fs_kernel  
Boot delay (0-9 seconds)          : 1  
Board Id (0-8)                    : 96358VW2  
Number of MAC Addresses (1-32)    : 11  
Base MAC Address                  : 00:1f:a3:65:55:8c  
PSI Size (1-64) KBytes            : 24  
Flash Block Size (1-128) in KBytes: 128  
Auxillary File System Size Percent: 25  
Main Thread Number [0|1]          : 0  

udp_send finished
No answer .auto boot ...
web info: Upload 3801092 bytes, Broadcom image format.
CFE> 
Flashing root file system and kernel at 0xbe020000: ..............................

.
*** Image flash done *** !

Resetting board...Boot Address 0xbe000000

2015.02.09更新:
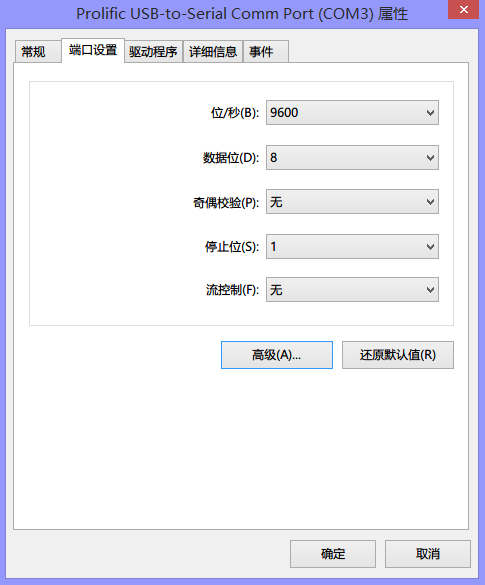
Windows8.1已自带TTL数据线驱动,插入后通过设备管理器查看COM接口:
2015-02-09_075239.png
然后点击查看属性,后面使用xshell或securecrt要用到:
2015-02-09_075357.png
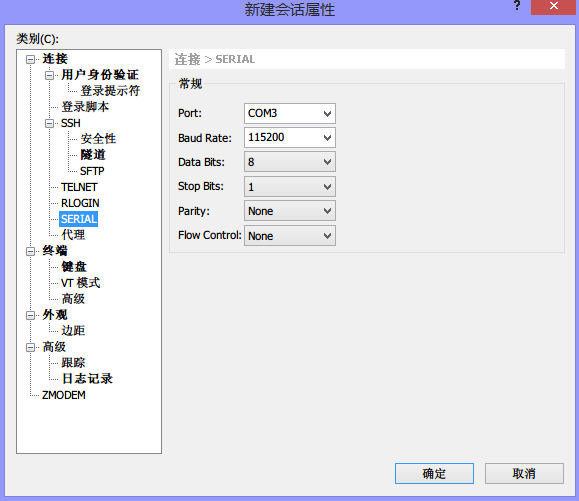
使用xshell新建会话,速率和上面的不一样:
2015-02-09_075829.png
然后连接:

Connecting to COM3...
Connected.

后面直接开机和进入CFE会显示启动界面,可用于进入CFE刷机或SSH不能连接Openwrt路由时使用。

Iptables模块TTL应用禁止二级路由及禁止tracert被跟踪

发布时间:August 5, 2012 // 分类:Iptables // No Comments

TTL即Time To Live,用来描述数据包的生存时间,防止数据包在互联网上一直游荡,每过一个路由减1,TTL为1时丢弃数据包并返回不可达信息。
Iptables TTL模块可以修改收到、发送数据的TTL值,这模块很有趣,可以实现很多妙用。
TTL使用参数:

https://www.haiyun.me
--ttl-set #设置TTL的值
--ttl-dec #设置TTL减去的值
--ttl-inc #设置TTL增加的值

应用示例:
禁止被tracert跟踪到,traceroute跟踪时首先向目标发送TTL为1的IP数据,路由收到后丢弃数据包并返回不可达信息,以此递增直到目标主机为止。

iptables -A INPUT -m ttl --ttl-eq 1 -j DROP
#禁止TTL为1的数据包进入
iptables -A FORWARD -m ttl --ttl-eq 1 -j DROP
#禁止转发TTL为1的数据

禁止二级路由:

iptables -t mangle -A PREROUTING -i pppoe-wan -j TTL --ttl-set 2
#进入路由数据包TTL设置为2,二级路由可接收数据不转发。

Centos编译IPID模块配置TTL防网络尖兵

发布时间:July 30, 2012 // 分类:Iptables // No Comments

Centos自带iptables TTL模块,IPID源码下载地址:http://bbs.chinaunix.net/thread-2102211-1-1.html

#https://www.haiyun.me
yum -y install kernel-devel
wget http://ftp.netfilter.org/pub/iptables/iptables-1.3.5.tar.bz2
tar jxvf iptables-1.3.5.tar.bz2
ln -s iptables-1.3.5 /usr/src/iptables

编译安装IPID:

cd iptables-ipid-2.1
sed -i 's/new_ipid\[i\]/new_ipid\[id\]/g' ipt_IPID.c
make
cp ipt_IPID.ko /lib/modules/2.6.18-308.11.1.el5/kernel/net/ipv4/netfilter/
chmod 744 /lib/modules/2.6.18-308.11.1.el5/kernel/net/ipv4/netfilter/ipt_IPID.ko
cp libipt_IPID.so /lib/iptables/
depmod -a
modprobe ipt_IPID

使用参数:

--ipid-pace [number] 设置每次增加的步调值,如果为0,则数据包的IPID字段应该为一个固定的值。
--ipid-choatic 0 设置随机IPID。0仅仅是填充参数作用。

应用示例:

iptables -t mangle -A PREROUTING  -i pppoe-wan -j TTL --ttl-inc 1
#限制2级路由
iptables -t mangle -A POSTROUTING -o pppoe-wan -j TTL --ttl-set 128
iptables -t mangle -A POSTROUTING -o pppoe-wan -j IPID --ipid-pace 1
#这样路由本机和下级电脑发的数据都修改TTL和IPID信息,修改TTL会导致tracert跟踪不正常。
#如需不影响路由本机tracert可在FORWARD链修改数据包信息
分类
最新文章
最近回复
  • opnfense: 谢谢博主!!!解决问题了!!!我之前一直以为内置的odhcp6就是唯一管理ipv6的方式
  • liyk: 这个方法获取的IPv6大概20分钟之后就会失效,默认路由先消失,然后Global IPV6再消失
  • 海运: 不好意思,没有。
  • zongboa: 您好,請問一下有immortalwrt設定guest Wi-Fi的GUI教學嗎?感謝您。
  • 海运: 恩山有很多。
  • swsend: 大佬可以分享一下固件吗,谢谢。
  • Jimmy: 方法一 nghtp3步骤需要改成如下才能编译成功: git clone https://git...
  • 海运: 地址格式和udpxy一样,udpxy和msd_lite能用这个就能用。
  • 1: 怎么用 编译后的程序在家里路由器内任意一台设备上运行就可以吗?比如笔记本电脑 m参数是笔记本的...
  • 孤狼: ups_status_set: seems that UPS [BK650M2-CH] is ...