海运的博客

ACME.sh使用ZeroSSL和Buypass根证书CA签发免费ssl证书

发布时间:December 25, 2020 // 分类: // No Comments

Let's Encrypt使用的DST Root CA X3根证书即将过期,而新根证书ISRG Root X1签发于2015年较新不被老设备信任,acme.sh最新版本支持zerossl和buypass签发证书,zerossl和buypass的根证书签发于2010年,相对支持的设备更多,申请方法:
安装acme.sh,先升级acme.sh到最新版本:

acme.sh --upgrade

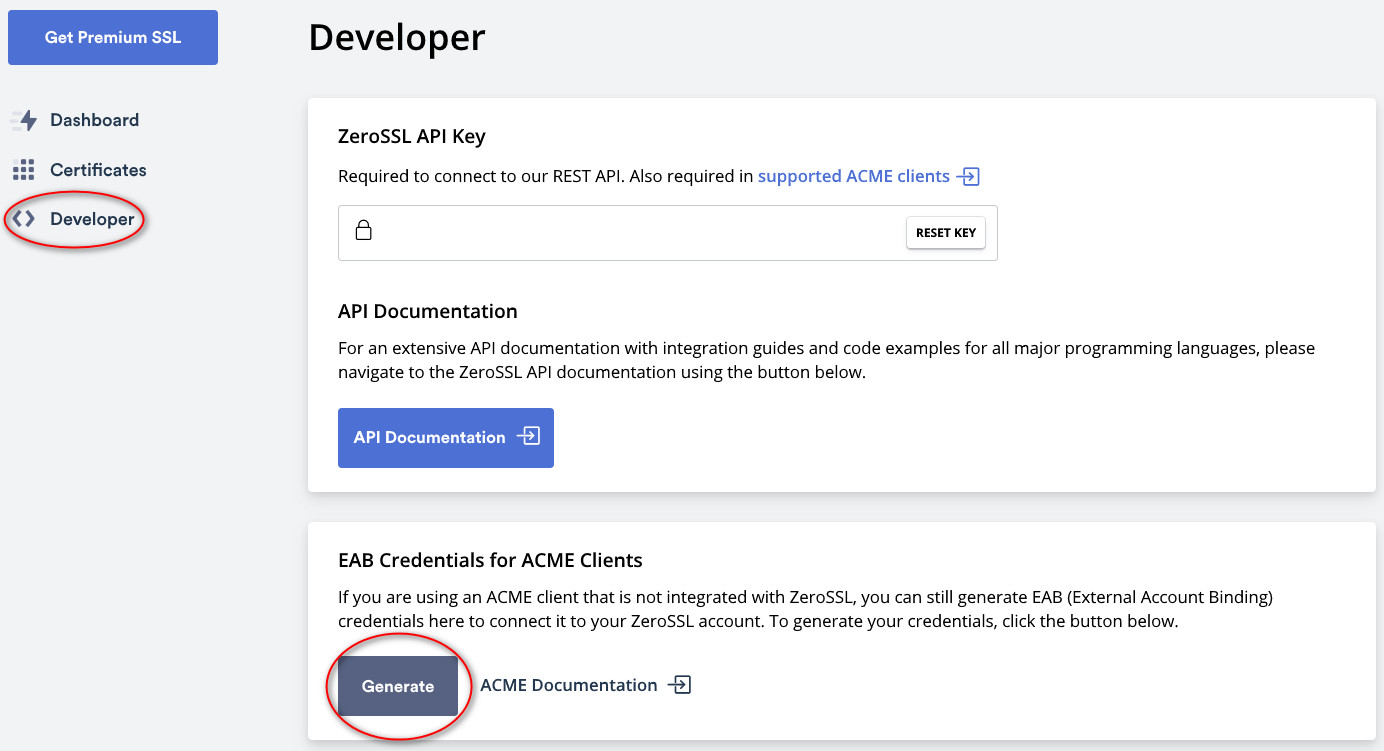
通过acme.sh申请zerossl免费证书,首先在zerossl官网注册账号并生成eab-kid和eab-hmac-key:
2020-12-25_083036.jpg

acme.sh注册zerossl:

acme.sh --register-account --server zerossl --eab-kid xxxxxxx --eab-hmac-key xxxxx  

指定server为zerossl申请ssl证书:

acme.sh --server zerossl --issue --dns dns_dp -d haiyun.me -d *.haiyun.me -k ec-256 --renew-hook "systemctl restart nginx" 

或设置默认CA为zerossl:

acme.sh --set-default-ca  --server zerossl                                                                                                                                                                                                          
acme.sh --issue --dns dns_dp -d haiyun.me -d *.haiyun.me -k ec-256 --renew-hook "systemctl restart nginx"    

acme.sh申请buypass免费ssl证书:

acme.sh --server https://api.buypass.com/acme/directory --register-account  --accountemail su@haiyun.me
acme.sh --server https://api.buypass.com/acme/directory --issue --dns dns_dp -d haiyun.me -d www.haiyun.me --renew-hook "systemctl restart nginx"    

参考:
https://ffis.me/archives/2110.html
https://luotianyi.vc/4839.html

ubuntu 20.04下nginx不支持tls1.0/tls1.1解决

发布时间:December 16, 2020 // 分类:Nginx // No Comments

在ubuntu 20.04下配置nginx ssl时怎么不支持tls1.0/1.1,确认配置文件无误怀疑是openssl的问题,原来是ubuntu 20.04/openssl 1.1.1默认禁用了不安全的tls协议,可以修改openssl配置文件开启。
patch:

--- openssl.cnf 2020-12-26 10:54:59.000000000 +0800
+++ /etc/ssl/openssl.cnf        2020-12-26 11:28:20.406439168 +0800
@@ -11,6 +11,8 @@
 # defined.
 HOME                   = .
 
+openssl_conf = default_conf
+
 # Extra OBJECT IDENTIFIER info:
 #oid_file              = $ENV::HOME/.oid
 oid_section            = new_oids
@@ -348,3 +350,13 @@
                                # (optional, default: no)
 ess_cert_id_alg                = sha1  # algorithm to compute certificate
                                # identifier (optional, default: sha1)
+
+[default_conf]
+ssl_conf = ssl_sect
+
+[ssl_sect]
+system_default = system_default_sect
+
+[system_default_sect]
+MinProtocol = TLSv1
+CipherString = DEFAULT:@SECLEVEL=1

或直接修改配置文件,openssl.cnf首部添加:

sed -i '1i openssl_conf = default_conf' /etc/ssl/openssl.cnf

尾部添加:

cat >> /etc/ssl/openssl.cnf << EOF
[default_conf]
ssl_conf = ssl_sect

[ssl_sect]
system_default = system_default_sect

[system_default_sect]
MinProtocol = TLSv1
CipherString = DEFAULT:@SECLEVEL=1
EOF

使用openssl测试是否支持tls1.0和1.1:

openssl s_client -connect www.haiyun.me:443 -tls1_1
openssl s_client -connect www.haiyun.me:443 -tls1

参考:
https://askubuntu.com/questions/1233186/ubuntu-20-04-how-to-set-lower-ssl-security-level

使用Let's Encrypt签发的免费https证书

发布时间:February 2, 2018 // 分类: // No Comments

安装ssl证书获取工具certbot,安装前先删除request及urllib包,不然可以会出现No module named 'requests.packages.urllib3' 的错误:

pip uninstall requests -y
pip uninstall urllib3 -y
yum remove python-urllib3 -y
yum remove python-requests -y
yum install python-urllib3 -y
yum install python-requests -y
yum install certbot -y

centos8直接下载certbot,运行时会自动安装依赖:

wget https://dl.eff.org/certbot-auto

获取证书,成功后证书文件在 /etc/letsencrypt/live/haiyun.me/目录下

certbot certonly --webroot --email sss@haiyun.me --agree-tos --no-eff-email -w /var/www/www.haiyun.me -d haiyun.me -d www.haiyun.me

配置nginx:

  listen       443 default ssl ;
  server_name www.haiyun.me haiyun.me;
  index index.html index.htm index.php; 
  root  /var/www/www.haiyun.me;
  ssl_certificate /etc/letsencrypt/live/haiyun.me/fullchain.pem;
  ssl_certificate_key /etc/letsencrypt/live/haiyun.me/privkey.pem;
  ssl_protocols       TLSv1 TLSv1.1 TLSv1.2;
  ssl_ciphers         HIGH:!aNULL:!MD5;
  ssl_prefer_server_ciphers   on;

由于Let's Encrypt的免费证书有效期为3个月,60天可以更新,使用cron定时任务自动更新证书:

00 01 * * * certbot renew --renew-hook "nginx -s reload"

吊销证书:

certbot revoke --cert-path /etc/letsencrypt/live/haiyun.me/cert.pem --key-path /etc/letsencrypt/live/haiyun.me/privkey.pem 

迁移服务器备份:

cd /etc/letsencrypt
tar zcf letsencrypt.tar.gz archive live renewal

WordPress后台强制使用SSL

发布时间:March 24, 2013 // 分类:WordPress // No Comments

编辑wp-config.php配置文件,在以下内容之前添加:

require_once(ABSPATH . 'wp-settings.php');

管理员登录使用SSL:

define('FORCE_SSL_ADMIN', true);

所有用户登录强制使用SSL:

define('FORCE_SSL_LOGIN', true);

使用OpenSSL转换X509 PEM与PFX证书

发布时间:February 9, 2013 // 分类:OpenSSL // No Comments

LinuxApacheNginx通常使用X509格式SSL证书,WindowsIIS使用PFX格式SSL证书,可以使用OpenSSL互转X509与PFX。
X509转PFX:

#https://www.haiyun.me
openssl pkcs12 -export -inkey www.haiyun.me.key -in www.haiyun.me.cer -out www.haiyun.me.pfx

PFX转X509:

openssl pkcs12 -in www.haiyun.me.pfx -nodes -out www.haiyun.me.pem 
openssl rsa -in www.haiyun.me.pem -out www.haiyun.me.key
openssl x509 -in www.haiyun.me.pem -out www.haiyun.me.crt 
分类
最新文章
最近回复
  • opnfense: 谢谢博主!!!解决问题了!!!我之前一直以为内置的odhcp6就是唯一管理ipv6的方式
  • liyk: 这个方法获取的IPv6大概20分钟之后就会失效,默认路由先消失,然后Global IPV6再消失
  • 海运: 不好意思,没有。
  • zongboa: 您好,請問一下有immortalwrt設定guest Wi-Fi的GUI教學嗎?感謝您。
  • 海运: 恩山有很多。
  • swsend: 大佬可以分享一下固件吗,谢谢。
  • Jimmy: 方法一 nghtp3步骤需要改成如下才能编译成功: git clone https://git...
  • 海运: 地址格式和udpxy一样,udpxy和msd_lite能用这个就能用。
  • 1: 怎么用 编译后的程序在家里路由器内任意一台设备上运行就可以吗?比如笔记本电脑 m参数是笔记本的...
  • 孤狼: ups_status_set: seems that UPS [BK650M2-CH] is ...