Nfsight分为两部分,后端以Nfsen插件安装,前端以PHP显示分析图表。
安装Perl Mysql支持:
yum install perl-DBD-MySQL后端Nfsen插件安装:
wget http://sourceforge.net/projects/nfsight/files/nfsight-beta-20110908.tgz
tar zxvf nfsight-beta-20110908.tgz
cd nfsight-beta-20110908/
cp backend/nfsight.pm /usr/local/nfsen/plugins/
mkdir /usr/local/nfsen/plugins/nfsight
chown -R apache:apache /usr/local/nfsen/plugins/nfsight
前端Web安装:
cp -r frontend/ /var/www/html/nfsight
chown -R apache:apache /var/www/html/nfsight新建Mysql数据库Nfsight:
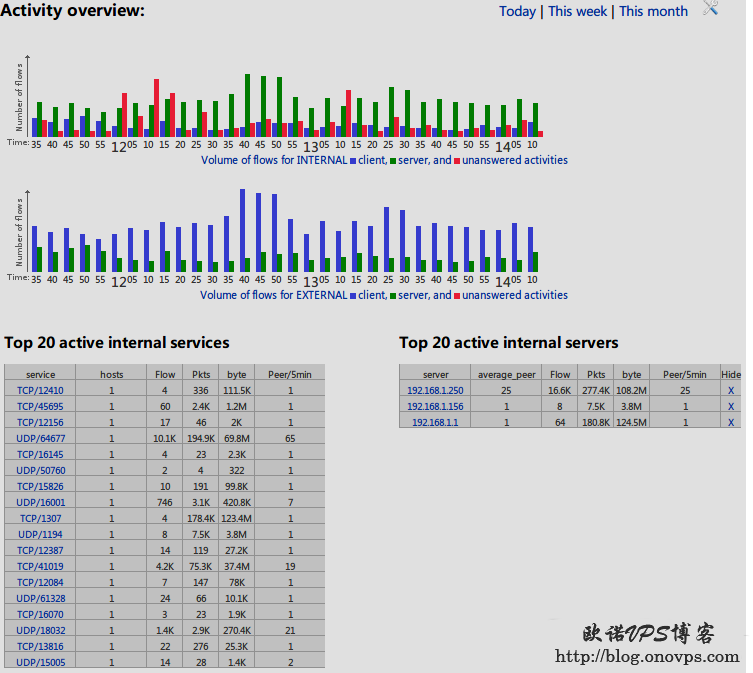
mysql -u root -p -e "create database ngsight;"然后通过浏览器访问www.haiyun.me/nfsight/installer.php安装提示进行安装,最后将屏幕出现的配置信息添加到Nfsen配置文件。
@plugins = (
    # profile    # module
    # [ '*',     'demoplugin' ],
      [ 'live',   'PortTracker'],
      [ '*', 'nfsight' ],
);

%PluginConf = (
    nfsight => {
        path => "/usr/local/nfsen/plugins/nfsight",
        expiration => "180",
        network => {
            "192.168.1.0" => "24",
        },
        scanner_limit => "5",
        print_int_scanner => "1",
        print_ext_scanner => "1",
        print_int_client => "1",
        print_ext_client => "1",
        print_int_server => "1",
        print_ext_server => "1",
        print_int_invalid => "1",
        print_ext_invalid => "1",
        sql_host => "localhost",
        sql_port => "3306",
        sql_user => "nfsight",
        sql_pass => "nfsight",
        sql_db => "nfsight",
    },
);
重启Nfsen加载Nfsight插件:
/usr/local/nfsen/bin/nfsen reload查看插件是否加载成功:
grep -i nfsight /var/log/messages
Oct 23 11:30:12 master nfsen[28085]: Loading plugin 'nfsight': Success
添加计划任务:
06 * * * * wget --no-check-certificate -q -O - http://management:aggregate@127.0.0.1/nfsight/aggregate.php还有默认登录nfsight主界面或设置界面会联网检查是否有新版本,可通会有点慢,可禁用此功能。
cat /var/www/html/nfsight/config.php
"check_version"=>      "0",
效果图如下: