海运的博客

Iptables模块recent应用

发布时间:May 3, 2012 // 分类:Iptables // 17 Comments

recent这个模块很有趣,善加利用可充分保证您服务器安全。
设定常用参数:

#https://www.haiyun.me
--name #设定列表名称,默认DEFAULT。
--rsource #源地址,此为默认。
--rdest #目的地址
--seconds #指定时间内
--hitcount #命中次数
--set #将地址添加进列表,并更新信息,包含地址加入的时间戳。
--rcheck #检查地址是否在列表,以第一个匹配开始计算时间。
--update #和rcheck类似,以最后一个匹配计算时间。
--remove #在列表里删除相应地址,后跟列表名称及地址。

示例:
1.限制80端口60秒内每个IP只能发起10个新连接,超过记录日记及丢失数据包,可防CC及非伪造IP的syn flood。

iptables -A INPUT -p tcp --dport 80 --syn -m recent --name webpool --rcheck --seconds 60 --hitcount 10 -j LOG --log-prefix 'DDOS:' --log-ip-options
iptables -A INPUT -p tcp --dport 80 --syn -m recent --name webpool --rcheck --seconds 60 --hitcount 10 -j DROP
iptables -A INPUT -p tcp --dport 80 --syn -m recent --name webpool --set -j ACCEPT

备忘:每个IP目标端口为80的新连接会记录在案,可在/proc/net/xt_recent/目录内查看,rcheck检查此IP是否在案及请求次数,如果超过规则就丢弃数据包,否则进入下条规则并更新列表信息。
2.发送特定指定执行相应操作,按上例如果自己IP被阻止了,可设置解锁哦。

#https://www.haiyun.me
iptables -A INPUT -p tcp --dport 5000 --syn -j LOG --log-prefix "WEBOPEN: "
#记录日志,前缀WEBOPEN:
iptables -A INPUT -p tcp --dport 5000 --syn -m recent --remove --name webpool --rsource -j REJECT --reject-with tcp-reset
#符合规则即删除webpool列表内的本IP记录

3.芝麻开门,默认封闭SSH端口,为您的SSH服务器设置开门暗语。

iptables -A INPUT -p tcp --dport 50001 --syn -j LOG --log-prefix "SSHOPEN: "
#记录日志,前缀SSHOPEN:
iptables -A INPUT -p tcp --dport 50001 --syn -m recent --set --name sshopen --rsource -j REJECT --reject-with tcp-reset
#目标端口tcp50001的新数据设定列表为sshopen返回TCP重置,并记录源地址。
iptables -A INPUT -p tcp --dport 22 --syn -m recent --rcheck --seconds 15 --name sshopen --rsource -j ACCEPT
#开启SSH端口,15秒内允许记录的源地址登录SSH。
nc host 50001  #开门钥匙
telnet host 50001
nmap -sS host 50001

指定端口容易被破解密钥,可以使用ping指定数据包大小为开门钥匙。

iptables -A INPUT -p icmp --icmp-type 8 -m length --length 78 -j LOG --log-prefix "SSHOPEN: "
#记录日志,前缀SSHOPEN:
iptables -A INPUT -p icmp --icmp-type 8 -m length --length 78 -m recent --set --name sshopen --rsource -j ACCEPT
#指定数据包78字节,包含IP头部20字节,ICMP头部8字节。
iptables -A INPUT -p tcp --dport 22 --syn -m recent --rcheck --seconds 15 --name sshopen --rsource -j ACCEPT
ping -s 50 host #Linux下解锁
ping -l 50 host #Windows下解锁
Nginx反向代理做负载均衡及缓存服务器

发布时间:May 2, 2012 // 分类:高可用 // No Comments

安装编译环境及相关组件:

yum -y install gcc gcc-c++ autoconf libjpeg libjpeg-devel libpng libpng-devel freetype freetype-devel libxml2 \
libxml2-devel zlib zlib-devel glibc glibc-devel glib2 glib2-devel bzip2 bzip2-devel ncurses ncurses-devel curl \
curl-devel e2fsprogs e2fsprogs-devel krb5 krb5-devel libidn libidn-devel openssl openssl-devel openldap \
openldap-devel nss_ldap openldap-clients openldap-servers unzip

编译安装PCRE、Nginx及缓存清除模块ngx_cache_purge:

/usr/local/src/
wget http://sourceforge.net/projects/pcre/files/pcre/8.30/pcre-8.30.zip
unzip pcre-8.30.zip 
cd pcre-8.30
./configure 
make && make install  
cd ..
wget http://labs.frickle.com/files/ngx_cache_purge-1.2.tar.gz
tar zxvf ngx_cache_purge-1.2.tar.gz 
wget http://nginx.org/download/nginx-1.0.15.tar.gz
tar zxvf nginx-1.0.15.tar.gz 
cd nginx-1.0.15
./configure --user=www --group=www --prefix=/usr/local/nginx --with-http_stub_status_module  \
--with-http_gzip_static_module --add-module=../ngx_cache_purge-1.2
make && make install  

Nginx配置文件:

user  www www;

worker_processes 4;

error_log  /usr/local/nginx/logs/nginx_error.log  crit;

pid        /usr/local/nginx/logs/nginx.pid;

worker_rlimit_nofile 65535;

events
    {
        use epoll;
        worker_connections 65535;
    }

http
    {
        include       mime.types;
                default_type application/octet-stream; 

                charset utf-8;   

        server_names_hash_bucket_size 128;
        client_header_buffer_size 32k;
        large_client_header_buffers 4 32k;
        client_max_body_size 50m;

        sendfile on;
        tcp_nopush     on;

        keepalive_timeout 60;

        tcp_nodelay on;

                proxy_temp_path /cache_tmp;
                proxy_cache_path /cache levels=1:2 keys_zone=proxy_cache:256m inactive=10d max_size=10g;

                client_body_buffer_size  512k;
                proxy_connect_timeout 5;   
                proxy_read_timeout 60;   
                proxy_send_timeout 15; 
                proxy_buffer_size        16k;
                proxy_buffers            4 64k;
                proxy_busy_buffers_size 128k;
                proxy_temp_file_write_size 128k;

        gzip on;
        gzip_min_length  1k;
        gzip_buffers     4 16k;
        gzip_http_version 1.0;
        gzip_comp_level 2;
        gzip_types       text/plain application/x-javascript text/css application/xml;
        gzip_vary on;

                upstream proxy_server_pool 
                {
                server node1.www.haiyun.me;
                server node2.www.haiyun.me;
                }
                 

                 log_format   proxy
                 $remote_addr-$remote_user-$time_local-$request-$body_bytes_sent-$http_referer-
                 $http_user_agent-$upstream_addr-$upstream_cache_status-$upstream_status ;
server
        {
                 listen       80;
                 server_name cdn.www.haiyun.me;
                 location /
                 {
                 proxy_next_upstream http_502 http_504 error timeout invalid_header;   
                 proxy_cache proxy_cache;
                 proxy_cache_valid  200 304 1d;
                 proxy_cache_key $host$uri$is_args$args; #$http_cookie
                 add_header Nginx-Cache "$upstream_cache_status from $upstream_addr";
                 proxy_set_header Host $host;
                 proxy_set_header X-Forwarded-For $remote_addr;
                 proxy_pass http://proxy_server_pool;
                 }

                 location ~ .*\.(php|jsp|cgi)?$
                 {
                 proxy_set_header Host $host;
                 proxy_set_header X-Forwarded-For $remote_addr;
                 proxy_pass http://proxy_server_pool;
                 }
                 location ~ /purge(/.*)   
                 {    
                 allow 127.0.0.1;   
                 deny all;   
                 proxy_cache_purge proxy_cache $host$uri$is_args$args;   
                 }   
                 access_log  /usr/local/nginx/logs/cdn.www.haiyun.me.log proxy;
         }
}

Putty小工具Plink妙用

发布时间:May 1, 2012 // 分类:Windows // No Comments

提及Putty大家都不陌生,Putty自带的工具Plink同样强大,本文就简单介绍下几种用法。
Plink使用参数:

Usage: plink [options] [user@]host [command]
Options:
  -V        print version information and exit
  -pgpfp    print PGP key fingerprints and exit
  -v        show verbose messages
  -load sessname  Load settings from saved session
  -ssh -telnet -rlogin -raw -serial
            force use of a particular protocol
  -P port   connect to specified port
  -l user   connect with specified username
  -batch    disable all interactive prompts
The following options only apply to SSH connections:
  -pw passw login with specified password
  -D [listen-IP:]listen-port
            Dynamic SOCKS-based port forwarding
  -L [listen-IP:]listen-port:host:port
            Forward local port to remote address
  -R [listen-IP:]listen-port:host:port
            Forward remote port to local address
  -X -x     enable / disable X11 forwarding
  -A -a     enable / disable agent forwarding
  -t -T     enable / disable pty allocation
  -1 -2     force use of particular protocol version
  -4 -6     force use of IPv4 or IPv6
  -C        enable compression
  -i key    private key file for authentication
  -noagent  disable use of Pageant
  -agent    enable use of Pageant
  -m file   read remote command(s) from file
  -s        remote command is an SSH subsystem (SSH-2 only)
  -N        don't start a shell/command (SSH-2 only)
  -nc host:port
            open tunnel in place of session (SSH-2 only)
  -sercfg configuration-string (e.g. 19200,8,n,1,X)
            Specify the serial configuration (serial only)

1.动态转发端口,可用于代*理上网哦。

plink -N -D 127.0.0.1:7070 root@192.168.1.2 -pw passwd

2.转发本地端口到远程服务器

plink -N -L 127.0.0.1:2222:google.com:80 root@haiyun.me -pw passwd
#通过haiyun.me将本地2222端口转发google.com 80端口,浏览器打开127.0.0.1:2222就是谷歌网站

3.登录ssh服务器并依次执行文件内的命令。

plink -m cmd.txt root@www.haiyun.me -pw passwd

4.内网穿透,转发远程服务器端口到本地端口,远程监听指定地址查看:https://www.haiyun.me/archives/1010.html

plink -N -R 0.0.0.0:2222:localhost:3389 root@haiyun.me -pw passwd
#转发haiyun.me 2222端口到本地3389端口

Linux/Centos服务器ssh安全设置

发布时间:April 28, 2012 // 分类:网络安全 // 2 Comments

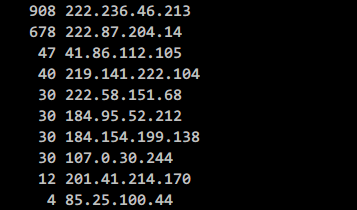
互联网很危险,SSH做为服务器的大门一定要做好安全设置,我曾经做过测试,一台VPS开启ssh服务监听默认端口22,几天后secure日记分割了10多个,统计最新几小时的恶意登录失败的IP数据如下:
ssh恶意登录统计.png
真是个恐怖的次数,蛋痛的人太多了,如果密码稍简单就被破解了,如需自动封IP请参考:iptables自动封IP防SSH被暴力破解
1.更改默认端口,网上很多针对22端口扫描的软件,这样不会被误伤。

#https://www.haiyun.me
sed -i 's/#Port 22/Port 33333/g' /etc/ssh/sshd_config 
#更改ssh端口为3333

2.禁止root登录,新建普通用户登录,登录后可su -转入root账户,让恶意登录者无法猜测用户名。

useradd onovps #新建用户名
passwd onovps #设置密码
sed -i 's/#PermitRootLogin yes/PermitRootLogin no/g' /etc/ssh/sshd_config
#禁止root登录
service sshd restart #重启ssh服务生效

3.限制登录失败次数并锁定

vim /etc/pam.d/login

在#%PAM-1.0下面添加:

auth required pam_tally2.so deny=5 unlock_time=180 #登录失败5次锁定180秒,不包含root
auth required pam_tally2.so deny=5 unlock_time=180 even_deny_root root_unlock_time=180 #包含root

4.允许特定的用户登录,编辑ssh配置文件:

vim /etc/ssh/sshd_config 
AllowUsers user 
#默认允许全部,多个用户以空格隔开,也可拒绝特定用户登录。
DenyUsers user

5.设置重复验证次数,默认3次:

MaxAuthTries 0
#错误一次即断开连接

6.直接用Iptables封闭ssh端口,为ssh服务器设置开门钥匙,有此其它都是浮云啦。。。。
一般做这些设置就足够了,也可设置为禁用密码用密钥登录,不同客户端方法不同,以后再写吧。

记录下Squid反向代理配置

发布时间:April 26, 2012 // 分类:Linux服务 // No Comments

版本:Squid Cache: Version 3.1.10

http_port 80 vhost vport
icp_port 0
visible_hostname proxy.www.haiyun.me
cache_mgr  support@www.haiyun.me
cache_effective_user squid
cache_effective_group  squid 
cache_access_log /cache/access.log
cache_log /cache/cache.log
cache_dir ufs /cache/ 2048 16 256
cache_mem 64 MB
maximum_object_size 4096 KB
minimum_object_size 0 KB
maximum_object_size_in_memory 256 KB
forwarded_for on 

acl manager proto cache_object
acl localhost src 127.0.0.1/32 ::1
acl to_localhost dst 127.0.0.0/8 0.0.0.0/32 ::1

acl SSL_ports port 443
acl Safe_ports port 80        # http
acl Safe_ports port 21        # ftp
acl Safe_ports port 443        # https
acl CONNECT method CONNECT

http_access allow manager localhost
http_access deny manager

http_access deny !Safe_ports
http_access deny CONNECT !SSL_ports

hierarchy_stoplist cgi-bin ?
hierarchy_stoplist -i ^https:\\ ? 
acl QUERY urlpath_regex -i cgi-bin \? \.php \.xml \.jsp \.js \.do
acl denyssl urlpath_regex -i ^https:\\ 
acl dy_cache urlpath_regex asp\?
acl dy_cache urlpath_regex aspx\?
acl dy_cache urlpath_regex php\?
acl dy_cache urlpath_regex jsp\?
no_cache deny QUERY
no_cache deny denyssl
no_cache deny dy_cache

cache_peer cp.www.haiyun.me parent 80 0 no-query originserver name=cp
cache_peer_domain cp cp.www.haiyun.me
cache_peer_access cp allow all
cache_peer www.haiyun.me parent 80 0 no-query originserver name=www
cache_peer_domain www www.haiyun.me
cache_peer_access www allow all
#always_direct allow all
http_access allow all 

refresh_pattern -i \.css$ 1440 50% 129600 reload-into-ims 
refresh_pattern -i \.xml$ 1440 50% 129600 reload-into-ims
refresh_pattern -i \.htm$ 1440 90% 129600 reload-into-ims
refresh_pattern -i \.html$ 1440 90% 129600 reload-into-ims
refresh_pattern -i \.shtml$ 1440 90% 129600 reload-into-ims
refresh_pattern -i \.png$ 1440 90% 129600 reload-into-ims
refresh_pattern -i \.jpg$ 1440 90% 129600 reload-into-ims
refresh_pattern -i \.jpeg$ 1440 90% 129600 reload-into-ims
refresh_pattern -i \.gif$ 1440 90% 129600 reload-into-ims
refresh_pattern -i \.bmp$ 1440 90% 129600 reload-into-ims
refresh_pattern -i \.js$ 1440 90% 129600 reload-into-ims
 
refresh_pattern -i \.mp3$ 1440 50% 2880 ignore-reload
refresh_pattern -i \.wmv$ 1440 50% 2880 ignore-reload
refresh_pattern -i \.rm$ 1440 50% 2880 ignore-reload
refresh_pattern -i \.swf$ 1440 50% 2880 ignore-reload
refresh_pattern -i \.mpeg$ 1440 50% 2880 ignore-reload
refresh_pattern -i \.wma$ 1440 50% 2880 ignore-reload
 
refresh_pattern -i \.exe$ 1440 50% 2880 ignore-reload
refresh_pattern -i \.rar$ 1440 50% 2880 ignore-reload
refresh_pattern -i \.zip$ 1440 50% 2880 ignore-reload
refresh_pattern -i \.gz$ 1440 50% 2880 ignore-reload
refresh_pattern -i \.bz2$ 1440 50% 2880 ignore-reload
refresh_pattern -i \.7z$ 1440 50% 2880 ignore-reload

#隐藏head信息,2.x版本使用header_access
reply_header_access Via deny all
reply_header_access Cache-Control deny all
reply_header_access Server deny all
reply_header_access X-Cache deny all
reply_header_access X-Cache-Lookup deny all
reply_header_access X-Squid-Error deny all
reply_header_access X-Forwarded-For deny all
request_header_access Via deny all
request_header_access Age deny all
request_header_access X-Squid-Error deny all
request_header_access Pragma deny all
#request_header_access X-Forwarded-For deny all
分类
最新文章
最近回复
  • opnfense: 谢谢博主!!!解决问题了!!!我之前一直以为内置的odhcp6就是唯一管理ipv6的方式
  • liyk: 这个方法获取的IPv6大概20分钟之后就会失效,默认路由先消失,然后Global IPV6再消失
  • 海运: 不好意思,没有。
  • zongboa: 您好,請問一下有immortalwrt設定guest Wi-Fi的GUI教學嗎?感謝您。
  • 海运: 恩山有很多。
  • swsend: 大佬可以分享一下固件吗,谢谢。
  • Jimmy: 方法一 nghtp3步骤需要改成如下才能编译成功: git clone https://git...
  • 海运: 地址格式和udpxy一样,udpxy和msd_lite能用这个就能用。
  • 1: 怎么用 编译后的程序在家里路由器内任意一台设备上运行就可以吗?比如笔记本电脑 m参数是笔记本的...
  • 孤狼: ups_status_set: seems that UPS [BK650M2-CH] is ...