海运的博客

Centos服务器安全配置SSH使用Google Authenticator二次验证

发布时间:August 30, 2012 // 分类:网络安全 // 2 Comments

CentOS安装所需组件:

yum -y install mercurial pam-devel

安装Google Authenticator:

#https://www.haiyun.me
wget --no-check-certificate https://google-authenticator.googlecode.com/files/libpam-google-authenticator-1.0-source.tar.bz2
tar jxvf libpam-google-authenticator-1.0-source.tar.bz2 
cd libpam-google-authenticator-1.0
make
make install

SSH登录时调用google-authenticator模块,编辑:

/etc/pam.d/sshd

第一行添加:

auth       required     pam_google_authenticator.so

修改SSH配置文件:

vim /etc/ssh/sshd_config

添加或修改以下内容:

ChallengeResponseAuthentication yes
UsePAM yes

重启SSH:

/etc/init.d/sshd restart

生成google-authenticator配置,运行:

google-authenticator 
Do you want authentication tokens to be time-based (y/n) y
https://www.google.com/chart?chs=200x200&chld=M|0&cht=qr&chl=otpauth://totp/root@node1.www.haiyun.me%3Fsecret%3DABEXG5K6CVB56BXY
#此网址为生成的二维码,客户端扫描
Your new secret key is: www.haiyun.me
Your verification code is 582849
Your emergency scratch codes are:
  30776626
  14200155
  80795568
  23936997
  21919909
#上面几行数字为应急码
Do you want me to update your "/root/.google_authenticator" file (y/n) y
#更新配置文件
Do you want to disallow multiple uses of the same authentication
token? This restricts you to one login about every 30s, but it increases
your chances to notice or even prevent man-in-the-middle attacks (y/n) y
#禁止一个口令多用
By default, tokens are good for 30 seconds and in order to compensate for
possible time-skew between the client and the server, we allow an extra
token before and after the current time. If you experience problems with poor
time synchronization, you can increase the window from its default
size of 1:30min to about 4min. Do you want to do so (y/n) n
#客户端与服务器时间误差
If the computer that you are logging into isn't hardened against brute-force
login attempts, you can enable rate-limiting for the authentication module.
By default, this limits attackers to no more than 3 login attempts every 30s.
Do you want to enable rate-limiting (y/n) y
#次数限制

Android安装google-authenticator客户端,扫描添加上方网址的二维码,以后在登录服务器时输入账号密码的同时还需输入google-authenticator即时生成的验证码才能登录。

ssh www.haiyun.me
Verification code: 
Password: 
WinSCP普通用户登录sftp切换到root权限

发布时间:August 28, 2012 // 分类:常用软件 // No Comments

一般服务器为安全禁止ssh下root账号登录,此时使用sftp登录管理服务器只能使用普通账号登录,给管理带来诸多不便,可以设置为特定普通SSH用户添加sudo权限,登录到sftp时可sudo切换到root权限下。
查看sftp-server执行文件目录:

cat /etc/ssh/sshd_config|grep sftp
Subsystem    sftp    /usr/libexec/openssh/sftp-server

编辑/etc/sudoers为特定用户添加执行sftp sudo权限:

#https://www.haiyun.me
user ALL=NOPASSWD:  /usr/libexec/openssh/sftp-server

后续如果登录失败日记显示:

sorry, you must have a tty to run sudo ; TTY=unknown

需在/etc/sudoers内注释此行:

#Defaults    requiretty  

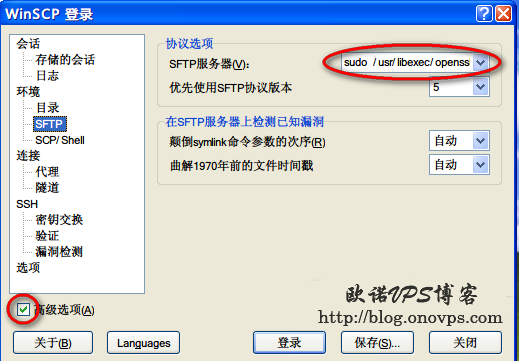
sftp客户端设置登录以sudo权限执行sftp,下图以winscp为例:

sudo /usr/libexec/openssh/sftp-server

winscp设置普通用户切换到root.png
此时用winscp登录就是root权限了,对整个系统的文件都拥有生杀大权。。。

RG100-AA通过TTL线刷OpenWRT系统

发布时间:August 23, 2012 // 分类:OpenWrt // No Comments

不小心RG100-AA成砖了,先尝试用TTL修复吧,不行再使用JTAG,USB-TTL PL-2303_HX_数据线驱动

黑=GND
白=RXD
灰=TXD

RG100-AA TTL连接图,从左到右依次为:VCC-GND-RXD-TXD
RG100A刷机TTL连接图.png
securecrt参数设置:
securecrt使用TTL连接刷机参数.png
以下开始刷机,按住路由reset键,然后开启路由电源,10秒左右松开reset键,进入CFE界面,输入e a回车清除flash信息,CFE登录账号和密码:

#https://www.haiyun.me
用户:telecomadmin 密码:telecomadmin
用户:telecomadmin 密码:nE7jA%5m 
帐号:admin       密码:8mCnC@bj 
帐号:bjcnchgw     密码:8mCnC@bj

清除信息后会重新启动进入CFE界面,将网络插入LAN4接口,通过浏览器打开192.168.1.1进入WEB升级界面,密码同上,上传OpenWRT固件刷机即可。
整个步骤securecrt显示如下:

Initializing Arena.
Initializing Devices.
Parallel flash device: name AM29LV320MT|S29GL128-A, id 0x2201, size 16384KB
Flash Layout: Boot[0,0xbe000000] Kern[1,0xbe020000]
              AuxFS[93,0xbeba0000] Misc[125,0xbefa0000] PSI[127,0xbefe0000]
Flash RootFS Partition Length: 12058624
CPU type 0x2A010: 300MHz, Bus: 133MHz, Ref: 64MHz
CPU running TP0
Total memory: 67108864 bytes (64MB)

Total memory used by CFE:  0x80401000 - 0x80529850 (1214544)
Initialized Data:          0x8041E730 - 0x80421050 (10528)


** Flash image not found. **


*** Break into CFE console ***

Board IP address                  : 192.168.1.1:ffffff00  
Host IP address                   : 192.168.1.100  
Gateway IP address                :   
Run from flash/host (f/h)         : f  
Default host run file name        : vmlinux  
Default host flash file name      : bcm963xx_fs_kernel  
Boot delay (0-9 seconds)          : 1  
Board Id (0-8)                    : 96358VW2  
Number of MAC Addresses (1-32)    : 11  
Base MAC Address                  : 00:1f:a3:65:55:8c  
PSI Size (1-64) KBytes            : 24  
Flash Block Size (1-128) in KBytes: 128  
Auxillary File System Size Percent: 25  
Main Thread Number [0|1]          : 0  

udp_send finished
No answer .auto boot ...
CFE> e a
Pleas longin:
user:telecomadmin
passwd:*************
login success
CFE> e a
Erase all flash (except bootrom)? (y/n):y
No image tag found.  Erase the blocks start at [1]
...............................................................................................................................

Resetting board...Boot Address 0xbe000000

Initializing Arena.
Initializing Devices.
Parallel flash device: name AM29LV320MT|S29GL128-A, id 0x2201, size 16384KB
Flash Layout: Boot[0,0xbe000000] Kern[1,0xbe020000]
              AuxFS[93,0xbeba0000] Misc[125,0xbefa0000] PSI[127,0xbefe0000]
Flash RootFS Partition Length: 12058624
CPU type 0x2A010: 300MHz, Bus: 133MHz, Ref: 64MHz
CPU running TP0
Total memory: 67108864 bytes (64MB)

Total memory used by CFE:  0x80401000 - 0x80529850 (1214544)
Initialized Data:          0x8041E730 - 0x80421050 (10528)


** Flash image not found. **

Board IP address                  : 192.168.1.1:ffffff00  
Host IP address                   : 192.168.1.100  
Gateway IP address                :   
Run from flash/host (f/h)         : f  
Default host run file name        : vmlinux  
Default host flash file name      : bcm963xx_fs_kernel  
Boot delay (0-9 seconds)          : 1  
Board Id (0-8)                    : 96358VW2  
Number of MAC Addresses (1-32)    : 11  
Base MAC Address                  : 00:1f:a3:65:55:8c  
PSI Size (1-64) KBytes            : 24  
Flash Block Size (1-128) in KBytes: 128  
Auxillary File System Size Percent: 25  
Main Thread Number [0|1]          : 0  

udp_send finished
No answer .auto boot ...
web info: Upload 3801092 bytes, Broadcom image format.
CFE> 
Flashing root file system and kernel at 0xbe020000: ..............................

.
*** Image flash done *** !

Resetting board...Boot Address 0xbe000000

2015.02.09更新:
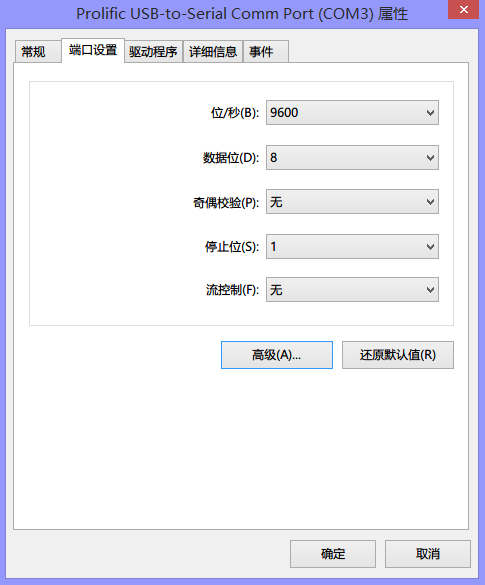
Windows8.1已自带TTL数据线驱动,插入后通过设备管理器查看COM接口:
2015-02-09_075239.png
然后点击查看属性,后面使用xshell或securecrt要用到:
2015-02-09_075357.png
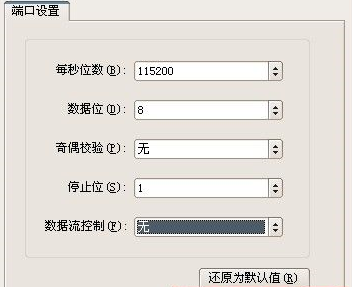
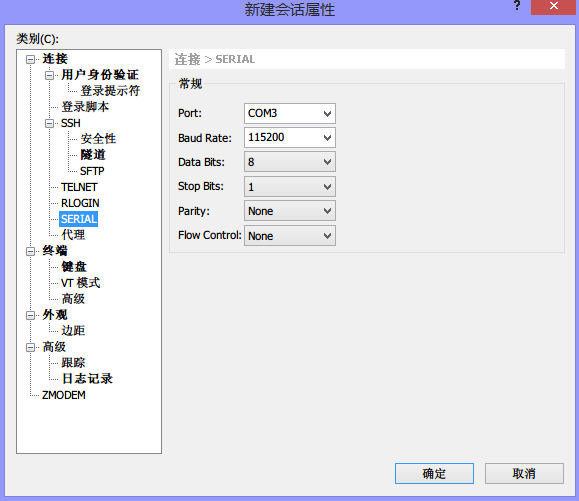
使用xshell新建会话,速率和上面的不一样:
2015-02-09_075829.png
然后连接:

Connecting to COM3...
Connected.

后面直接开机和进入CFE会显示启动界面,可用于进入CFE刷机或SSH不能连接Openwrt路由时使用。

Centos安装使用配置tmux

发布时间:August 22, 2012 // 分类:Tmux // No Comments

CentOS安装支持组件:

yum install libevent-devel ncurses-devel

安装tmux

wget http://downloads.sourceforge.net/tmux/tmux-1.6.tar.gz
tar zxvf tmux-1.6.tar.gz 
cd tmux-1.6
./configure
make
make install

启动新会话:

tmux [new -s 会话名 -n 窗口名]

启动新会话时执行命令:

#-d 后台启动
#exec bash 当ping结束时启动bash,不然会退出tmux窗口
tmux new -s test -d "ping qq.com; bash"  

指定会话启动新窗口:

tmux [neww -t 会话名 -n 窗口名]

恢复会话:

tmux at [-t 会话名]

列出所有会话:

tmux ls

关闭会话:

tmux kill-session -t 会话名

在 Tmux 中,按下 Tmux 前缀 ctrl+b,然后:
会话

:new<回车>  启动新会话
s           列出所有会话
$           重命名当前会话

贴上我的tmux配置文件:

#https://www.haiyun.me
bind a send-prefix
bind m command-prompt "splitw -h 'exec %%'"
bind S command-prompt "neww -n %1 'ssh %1'"
bind r source-file ~/.tmux.conf \; display-message "Config reloaded..."
bind k selectp -U 
bind j selectp -D
bind h selectp -L
bind l selectp -R
bind K resizep -U 10 
bind J resizep -D 10
bind H resizep -L 10
bind L resizep -R 10
bind ^i kill-session
bind ^l last-window
set -g prefix C-a
set -g base-index 1
setw -g pane-base-index 1
set -g display-time 5000
set -g repeat-time 1000 
set -g status-right '"#(hostname)" #(date -d "today" +"%Y/%m/%d-%H:%M")#(uptime |cut -d ',' -f 2-)'
set -g status-interval 10
set -g status-right-length 100
set -g status-utf8 on 
set -g status-keys vi 

setw -g mode-mouse on
set -g mouse-select-pane on
set -g mouse-select-window on
set -g mouse-resize-pane on
set -g mode-mouse on
set -g mouse-utf8 on
setw -g mode-keys vi
setw -g utf8 on
#setw -g window-status-current-bg red

Tmux实现Screen -xR类似功能

发布时间:August 21, 2012 // 分类:常用软件 // No Comments

之前有介绍Xshell登录ssh后进入Screen窗口,意外断开后不影响当前执行任务,重新连接服务器回到之前断开的终端。

screen -xR

Tmux重新连接到之前的窗口可使用:

tmux attach

不过第一次执行会提示:

#https://www.haiyun.me
no sessions

修改Tmux配置如果无分离终端则新建:

cat ~/.tmux.conf
new-session

20220315更新,以上方法tmux加载配置有问题,如设置默认default-terminal无效。
注释no sessions使用以下命令解决:

tmux new -A -s 0

参考:
https://unix.stackexchange.com/questions/103898/how-to-start-tmux-with-attach-if-a-session-exists

分类
最新文章
最近回复
  • opnfense: 谢谢博主!!!解决问题了!!!我之前一直以为内置的odhcp6就是唯一管理ipv6的方式
  • liyk: 这个方法获取的IPv6大概20分钟之后就会失效,默认路由先消失,然后Global IPV6再消失
  • 海运: 不好意思,没有。
  • zongboa: 您好,請問一下有immortalwrt設定guest Wi-Fi的GUI教學嗎?感謝您。
  • 海运: 恩山有很多。
  • swsend: 大佬可以分享一下固件吗,谢谢。
  • Jimmy: 方法一 nghtp3步骤需要改成如下才能编译成功: git clone https://git...
  • 海运: 地址格式和udpxy一样,udpxy和msd_lite能用这个就能用。
  • 1: 怎么用 编译后的程序在家里路由器内任意一台设备上运行就可以吗?比如笔记本电脑 m参数是笔记本的...
  • 孤狼: ups_status_set: seems that UPS [BK650M2-CH] is ...