海运的博客

ROS下单线ADSL使用HTB+PCQ限速

发布时间:October 18, 2012 // 分类:ROS // 7 Comments

单线ADSL带宽4M,线路损耗后实际速度3.5M左右,上传350k左右,由于ADSL满速下载、上传速度会变慢,配置ROS最高上传、下载不得超过总带宽90%,QOS配置如下:
首先分类标记上传、下载数据:

#https://www.haiyun.me
/ip firewall mangle
#小数据
add chain=prerouting action=mark-connection new-connection-mark=Small-conn passthrough=yes protocol=icmp comment=Small
add chain=prerouting action=mark-connection new-connection-mark=Small-conn passthrough=yes protocol=udp dst-port=53
add chain=postrouting action=mark-connection new-connection-mark=Small-conn passthrough=yes protocol=udp dst-port=53
add chain=prerouting action=mark-connection new-connection-mark=Small-conn passthrough=yes protocol=udp dst-port=123
add chain=postrouting action=mark-packet new-packet-mark=Small-up passthrough=no out-interface=pppoe-out1 connection-mark=Small-conn 
add chain=prerouting action=mark-packet new-packet-mark=Small-up passthrough=no in-interface=bridge-local connection-mark=Small-conn 
add chain=prerouting action=mark-packet new-packet-mark=Small-down passthrough=no in-interface=pppoe-out1 connection-mark=Small-conn 
#SSH及VPN
add chain=prerouting action=mark-connection new-connection-mark=SSH-conn passthrough=yes protocol=tcp dst-port=22 comment=SSH
add chain=prerouting action=mark-connection new-connection-mark=SSH-conn passthrough=yes protocol=tcp dst-port=23
add chain=prerouting action=mark-packet new-packet-mark=SSH-up passthrough=no in-interface=bridge-local connection-mark=SSH-conn 
add chain=prerouting action=mark-packet new-packet-mark=SSH-down passthrough=no in-interface=pppoe-out1 connection-mark=SSH-conn 
#网页数据
add chain=prerouting action=mark-connection new-connection-mark=HTTP-conn passthrough=yes protocol=tcp dst-port=80 comment=HTTP
add chain=prerouting action=mark-connection new-connection-mark=HTTP-conn passthrough=yes protocol=tcp dst-port=443
add chain=prerouting action=mark-packet new-packet-mark=HTTP-up passthrough=no in-interface=bridge-local connection-mark=HTTP-conn 
add chain=prerouting action=mark-packet new-packet-mark=HTTP-down passthrough=no in-interface=pppoe-out1 connection-mark=HTTP-conn 
#其它
add chain=prerouting action=mark-connection new-connection-mark=Other-conn passthrough=yes comment=Other
add chain=prerouting action=mark-packet new-packet-mark=Other-up passthrough=no in-interface=bridge-local connection-mark=Other-conn 
add chain=prerouting action=mark-packet new-packet-mark=Other-down passthrough=no in-interface=pppoe-out1 connection-mark=Other-conn

新建队列类型为PCQ

#pcq-rate为每个了数据流最大速度,0为按数据流数公平分配带宽,pcq-limit为每一数据流队列长度;
#pcq-total-limit不能小于内网主机数*pcq-limit。
/queue type 
add name="Small-down" kind=pcq pcq-rate=0 pcq-limit=50 pcq-classifier=dst-address pcq-total-limit=2000 
add name="Small-up" kind=pcq pcq-rate=50k pcq-limit=50 pcq-classifier=src-address pcq-total-limit=2000 
add name="SSH-down" kind=pcq pcq-rate=0 pcq-limit=50 pcq-classifier=dst-address pcq-total-limit=2000 
add name="SSH-up" kind=pcq pcq-rate=50k pcq-limit=50 pcq-classifier=src-address pcq-total-limit=2000 
add name="HTTP-down" kind=pcq pcq-rate=0 pcq-limit=50 pcq-classifier=dst-address pcq-total-limit=2000 
add name="HTTP-up" kind=pcq pcq-rate=80k pcq-limit=50 pcq-classifier=src-address pcq-total-limit=2000 
add name="Other-down" kind=pcq pcq-rate=0 pcq-limit=50 pcq-classifier=dst-address pcq-total-limit=2000 
add name="Other-up" kind=pcq pcq-rate=30k pcq-limit=50 pcq-classifier=src-address pcq-total-limit=2000 

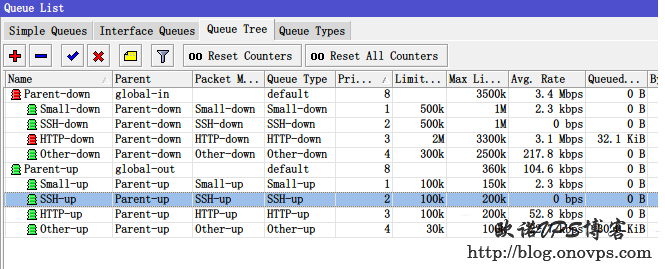
添加队列树调用之前标记的数据包设置优先级,队列类型设置为之前新建的PCQ类型。

/queue tree
add name="Parent-up" parent=global-out limit-at=330k max-limit=330k
add name="Parent-down" parent=global-in limit-at=3300k max-limit=3300k
add name=Small-up parent=Parent-up packet-mark=Small-up limit-at=70k max-limit=150k queue=Small-up priority=1
add name=Small-down parent=Parent-down packet-mark=Small-down limit-at=500k max-limit=1000k queue=Small-down priority=1
add name=SSH-up parent=Parent-up packet-mark=SSH-up limit-at=70k max-limit=200k queue=SSH-up priority=2
add name=SSH-down parent=Parent-down packet-mark=SSH-down limit-at=500k max-limit=1000k queue=SSH-down priority=2
add name=HTTP-up parent=Parent-up packet-mark=HTTP-up limit-at=150k max-limit=200k queue=HTTP-up priority=3
add name=HTTP-down parent=Parent-down packet-mark=HTTP-down limit-at=2000k max-limit=3000k queue=HTTP-down priority=3
add name=Other-up parent=Parent-up packet-mark=Other-up limit-at=20k max-limit=80k queue=Other-up priority=4
add name=Other-down parent=Parent-down packet-mark=Other-down limit-at=200k max-limit=2000k queue=Other-down priority=4

ros+htb+pcq限速.png
ROS路由设置HTB+PCQ流量控制的一些注意事项

1.WAN限制上传,按源地址分组;LAN限制下载,按目标地址分组;
2.passthrough是否继续向下匹配此链接,选择yes会向下匹配,下面规则如有匹配标记会改变;
3.在HTB首先满足Limit At,在父级有剩余带宽的前提下才会Max Limit,优先级高的队列优先获得Max Limit;
4.mark-connection的数据包是双向的,然后通过mark-pack区分上传和下载;
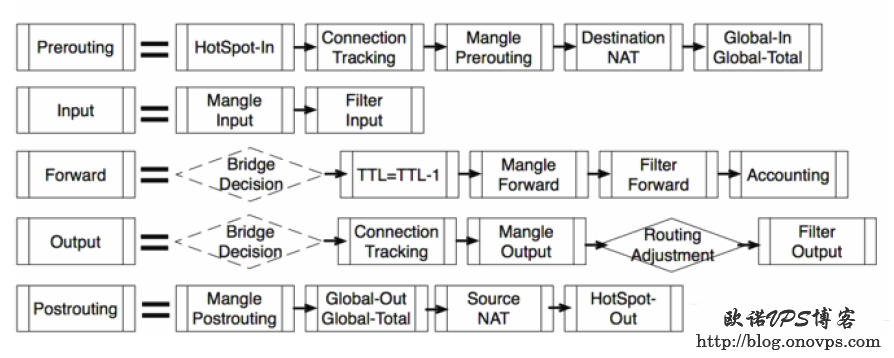
5.global-in在DNAT后,global-out在SNAT前,分别可匹配目标地址和源地址。
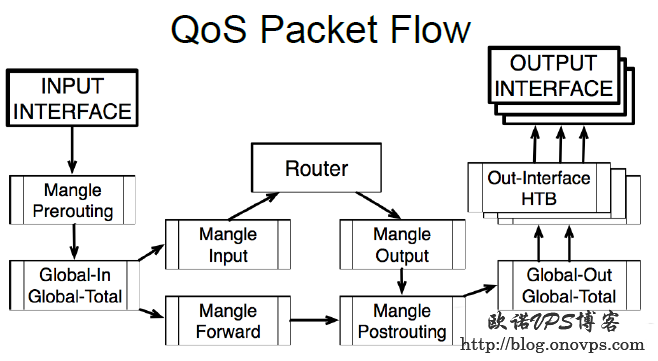
ROS数据包流程图:
ros数据包流程图.png
ROS防火墙处理数据包流程.png

Tmux多窗口分隔线显示虚线不正常解决

发布时间:September 15, 2012 // 分类:Tmux // No Comments

使用Tmux在UTF-8编码下窗口分隔线会显示为虚线,如下:
tmux分隔线虚线.png
解决方法,SSH客户端字体选项处取消Treat CJK ambiguous characters as wide支持,Xshell下设置如下:
xshell下tmux分隔线不正常解决.png
重新登录SSH终端,现tmux分隔多窗口效果如下:
tmux分隔线显示不正常解决.png

发个自己编译的OpenWRT官方稳定版加IPID/TTL固件下载

发布时间:September 14, 2012 // 分类:OpenWrt // 4 Comments

使用Openwrt官方源最新稳定版编译,添加IPID/TTL模块,适用于RG100AA和DB120。
linux内核版本:

Linux OpenWrt 2.6.32.27 #2 Fri Sep 14 17:12:10 CST 2012 mips GNU/Linux

编译安装的软件如下:

opkg list-installed
base-files - 43.35-r33081
bash - 4.2-2
busybox - 1.15.3-3.4
crda - 1.1.1-1
ddns-scripts - 1.0.0-18
dnsmasq - 2.55-6.1
dropbear - 0.53.1-6
gpioctl - 1.0-1
hotplug2 - 1.0-beta-3
ip - 2.6.29-1-2
iptables - 1.4.6-3.1
iptables-mod-conntrack - 1.4.6-3.1
iptables-mod-conntrack-extra - 1.4.6-3.1
iptables-mod-extra - 1.4.6-3.1
iptables-mod-filter - 1.4.6-3.1
iptables-mod-hashlimit - 1.4.6-3.1
iptables-mod-imq - 1.4.6-3.1
iptables-mod-ipopt - 1.4.6-3.1
iptables-mod-ipsec - 1.4.6-3.1
iptables-mod-nat - 1.4.6-3.1
iptables-mod-nat-extra - 1.4.6-3.1
iw - 0.9.22-2
kernel - 2.6.32.27-1
kmod-b43 - 2.6.32.27+2011-12-01-1
kmod-cfg80211 - 2.6.32.27+2011-12-01-1
kmod-crc-ccitt - 2.6.32.27-1
kmod-crypto-aes - 2.6.32.27-1
kmod-crypto-arc4 - 2.6.32.27-1
kmod-crypto-core - 2.6.32.27-1
kmod-fs-ext3 - 2.6.32.27-1
kmod-fs-ntfs - 2.6.32.27-1
kmod-fs-vfat - 2.6.32.27-1
kmod-ipt-conntrack - 2.6.32.27-1
kmod-ipt-conntrack-extra - 2.6.32.27-1
kmod-ipt-core - 2.6.32.27-1
kmod-ipt-extra - 2.6.32.27-1
kmod-ipt-filter - 2.6.32.27-1
kmod-ipt-hashlimit - 2.6.32.27-1
kmod-ipt-imq - 2.6.32.27-1
kmod-ipt-ipopt - 2.6.32.27-1
kmod-ipt-ipsec - 2.6.32.27-1
kmod-ipt-nat - 2.6.32.27-1
kmod-ipt-nat-extra - 2.6.32.27-1
kmod-mac80211 - 2.6.32.27+2011-12-01-1
kmod-macvlan - 2.6.32.27-1
kmod-nls-base - 2.6.32.27-1
kmod-nls-cp437 - 2.6.32.27-1
kmod-nls-iso8859-1 - 2.6.32.27-1
kmod-nls-utf8 - 2.6.32.27-1
kmod-ppp - 2.6.32.27-1
kmod-pppoe - 2.6.32.27-1
kmod-sched - 2.6.32.27-1
kmod-scsi-core - 2.6.32.27-1
kmod-switch - 2.6.32.27-4
kmod-textsearch - 2.6.32.27-1
kmod-usb-core - 2.6.32.27-1
kmod-usb-ohci - 2.6.32.27-1
kmod-usb-storage - 2.6.32.27-1
kmod-usb2 - 2.6.32.27-1
l7-protocols - 2009-05-28-1
libc - 0.9.30.1-43.35
libevent2 - 2.0.16-1
libgcc - 4.3.3+cs-43.35
libip4tc - 1.4.6-3.1
libiwinfo - 18.2
libiwinfo-lua - 18.2
liblua - 5.1.4-7
libncurses - 5.7-2
libnl-tiny - 0.1-2.1
libopenssl - 0.9.8x-1
libpcap - 1.0.0-2
libpthread - 0.9.30.1-43.35
librt - 0.9.30.1-43.35
libuci - 12012009.7-4
libuci-lua - 12012009.7-4
libxtables - 1.4.6-3.1
lrzsz - 0.12.20-2
lua - 5.1.4-7
luci-app-ddns - 0.10+svn9273-1
luci-i18n-chinese - 0.10+svn9273-1
luci-i18n-english - 0.10+svn9273-1
luci-lib-core - 0.10+svn9273-1
luci-lib-ipkg - 0.10+svn9273-1
luci-lib-lmo - 0.10+svn9273-1
luci-lib-nixio - 0.10+svn9273-1
luci-lib-sys - 0.10+svn9273-1
luci-lib-web - 0.10+svn9273-1
luci-mod-admin-core - 0.10+svn9273-1
luci-mod-admin-full - 0.10+svn9273-1
luci-proto-core - 0.10+svn9273-1
luci-proto-ppp - 0.10+svn9273-1
luci-sgi-cgi - 0.10+svn9273-1
luci-sgi-uhttpd - 0.10+svn9273-1
luci-theme-base - 0.10+svn9273-1
luci-theme-openwrt - 0.10+svn9273-1
mtd - 13
openssh-client - 5.9p1-4
opkg - 576-2
ppp - 2.4.4-16.1
ppp-mod-pppoe - 2.4.4-16.1
tc - 2.6.29-1-2
tcpdump - 4.1.1-2
tmux - 1.6-2
uci - 12012009.7-4
udevtrigger - 106-1
uhttpd - 28.1
uhttpd-mod-lua - 28.1
wireless-tools - 29-4
wpad-mini - 20111103-3
zlib - 1.2.3-5

IPID及TTL使用参数参考:Openwrt/Linux使用IPID和TTL模块防网络尖兵

Openwrt下使用Stunnel加密Squid取代SSH转发

发布时间:September 3, 2012 // 分类:Squid,OpenWrt // No Comments

Stunnel真是个好东西,可以使用SSL加密任意两点间的TCP连接,本文记录使用Stunnel加密Squid代理服务器来代替SSH数据转发
服务器端配置Squid正向代理:

#https://www.haiyun.me
http_port 127.0.0.1:8080
icp_port 0
visible_hostname proxy.www.haiyun.me
cache_mgr  admin@www.haiyun.me
cache_effective_user squid
cache_effective_group  squid 
via off     
forwarded_for off
acl localnet src 127.0.0.0/24
http_access allow localnet

生成OpenSSL证书:

openssl req -new -x509 -days 365 -nodes -out stunnel.pem -keyout stunnel.pem
chmod 400 stunnel.pem

服务器端Stunnel安装配置:

yum install stunnel
compression=zlib
syslog=no
debug=7
output=/var/log/stunnel.log
setuid=nobody
setgid=nobody
pid=/var/run/stunnel.pid
cert=/etc/stunnel/stunnel.pem
key=/etc/stunnel/stunnel.pem
client=no
[squid]
accept=8000
connect=127.0.0.1:8080

Openwrt下安装配置Stunnel客户端:

opkg update
opkg install stunnel
compression=zlib
syslog=no
debug=7
output=/var/log/stunnel.log
pid=/var/run/stunnel.pid
client=yes
[squid]
accept=8080
connect=www.haiyun.me:8000

客户端服务器端启动Stunnel:

stunnel

此时客户端和Squid代理服务器之间的数据是使用SSL加密的,其它HTTP代理服务器也同样适用此方法,如Kingate代理服务器

Centos服务器安全配置SSH使用Google Authenticator二次验证

发布时间:August 30, 2012 // 分类:网络安全 // 2 Comments

CentOS安装所需组件:

yum -y install mercurial pam-devel

安装Google Authenticator:

#https://www.haiyun.me
wget --no-check-certificate https://google-authenticator.googlecode.com/files/libpam-google-authenticator-1.0-source.tar.bz2
tar jxvf libpam-google-authenticator-1.0-source.tar.bz2 
cd libpam-google-authenticator-1.0
make
make install

SSH登录时调用google-authenticator模块,编辑:

/etc/pam.d/sshd

第一行添加:

auth       required     pam_google_authenticator.so

修改SSH配置文件:

vim /etc/ssh/sshd_config

添加或修改以下内容:

ChallengeResponseAuthentication yes
UsePAM yes

重启SSH:

/etc/init.d/sshd restart

生成google-authenticator配置,运行:

google-authenticator 
Do you want authentication tokens to be time-based (y/n) y
https://www.google.com/chart?chs=200x200&chld=M|0&cht=qr&chl=otpauth://totp/root@node1.www.haiyun.me%3Fsecret%3DABEXG5K6CVB56BXY
#此网址为生成的二维码,客户端扫描
Your new secret key is: www.haiyun.me
Your verification code is 582849
Your emergency scratch codes are:
  30776626
  14200155
  80795568
  23936997
  21919909
#上面几行数字为应急码
Do you want me to update your "/root/.google_authenticator" file (y/n) y
#更新配置文件
Do you want to disallow multiple uses of the same authentication
token? This restricts you to one login about every 30s, but it increases
your chances to notice or even prevent man-in-the-middle attacks (y/n) y
#禁止一个口令多用
By default, tokens are good for 30 seconds and in order to compensate for
possible time-skew between the client and the server, we allow an extra
token before and after the current time. If you experience problems with poor
time synchronization, you can increase the window from its default
size of 1:30min to about 4min. Do you want to do so (y/n) n
#客户端与服务器时间误差
If the computer that you are logging into isn't hardened against brute-force
login attempts, you can enable rate-limiting for the authentication module.
By default, this limits attackers to no more than 3 login attempts every 30s.
Do you want to enable rate-limiting (y/n) y
#次数限制

Android安装google-authenticator客户端,扫描添加上方网址的二维码,以后在登录服务器时输入账号密码的同时还需输入google-authenticator即时生成的验证码才能登录。

ssh www.haiyun.me
Verification code: 
Password: 
分类
最新文章
最近回复
  • opnfense: 谢谢博主!!!解决问题了!!!我之前一直以为内置的odhcp6就是唯一管理ipv6的方式
  • liyk: 这个方法获取的IPv6大概20分钟之后就会失效,默认路由先消失,然后Global IPV6再消失
  • 海运: 不好意思,没有。
  • zongboa: 您好,請問一下有immortalwrt設定guest Wi-Fi的GUI教學嗎?感謝您。
  • 海运: 恩山有很多。
  • swsend: 大佬可以分享一下固件吗,谢谢。
  • Jimmy: 方法一 nghtp3步骤需要改成如下才能编译成功: git clone https://git...
  • 海运: 地址格式和udpxy一样,udpxy和msd_lite能用这个就能用。
  • 1: 怎么用 编译后的程序在家里路由器内任意一台设备上运行就可以吗?比如笔记本电脑 m参数是笔记本的...
  • 孤狼: ups_status_set: seems that UPS [BK650M2-CH] is ...