海运的博客

linux/ubuntu交叉静态编译mips tmux和dropbear/openssl/openssh/bash/iperf3/dnsmasq/vnstat

发布时间:April 27, 2023 // 分类: // No Comments

下载mips musl交叉编译环境,也可以使用https://toolchains.bootlin.com/

wget https://musl.cc/mips-linux-musl-cross.tgz
tar zxf mips-linux-musl-cross.tgz
export PATH=$PATH:`pwd`/mips-linux-musl-cross/bin/

编译ncurses,后续要将/lib/terminfo/x/xterm-256color等复制到目标机器/data/terminfo目录,不然运行tmux提示找不到terminfo database。

wget https://ftp.gnu.org/pub/gnu/ncurses/ncurses-6.4.tar.gz
tar zxf ncurses-6.4.tar.gz
cd ncurses-6.4/
./configure --prefix /usr/local/tmux --with-default-terminfo-dir=/data/terminfo --enable-pc-files --host=mips-linux-musl
#解决错误:strip: Unable to recognise the format of the input file `/usr/local/tmux/bin/tic'
ln -s `pwd`/../mips-linux-musl-cross/bin/mips-linux-musl-strip /usr/local/bin/strip
make && make install
rm -rf /usr/local/bin/strip

编译libevent和tmux:

wget https://github.com/libevent/libevent/releases/download/release-2.1.12-stable/libevent-2.1.12-stable.tar.gz
tar zxf libevent-2.1.12-stable.tar.gz 
cd libevent-2.1.12-stable/
./configure --prefix /usr/local/tmux --host=mips-linux-musl --disable-openssl
make && make install

wget https://github.com/tmux/tmux/releases/download/3.3a/tmux-3.3a.tar.gz
tar zxf tmux-3.3a.tar.gz 
cd tmux-3.3a/
export CFLAGS="-I/usr/local/tmux/include -I/usr/local/tmux/include/ncurses"
export LDFLAGS="-L/usr/local/tmux/lib"
./configure --enable-static --prefix=/usr/local/tmux --host=mips-linux-musl
make && make install

静态编译dropbear,当前最新版本使用SRT关闭窗口后dropbear和执行的命令一直在后台不结束,使用dropbear-2020.81版本正常。

wget https://github.com/mkj/dropbear/archive/refs/tags/DROPBEAR_2020.81.tar.gz
tar zxf DROPBEAR_2020.81.tar.gz 
cd dropbear-DROPBEAR_2020.81/
#老版本没有configure使用autoconf生成
./configure --enable-static --prefix=/usr/local/dropbear --host=mips-linux-musl --disable-zlib --disable-syslog --disable-harden --disable-lastlog --disable-utmp --disable-utmpx --disable-wtmp --disable-wtmpx --disable-pututline --disable-pututxline --disable-loginfunc 
PROGRAMS="dropbear dbclient dropbearkey dropbearconvert scp" MULTI=1 make strip

编译前可修改default_options.h定义dropbear运行时的PATH用来查找scp执行文件,sftp-server执行文件路径使用SFTP。

#define SFTPSERVER_PATH "/data/bin/sftp-server"
#define DROPBEAR_PATH_SSH_PROGRAM "/data/bin/dbclient"
#define DEFAULT_ROOT_PATH "/usr/sbin:/usr/bin:/sbin:/bin:/data/bin"
#define DEFAULT_PATH "/usr/bin:/bin:/data/bin"

编译的为单个文件dropbearmulti,使用时创建软链接:

ln -s /data/bin/dropbearmulti /data/bin/dropbear
ln -s /data/bin/dropbearmulti /data/bin/dropbearkey 
ln -s /data/bin/dropbearmulti /data/bin/scp     

使用:

mkdir /etc/dropbear/
./dropbearkey -t ecdsa -s 256 -f /etc/dropbear/dropbear_ecdsa_host_key
./dropbearkey -t ed25519 -f /etc/dropbear/dropbear_ed25519_host_key
./dropbearkey -t dss -f /etc/dropbear/dropbear_dss_host_key
./dropbearkey -t rsa -s 3072 -f /etc/dropbear/dropbear_rsa_host_key
./dropbear -r /etc/dropbear/dropbear_rsa_host_key

静态编译openssl/openssh/sshd:

wget https://github.com/madler/zlib/releases/download/v1.2.13/zlib-1.2.13.tar.gz
tar zxf zlib-1.2.13.tar.gz 
cd zlib-1.2.13/
CC=mips-linux-musl-gcc  ./configure --prefix=/usr/local/openssh --static 
make && make install

wget https://github.com/openssl/openssl/releases/download/OpenSSL_1_1_1t/openssl-1.1.1t.tar.gz
tar zxf openssl-1.1.1t.tar.gz 
cd openssl-1.1.1t
#./config no-asm no-shared --prefix=/usr/local/openssh --cross-compile-prefix=mips-linux-musl-
#sed -i 's/-m64//g' Makefile
./Configure linux-mips32 no-asm no-shared --prefix=/usr/local/openssh --cross-compile-prefix=mips-linux-musl-
make && make install

export CFLAGS="-I/usr/local/openssh/include/"
export LDFLAGS="-L/usr/local/openssh/lib/"
wget https://cdn.openbsd.org/pub/OpenBSD/OpenSSH/portable/openssh-9.3p1.tar.gz
tar zxf openssh-9.3p1.tar.gz 
cd openssh-9.3p1/
./configure --prefix=/usr/local/openssh --host=mips-linux-musl --with-ldflags=-static --disable-lastlog --disable-utmp  --disable-utmpx --disable-wtmp  --disable-wtmpx --disable-libutil --disable-pututline --disable-pututxline --with-default-path=/usr/bin:/bin:/usr/sbin:/sbin:/sbin:/usr/sbin:/bin:/usr/bin:/data/bin
make && make install

使用:

mkdir /etc/ssh
ssh-keygen -A
cat <<EOF > /etc/ssh/sshd.conf
Port 22
PermitRootLogin yes
ChallengeResponseAuthentication no
Subsystem       sftp    /data/bin/sftp-server

PubkeyAuthentication yes

HostKey /etc/ssh/ssh_host_rsa_key
HostKey /etc/ssh/ssh_host_ecdsa_key
HostKey /etc/ssh/ssh_host_ed25519_key
EOF

/src/openssh-9.3p1/sshd -f /etc/ssh/sshd.conf

静态编译bash:

wget https://ftp.gnu.org/gnu/bash/bash-5.1.tar.gz
tar zxf bash-5.1.tar.gz 
cd bash-5.1/
./configure --enable-static-link --host=mips-linux-musl --without-bash-malloc
make
mips-linux-musl-strip -s bash

静态编译iperf3:

wget https://github.com/esnet/iperf/releases/download/3.15/iperf-3.15.tar.gz
tar zxf iperf-3.15.tar.gz 
cd iperf-3.15/
./configure --prefix=/usr/local/iperf3 --host=mips-linux-musl "LDFLAGS=--static" --disable-shared 
make

静态编译dnsmasq:

wget https://thekelleys.org.uk/dnsmasq/dnsmasq-2.89.tar.gz
tar zxf dnsmasq-2.89.tar.gz 
cd dnsmasq-2.89/
CC=mips-linux-musl-gcc make CFLAGS=-Os LDFLAGS=-static

EcoNet EN751221 SOC MIPS 34Kc uclibc编译vnstat:

#gcc版本太高vnstat编译失败,由于目标是uclibc,使用上面的musl编译后不能运行
wget https://toolchains.bootlin.com/downloads/releases/toolchains/mips32/tarballs/mips32--uclibc--stable-2022.08-1.tar.bz2
tar jxf mips32--uclibc--stable-2022.08-1.tar.bz2
export PATH=$PATH:`pwd`/mips32--uclibc--stable-2022.08-1/bin/

wget https://www.sqlite.org/2025/sqlite-autoconf-3490100.tar.gz
tar zxf sqlite-autoconf-3490100.tar.gz 
cd sqlite-autoconf-3490100/
./configure --host=mips-linux --disable-shared --enable-static --prefix=/usr/local/sqlite
make && make install
  
cd ../
wget https://humdi.net/vnstat/vnstat-2.13.tar.gz
tar zxf vnstat-2.13.tar.gz 
cd vnstat-2.13/
CPPFLAGS="-I/usr/local/sqlite/include/" LDFLAGS="-L/usr/local/sqlite/lib/ -static" ./configure --host=mips-linux --disable-shared --enable-static --prefix=/usr/local/vnstat
make && make install

编译aarch64版本coreutils,内核版本4.1.52:

wget https://toolchains.bootlin.com/downloads/releases/toolchains/aarch64/tarballs/aarch64--glibc--stable-2018.11-1.tar.bz2
tar jxf aarch64--glibc--stable-2018.11-1.tar.bz2 
export PATH=$PATH:`pwd`/aarch64--glibc--stable-2018.11-1/bin/
wget http://ftp.gnu.org/gnu/coreutils/coreutils-8.30.tar.xz
tar Jxf coreutils-8.30.tar.xz 
cd coreutils-8.30/
./configure --host=aarch64-linux --prefix=/usr/local/coreutils
贝尔光猫G-140W-UG优化CPU和内存

发布时间:April 23, 2023 // 分类: // No Comments

默认占用CPU和内存高,内存高因为java,通过/etc/scripts/osgi_admin.sh/osgi_start.sh启动,sysmon调用/etc/scripts/jwatchdog.sh 不停检测java是否退出,导致cpu占用高。
还有内核模块ORTP_TASK每2分左右占用单核心CPU 100%,通过/etc/init.d/rcS判断猫是否支持电话加载,修改此文件无效果,估计使用的/usr/etc/,通过rmmod /lib/modules/pcm1.ko减小到20%,如果rmmod不能用可以下载openwrt mips34kc软件包或编译使用。
也可下载完整版busybox使用:https://busybox.net/downloads/binaries/1.31.0-defconfig-multiarch-musl/

修改/etc/scripts/pcm_startup.sh文件让它开机后kill程序和rmmod模块,优化后CPU 0占用,ORTP_TASK每2分钟占用一次20%,解决这个估计要修改固件了。

一个小问题,使用go编译的sshd服务端非要在telnet终端内启动,不然在ssh连接终端使用ctrl+c不能终止程序,x86没问题。

/etc/pkill.sh &
exit

以下/etc/pkill.sh为脚本内容,也可添加到/etc/rc.d/S10pkill脚本,开机也能执行:

#!/bin/sh
sleep 60
/etc/rmmod /lib/modules/pcm1.ko   
pkill -9 sysmon #占用大幅降低
pkill -9 voip
pkill -9 evtmgr  

pkill -9 dropbear
pkill -9 dnsproxy
pkill -9 samba
pkill -9 homenas
pkill -9 storageSrv
pkill -9 securitySrv
pkill -9 batch_upgrade
pkill -9 xl2tpd
pkill -9 udhcpd
pkill -9 dhcp6s 
pkill -9 radvd

pkill -9 http_traffic_process
pkill -9 traffic_mirror
pkill -9 lanhostsd
pkill -9 wifihostd
pkill -9 arpwan
pkill -9 umonitor

pkill -9 tcwdog
pkill -9 spccu
pkill -9 nffd
pkill -9 appmgr
pkill -9 ramond
pkill -9 usrbh

#禁用pcm启动后以下未启动
#pkill -9 trafficsrv
#pkill -9 usbsrv
#pkill -9 syssrv
#pkill -9 wifisrv
#pkill -9 wansrv
#pkill -9 lansrv
#pkill -9 diagsrv
#pkill -9 pcmcu

#pkill -9 omciMgr #这个kill后pon断线后不重连
#上面全部关闭后下面才能关闭,不然重启
#pkill -9 msgmgr #这两个关闭后网页不能登录
#pkill -9 cfgmgr
#pkill -9 parse #这两个ocmimgr依赖
pkill -9 alarmd
/etc/rmmod /lib/modules/sys_mod.ko                                                  
/etc/rmmod /lib/modules/DSPCore.ko                                                                                                                                  
/etc/rmmod /lib/modules/pcm1.ko                                                     
/etc/rmmod /lib/modules/lec.ko                                                                 
/etc/rmmod /lib/modules/spi.ko                                                      
/etc/rmmod /lib/modules/slic3_sep.ko 
/etc/rmmod /lib/modules/fxs3.ko                                         
/etc/rmmod /lib/modules/ksocket.ko                                      
/etc/rmmod /lib/modules/ortp.ko                                         
/etc/rmmod /lib/modules/acodec_x.ko                                     
/etc/rmmod /lib/modules/foip.ko                                         
#/etc/rmmod /lib/modules/ovdsp.ko                                        
/etc/rmmod /lib/modules/pcmDump.ko     
/etc/rmmod /lib/modules/lantiq/drv_ifxos.ko                                        
/etc/rmmod /lib/modules/lantiq/drv_tapi.ko                                                                                                                          
/etc/rmmod /lib/modules/lantiq/drv_dxs.ko 

修改rootfs分区禁止加载voip相关模块ORTP_TASK后CPU依然每2分钟占用单核50%左右,通过top查看是软中断占用的CPU,查看软中断wifi_ratelimit占用CPU0明显超高:

cat /proc/softirqs 
                    CPU0       CPU1       
          HI:   24304711          0
       TIMER:    2495627    2495649
      NET_TX:      81335      77293
      NET_RX:      81699     182716
       BLOCK:          0          0
BLOCK_IOPOLL:          0          0
     TASKLET:         30          4
       SCHED:    2488517     155237
     HRTIMER:          0          0
         RCU:      21636    2500274
cat /proc/interrupts
           CPU0       CPU1       
  1:      72432          0      MIPS  TC3162 UART
  7:   24950419          0      MIPS  wifi_ratelimit
  8:      21236       4723      MIPS  IPI_resched
  9:        819       3594      MIPS  IPI_call
 10:          0          0      MIPS  watchdog
 18:          0          0      MIPS  xhci-hcd:usb1
 19:          0          0      MIPS  dying gasp
 22:     244212          0      MIPS  qdma_lan
 23:          0     250646      MIPS  qdma_wan
 24:        138          0      MIPS
 31:    2496872    2496886      MIPS  timer
 33:          0          0      MIPS  bus timeout
ERR:          0
qdmamgr_lan set rxratelimit config Disable packet
qdmamgr_wan set rxratelimit config Disable packet
/etc/rmmod /lib/modules/wlan_ratelimit

到此CPU占用完全恢复正常,基本保持在0占用。

使用sshd没有ctrl+c不能终止的问题了
https://github.com/darkerego/mips-binaries/tree/master/openssh

UsePrivilegeSeparation no
Port 22
PermitRootLogin yes
ChallengeResponseAuthentication no
Subsystem       sftp    /data/sftp-server

360t7通过usb tll刷入不死uboot和openwrt系统

发布时间:December 5, 2022 // 分类: // No Comments

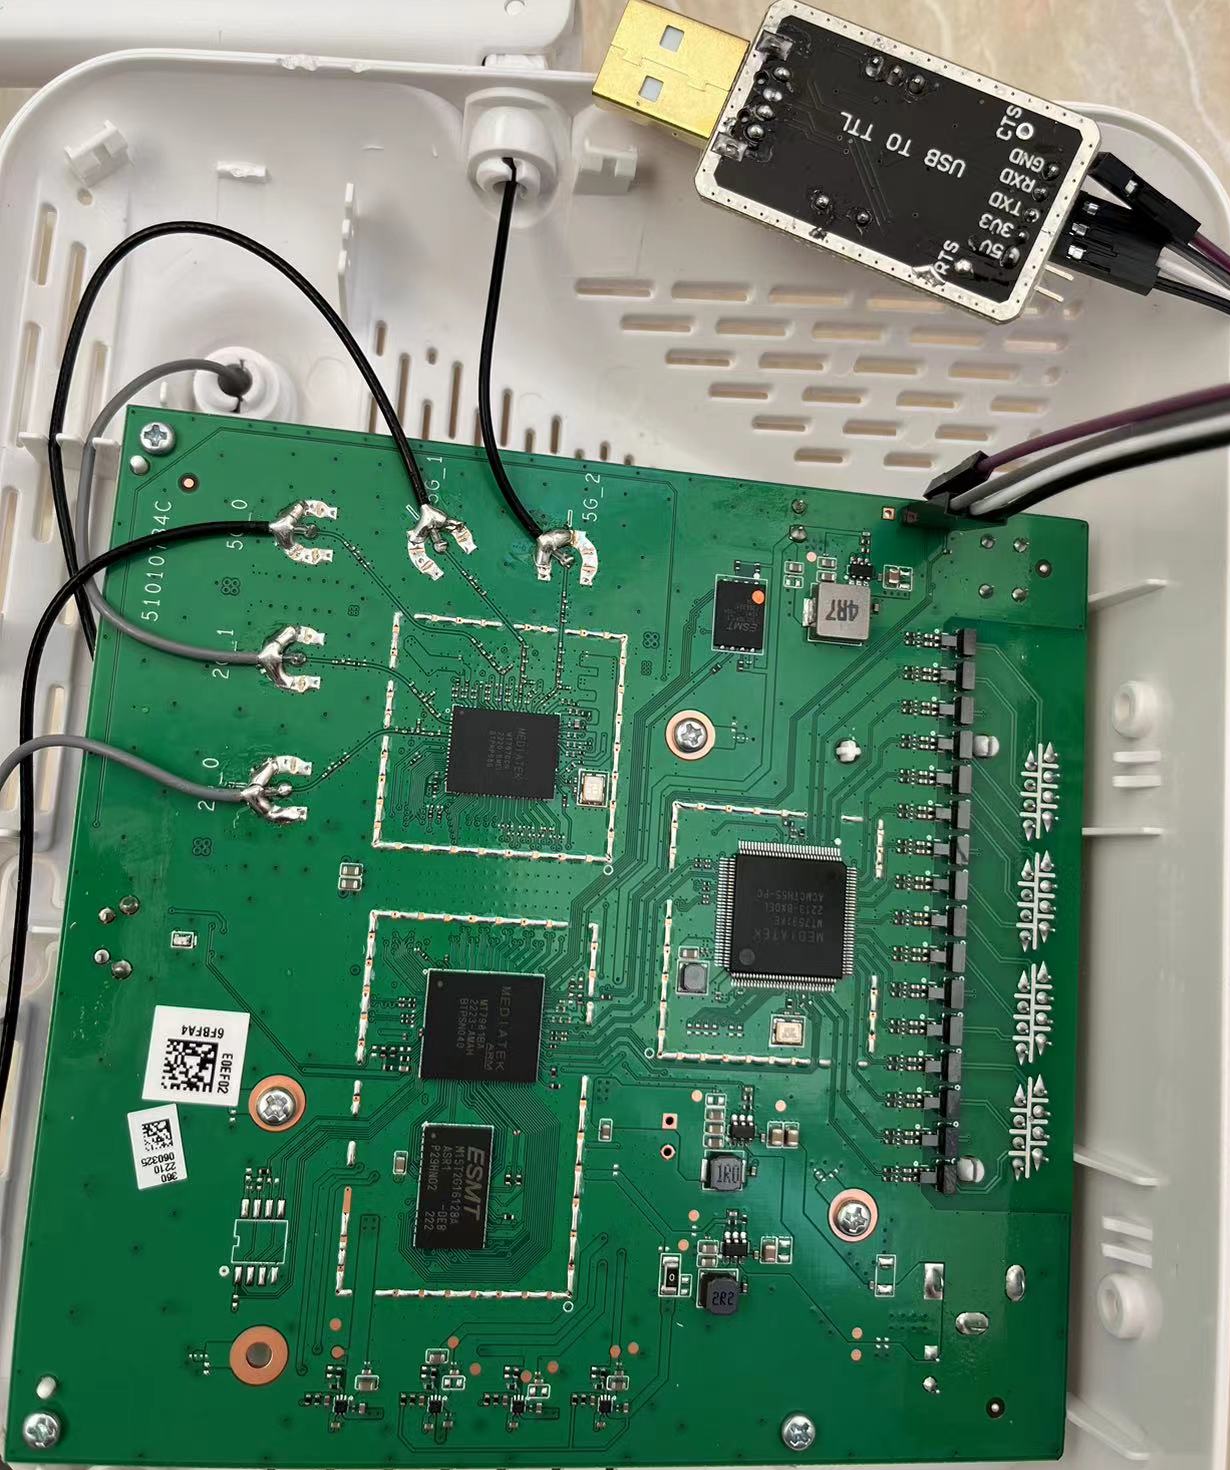
拆机连接ttl,从外到内依次为txd rxd gnd,也有人说rxd txd gnd。

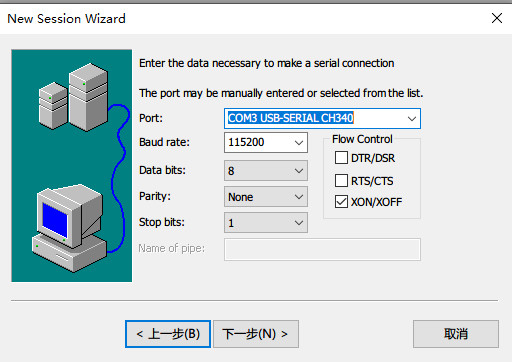
用SRT连接或其它ssh管理软件:

启动时持续按f加回车键直到进入failsafe模模式:

#开启uboot控制台菜单(可选),开启后可通过uboot命令行更新固件。
#fw_setenv bootmenu_delay 3

# 挂载rootfs并开启telnet
mount_root
sed -i 's/.*local debug=.*/\tlocal debug=1/' /etc/init.d/telnet

# 修改root密码
passwd root
reboot

不开启telnet也可通过ttl配置网络备份系统和刷入uboot:

ifconfig eth0 0.0.0.0
brctl addbr br-lan
ifconfig br-lan 192.168.2.1 netmask 255.255.255.0 up
brctl addif br-lan eth0

重启后通过telnet登录,查看分区表:

cat /proc/mtd 
dev:    size   erasesize  name
mtd0: 08000000 00020000 "spi0.0"
mtd1: 00100000 00020000 "bl2"
mtd2: 00080000 00020000 "u-boot-env"
mtd3: 00200000 00020000 "Factory"
mtd4: 00200000 00020000 "fip"
mtd5: 02400000 00020000 "ubi"
mtd6: 02400000 00020000 "firmware-1"
mtd7: 02400000 00020000 "plugin"
mtd8: 00100000 00020000 "config"
mtd9: 00080000 00020000 "factory"
mtd10: 00700000 00020000 "log"

备份整个路由固件:

nc -l -p 3333 > all.bin
cat /dev/mtd0 | nc 192.168.1.8 3333
#或
nc -l -p 3333 | dd of=all2.bin
dd if=/dev/mtd0 | nc 192.168.1.8 3333

刷入下载的uboot:

wget 192.168.1.8/mt7981_360t7-fip-fixed-parts.bin 
#验证文件是否正确,刷错路由会变砖。
md5sum mt7981_360t7-fip-fixed-parts.bin 
256977db5ca6a17b0f9e73b0ddfd3efd  mt7981_360t7-fip-fixed-parts.bin
mtd -r write mt7981_360t7-fip-fixed-parts.bin fip

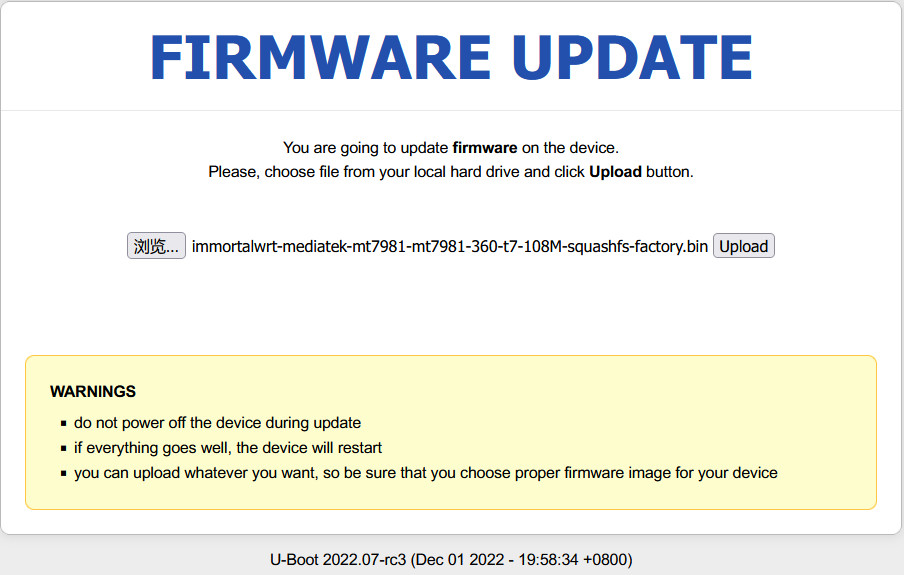
关闭电源将电脑ip设置为192.168.1.2,按住reset键路由开机,然后访问192.168.1.1 web界面刷入openwrt固件,使用immortalwrt-mediatek-mt7981-mt7981-360-t7-108M-squashfs-factory.bin,通过openwrt更新可使用immortalwrt-mediatek-mt7981-mt7981-360-t7-108M-squashfs-sysupgrade.bin。

https://cmi.hanwckf.top/p/360t7-firmware/
https://github.com/hanwckf/bl-mt798x
https://github.com/hanwckf/immortalwrt-mt798x

Proxmox LXC挂载目录及权限设置

发布时间:November 26, 2021 // 分类: // No Comments

PVE LXC挂载目录服务器目录到容器内:

cat /etc/pve/lxc/100.conf 
mp0: /data/e,mp=/data/e
mp1: /data/f,mp=/data/f

LXC为了安全默认为无特权容器,容器内程序以root的子用户运行,容器内要写挂载的文件要在服务器内为指定的子用户设置相应权限。
查看root的默认从属用户起始id为100000,数量65536个。

grep root /etc/subgid /etc/subuid
/etc/subgid:root:100000:65536
/etc/subuid:root:100000:65536

配置映射从属用户到lxc容器,默认lxc容器内root(id=0)映射为服务器id 100000,递增65536个,即容器内用户id 0-65535对应服务器100000-165535。

cat /etc/pve/lxc/100.conf 
lxc.idmap: u 0 100000 65536
lxc.idmap: g 0 100000 65536

注意容器内nobody id为65534,没映射到会连接不上ssh,提示错误:

fatal: setgroups: Invalid argument [preauth]

如果将挂载目录让容器内root可读写的话在服务器内将所有者更改为id 100000。

chown -R 100000:100000 /data/e
#也可使用用户名
useradd -u 100000 -M -s -s /usr/sbin/nologin lxc-root 
groupmod -g 100000 lxc-root
chown -R lxc-root:lxc-root /data/e

为方便管理可将服务器实体用户映射为容器内指定用户,需先将服务器内的实体用户id添加为root的子用户(其它用户不行),如添加id为1005的用户。

grep root /etc/subuid /etc/subgid
/etc/subgid:root:100000:65536
/etc/subgid:root:1005:1
/etc/subuid:root:100000:65536
/etc/subuid:root:1005:1

配置lxc将服务器id 1005映射为容器内id 1005,其它为root虚拟子用户。

#lxc内id 0到1005映射为服务器id 100000到101005
lxc.idmap: u 0 100000 1005
lxc.idmap: g 0 100000 1005
#将lxc内id 1005映射为服务器id 1005实体用户
lxc.idmap: u 1005 1005 1
lxc.idmap: g 1005 1005 1
#lxc剩下的id 1006到65535映射为服务器id 101006到165535
lxc.idmap: u 1006 101006 64530
lxc.idmap: g 1006 101006 64530

参考:
https://pve.proxmox.com/wiki/Unprivileged_LXC_containers
https://forum.proxmox.com/threads/newuidmap-uid-range-1100-1101-1100-1101-not-allowed.73414/

ubuntu通过dropbear ssh远程解锁luks rootfs全盘加密

发布时间:January 1, 2021 // 分类: LUKS // No Comments

之前使用preseed安装ubuntu luks全盘加密,这样每次重启系统都要通过vnc输入密码,可以将dropbear添加到initramfs,通过ssh解锁要方便很多。
安装dropbear-initramfs:

apt install dropbear-initramfs

安装时会提示:

dropbear: WARNING: Invalid authorized_keys file, remote unlocking of cryptroot via SSH won't work!

因为生成initramfs时要包含/etc/dropbear-initramfs/authorized_keys,复制ssh验证密钥:

#本地执行
ssh-copy-id  root@www.haiyun.me
#远程执行
cp -p ~/.ssh/authorized_keys /etc/dropbear-initramfs/

修改dropbear ssh端口:

echo 'DROPBEAR_OPTIONS="-p 2222"' >> /etc/dropbear-initramfs/config

配置initramfs ip:

#IP="${ip_address}::${gateway_ip}:${netmask}:${optional_fqdn}:${interface_name}:${auto_config}:${name_server}
echo 'IP=192.168.1.2::192.168.1.1:255.255.255.0::eth0:none:1.1.1.1' >> /etc/initramfs-tools/initramfs.conf

ip配置也可添加到grub启动参数:

GRUB_CMDLINE_LINUX="ip=192.168.1.2::192.168.1.1:255.255.255.0::eth0:none:1.1.1.1"

可选修改cryptroot-unlock解锁程序通过参数输入加密密码:

sed -i  '/^set/i if [ ! -n "\$1" ] ; then echo "use cryptroot-unlock password";exit;fi' /usr/share/cryptsetup/initramfs/bin/cryptroot-unlock
sed -i 's/read -rs/#read -rs/' /usr/share/cryptsetup/initramfs/bin/cryptroot-unlock
sed -i 's/\$REPLY/\$1/' /usr/share/cryptsetup/initramfs/bin/cryptroot-unlock

重新生成initramfs:

update-initramfs -u -k all

重启后通过ssh连接执行解锁luks:

cryptroot-unlock password

虽然/usr/share/initramfs-tools/scripts/init-bottom/dropbear有包含解锁luks后删除ip信息,但是启动后还是包含在initramfs内配置的ip信息,使用ubuntu在配置网络前清除ip信息:

sed -i '/iface eth0/a pre-up ip addr flush dev eth0' /etc/network/interfaces

20240325更新,debian12新版本ssh不能登录,提示:

debug1: Offering public key: /dev/shm/id_rsa RSA SHA256:xxxxx explicit                    
debug1: send_pubkey_test: no mutual signature algorithm                                                                         
debug1: No more authentication methods to try.  
root@www.haiyun.me: Permission denied (publickey).  

添加ssh配置:

cat .ssh/config 
Host *
    PubkeyAcceptedKeyTypes=+ssh-rsa
    HostKeyAlgorithms=+ssh-rsa

使用php调用expect ssh远程自动解锁luks:

<?php
ini_set("expect.timeout", 5);
ini_set("expect.loguser", "off");
$host = "www.haiyun.me";
$port = 22;
$pass = "xxxxxx";
$stream = expect_popen("ssh -o StrictHostKeyChecking=no -p {$port} root@{$host}");
$cases = array(
  array("password:", "pass"),
  array("Enter 'help'", "shell"),
  array("Please unlock disk", "unlock"),
  array("set up successfully", "sus"),
  array("Permission denied", "den"),
  array("cryptsetup failed", "fai")
);

while (true) {
  switch (expect_expectl($stream, $cases)) {
  case "den":
    echo 'Permission denied'.PHP_EOL;
    break 2;
  case "pass":
    fwrite($stream, "password\n");
    break;
  case "shell":
    fwrite($stream, "/usr/bin/cryptroot-unlock\n");
    //fwrite($stream, "/usr/bin/cryptroot-unlock {$pass}\n");
    break;
  case "unlock":
    fwrite($stream, "{$pass}\n");
    break;
  case "fai":
    echo 'unlock failed, bad password or options?'.PHP_EOL;
    break 2;
  case "sus":
    echo 'unlock sus'.PHP_EOL;
    break 2;
  case EXP_TIMEOUT:
    echo 'timeout'.PHP_EOL;
    break 2;
  case EXP_EOF:
    echo 'eof'.PHP_EOL;
    break 2; 
  default:
    die("Error has occurred!");
  }
}
fclose ($stream);

php调用ssh2扩展远程解锁luks加密:

<?php
$host = 'www.haiyun.me';
$port = 2222;
$pass = 'xxxx';
if (!($conn = ssh2_connect($host, $port, array('hostkey'=>'ssh-rsa')))) {
  die("conn fail\n");
}
//注意路径不要使用~/.ssh/id_rsa.pub,会遇到段错误和其它莫名其妙的问题
if (ssh2_auth_pubkey_file($conn, 'root', '/root/.ssh/id_rsa.pub', '/root/.ssh/id_rsa')) {
  echo "auth sus\n";
} else {
  die("auth fail\n");
}
function expect($stream, $match) {
  $time = time();
  $res = '';
  while(!feof($stream)){
    //if (($buffer = fgets($stream, 4096)) !== false) {
    if (($buffer = fread($stream, 4096)) !== false) {
      $res .= $buffer;
    }
    if (stristr($res, $match)) {
      return 'sus';
    }
    $now = time();
    if (($now - $time) >= 10) {
      return 'timeout';
    }
    usleep(100);
  }
  return 'disconnect';
}
 
$shell=ssh2_shell($conn, 'xterm');
fwrite($shell, "/usr/bin/cryptroot-unlock\n");
$res = expect($shell, 'Please unlock disk');
if ($res == 'sus') {
  fwrite($shell, "{$pass}\n");
  $res = expect($shell, 'set up successfully');
  if ($res == 'sus') {
  }
  var_dump($res);
}

发现的问题:此方法在ubuntu20.04使用编译的4.14内核bbrplus下导致系统启动很慢,5.4及5.10内核测试正常。
另外一种通过dracut生成initramfs调用openssh解锁luks的方法:
https://github.com/gsauthof/dracut-sshd
参考:
https://hamy.io/post/0009/how-to-install-luks-encrypted-ubuntu-18.04.x-server-and-enable-remote-unlocking/

分类
最新文章
最近回复
  • opnfense: 谢谢博主!!!解决问题了!!!我之前一直以为内置的odhcp6就是唯一管理ipv6的方式
  • liyk: 这个方法获取的IPv6大概20分钟之后就会失效,默认路由先消失,然后Global IPV6再消失
  • 海运: 不好意思,没有。
  • zongboa: 您好,請問一下有immortalwrt設定guest Wi-Fi的GUI教學嗎?感謝您。
  • 海运: 恩山有很多。
  • swsend: 大佬可以分享一下固件吗,谢谢。
  • Jimmy: 方法一 nghtp3步骤需要改成如下才能编译成功: git clone https://git...
  • 海运: 地址格式和udpxy一样,udpxy和msd_lite能用这个就能用。
  • 1: 怎么用 编译后的程序在家里路由器内任意一台设备上运行就可以吗?比如笔记本电脑 m参数是笔记本的...
  • 孤狼: ups_status_set: seems that UPS [BK650M2-CH] is ...