mkdir -p ~/.vim/syntax/
wget -O ~/.vim/syntax/nginx.vim https://www.haiyun.me/usr/uploads/2012/05/2410071208.vim
echo "au BufRead,BufNewFile /usr/local/nginx/conf/* set ft=nginx" >> ~/.vimrc
效果图如下:
发布时间:May 4, 2012 // 分类:Vim // No Comments
mkdir -p ~/.vim/syntax/
wget -O ~/.vim/syntax/nginx.vim https://www.haiyun.me/usr/uploads/2012/05/2410071208.vim
echo "au BufRead,BufNewFile /usr/local/nginx/conf/* set ft=nginx" >> ~/.vimrc效果图如下:
发布时间:May 4, 2012 // 分类:Vim // No Comments
"插件管理器vundle设置
set nocompatible "与vi不一致
filetype off
set rtp+=~/.vim/bundle/vundle/ "载入特定目录插件
call vundle#rc()
"plugin
Bundle 'gmarik/vundle'
Bundle 'snipMate'
Bundle 'The-NERD-tree'
Bundle 'bufexplorer.zip'
Bundle 'neocomplcache'
Bundle 'winmanager'
Bundle 'taglist.vim'
"Bundle 'minibufexpl.vim'
Bundle 'FencView.vim'
Bundle 'grep.vim'
Bundle 'ZenCoding.vim'
"indent
Bundle 'php.vim-html-enhanced'
Bundle 'foxconndmd/vim-colors-xterm'
Bundle 'blackdust.vim'
Bundle 'darkburn'
Bundle 'freya'
Bundle 'Lucius'

"基本设置
"cd $HOME "设置工作目录
set helplang=cn "中文帮助
"au bufwritepost .vimrc source % "自动加载修改的配置文件
set fileencodings=utf-8,gb2312,gbk,gb18030,ucs-bom,cp936,big5,euc-jp,euc-kr,latin1 "自动选择编码
set ambiwidth=double "阻止特殊符号无法显示
set termencoding=utf-8
set encoding=utf-8  "设置当前默认编码
set langmenu=zh_CN.UTF-8 " 设置中文菜单及编码
language message zh_CN.UTF-8  "使用中文提示信息
set history=1000  "记录历史文件数”
set confirm "在处理未保存或只读文件的时候,弹出确认
set autoread "自动加载修改的文件

  "界面设置
set cmdheight=1 "命令栏高度
"set number   "显示行号
set laststatus=2 "总是显示状态行
"状态行的显示内容:文件路径、编码、时间、类型
set statusline=%F%m%r%h%w\ [Code=%{&encoding}\ [Format=%{&fileformat}]\ [Type=%Y]\ [Line=%l\ Of\ %L][Column=%v][%p%%]\ %{strftime(\"%d/%m/%y\ -\ %H:%M\")}
set wildmenu  "在命令模式下使用 Tab 自动补全的时候, 将补全内容使用一个漂亮的单行菜单形式显示出来。
"set completeopt=longest,menu "关闭自动补全预览窗口
syntax enable  "语法高亮
set t_Co=256
set shortmess=atI  "不显示乌干达儿童
set showcmd  "在状态栏显示目前所执行的指令,未完成的指令片段亦
set novisualbell  "不要闪烁

"图形界面配置"
if  (has("gui_running"))
    au  GUIEnter * simalt ~x "启动最大化
    set mouse=a "鼠标支持"
    set clipboard+=unnamed "与windows共享剪贴板
    set mousemodel=popup  "右键菜单
    set guifont=Microsoft_YaHei_Mono:h12:cANSI
    set gfw=Microsoft_YaHei_Mono:h12:cGB2312
    set guioptions-=m " 隐藏菜单栏
    set guioptions-=T " 隐藏工具栏
    "set guioptions-=r " 隐藏右侧滚动条
    set guioptions+=b
    colo desert
else
"字符界面配置
    colo desert-xterm
endif

 "文本编辑设置
set nobackup "修改文件无备份"
set backspace=2 " 设置退格键可用
filetype plugin indent on " 侦测文件类型
"set showmatch   " 插入括号时,短暂地跳转到匹配的对应括号
"set matchtime=2 " 短暂跳转到匹配括号的时间
set magic " 显示括号配对情况
set expandtab "编辑时将所有 Tab 替换为空格
set softtabstop=4    "设置tab键为4个空格"
set shiftwidth=4  "缩进空格数
set smarttab "一次删除4个空格
au FileType html,python,vim,javascript setl shiftwidth=2 "特定类型文件缩进空格
au FileType html,python,vim,javascript setl tabstop=2
"set spell "打开拼写检查
set vb t_vb=  "设置去掉响声"
"set paste "设置粘贴模式,代码不错位
au BufReadPost * if line("'\"") > 1 && line("'\"") <= line("$") | exe "normal! g'\"" | endif "记住上次的位置

  "搜索设置"
"set nohls  "关闭高亮显示
set hls  "高亮显示匹配内容
set incsearch "搜索时,输入的词句的逐字符高亮
set cursorline "高亮显示当前行"
set whichwrap=b,s,h,l,<,>,[,]  "光标左右循环移动“

  "断行设置
"set wrap           " 自动换行
"set nowrap         " 不自动换行
set linebreak       " 整词换行
"set tw=78  "超过78个字符自动断行
set lbr  "不在单词之间断行
set fo+=mB  "打开断行模块对亚洲语言支持。 m 表示允许在两个汉字之间断行, 即使汉字之间没有出现空格。 B 表示
" 两行合并为一行的时候, 汉字与汉字之间不要补空格。

  "设置自动对起折叠
set autoindent "" 自动对齐,继承前一行的缩进方式,特别适用于多行注释
set smartindent "开启新行时使用智能自动缩进
set cindent   "c风格程序缩进
"set foldopen=all  "光标遇到折叠,折叠就打开
"set foldclose=all "移开折叠时自动关闭折叠
"set foldenable    "开始折叠
"set foldmethod=syntax " 设置语法折叠
"set foldcolumn=0      " 设置折叠区域的宽度
"setlocal foldlevel=1  " 设置折叠层数

" C的编译和运行
map <F5> :call CompileRunGcc()<CR>
func! CompileRunGcc()
exec "w"
exec "!gcc % -o %<"
exec "! ./%<"
endfunc

" C++的编译和运行
map <F6> :call CompileRunGpp()<CR>
func! CompileRunGpp()
exec "w"
exec "!g++ % -o %<"
exec "! ./%<"
endfunc

 "启用 omni 补全.
au FileType php set omnifunc=phpcomplete#CompletePHP
au FileType css set omnifunc=csscomplete#CompleteCSS
au FileType html set omnifunc=htmlcomplete#CompleteTags
au FileType mysql set omnifunc=mysqlcomplete#CompleteMYSQL
au FileType javascript set omnifunc=javascriptcomplete#CompleteJS
au FileType python setlocal omnifunc=pythoncomplete#Complete
au FileType xml setlocal omnifunc=xmlcomplete#CompleteTags

 "自定义CSS补全"
au FileType css call AddCssList()
function AddCssList()
set dictionary-=$VIM/vimfiles/dict/csslist.txt
set complete-=k complete+=k
endfunction

 "检测PHP文件补全
au FileType php call PHPFuncList()
function PHPFuncList()
set dictionary-=$VIM/vimfiles/dict/php_funclist.txt
set complete-=k complete+=k
endfunction

" phpDocumentor for VIM
"inoremap  :call PhpDocSingle()
"nnoremap  :call PhpDocSingle()
"vnoremap  :call PhpDocRange()

"winmanager设置
let g:winManagerWindowLayout='FileExplorer,BufExplorer|TagList' "设置WM窗口内容,在文件管理下ctrl+n切换到BufExplorer
"let g:winManagerWidth = 30 "设置WM窗口宽度
nmap <c-w><c-f> :FirstExplorerWindow<cr> "切换到第一个窗口
nmap <c-w><c-b> :BottomExplorerWindow<cr> "切换到最后一个窗口
nmap wm :WMToggle<cr> "打开WM窗口
nmap wf :NERDTreeToggle<cr> "打开文件管理器

"taglist设置
let Tlist_Ctags_Cmd = 'D:\Program Files\Ctags\ctags.exe'
set tags=tags;
set autochdir
"let Tlist_Show_One_File=1 "只显示当前文件Tag
"let Tlist_Exit_OnlyWindow=1 "如Tag为最后窗口退出
"let Tlist_Show_Menu=1 "Gvim下显示菜单
"let Tlist_Auto_Open=1  "自动打开taglist

"neocomplcache配置
let g:neocomplcache_enable_at_startup = 1 "启动neocomplcache
"let g:neocomplcache_enable_auto_select = 1 "自动选择第一个
let g:neocomplcache_enable_smart_case = 1 "大写字母区分大小写
let g:neocomplcache_enable_camel_case_completion = 1 "入大写字母时, 进行模糊搜索可能性词语  例如,当输入AE时会匹配ArgumentsException。
let g:neocomplcache_enable_underbar_completion = 1 " 启用下划线补全.进行模糊搜索匹配的词。例如,当输入'p_h'时会匹配'public_html'。默认值是 0
"inoremap <expr><Space>  pumvisible() ? "\<C-n>" : "\<Space>"  "定义补全选择快捷键
"let g:neocomplcache_min_syntax_length = 3 " 设定最小语法关键词长度.
"let g:neocomplcache_lock_buffer_name_pattern = '\*ku\*'

"supertab设置
"let g:SuperTabRetainCompletionType=1 "记住上次的补全方式,直到用其他的补全命令改变它
"let g:SuperTabDefaultCompletionType="<C-X><C-O>" "改变自动补全快捷键

"minibufexpl设置
let g:miniBufExplMapWindowNavVim = 1 "多窗口下ctrl加j/k/l/h/切换窗口
let g:miniBufExplMapWindowNavArrows = 1 "多窗口下ctrl加箭头切换窗口
"let g:miniBufExplMapCTabSwitchBufs = 1 "ctrl加Tab循环切换窗口
"let g:miniBufExplModSelTarget = 1
let g:miniBufExplForceSyntaxEnable = 1
map <C-n> :bprev!<CR> "切换到下一个Buf
"map <C-b> :bprev!<CR> "切换到上一个Buf

"grep插件
"nnoremap <silent> <F3> :Grep<CR> "F3 Grep查找
nnoremap <silent> <F3> :Rgrep<CR>

"fencview.vim 插件设置
"let g:fencview_autodetect = 1 "开启自动识别编码
"let g:fencview_checklines = 10 "检查前后10行来判断编码

"模仿MS快捷键
vmap <C-c> "yy
vmap <C-x> "yd
nmap <C-v> "yp
vmap <C-v> "yp
nmap <C-a> ggvG$
imap <C-s> <Esc>:wa<cr>i<Right>
nmap <C-s> :wa<cr>
inoremap <C-a> <esc>ggVG "插入模式下C-a全局选中
vmap <C-c> "+y "可视模式下对选中模块进行复制C-c或剪切C-x
vmap <C-x> "+x
"插入模式下C-v粘贴
inoremap <C-v> <esc>:set paste<cr>mui<C-R>+<esc>mv'uV'v=:set nopaste<cr>

"分割窗口快捷键
nmap wv <C-w>v   " 垂直分割当前窗口
nmap wc <C-w>c   " 关闭当前窗口
nmap ws <C-w>s   " 水平分割当前窗口

"一些不错的映射转换语法,如果在一个文件中混合了不同语言时有用
nmap <leader>1 :set filetype=xhtml<CR>
nmap <leader>2 :set filetype=css<CR>
nmap <leader>3 :set filetype=javascript<CR>
nmap <leader>4 :set filetype=php<CR>
let mapleader=',' "自定义leader键发布时间:May 4, 2012 // 分类:Windows // No Comments
有时我们需要查看指定文件有哪个进程在打开,或指定进程都打开了哪些文件,在Linux下可通过lsof或fuser查看,Windows下可通过微软官方提供的ProcessExplorer查看。
ProcessExplorer打开会显示当前系统运行中的进程,点击进程在下方会显示其调用的文件。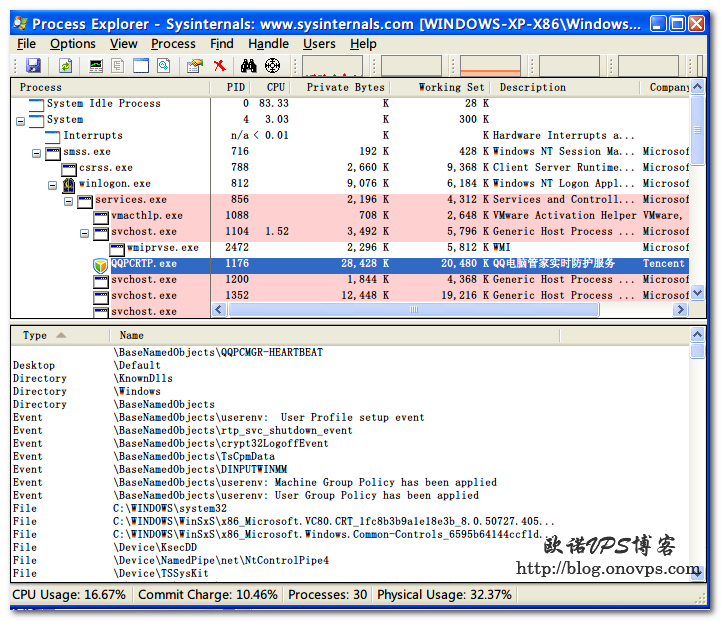
测试查找打开文件的进程,在C盘根目录新那个test.txt文件用vim打开,然后打开ProcessExplorer——>Find——输入test.txt,查找结果如下: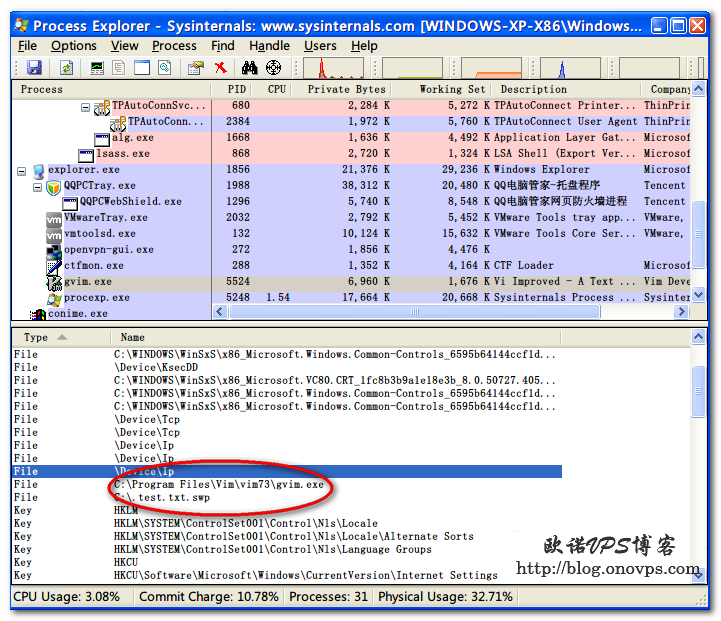
发布时间:May 4, 2012 // 分类:系统调优 // No Comments
vmstat是一个全面的性能分析工具,可以用来观察系统的进程、IO、内存、CPU使用情况,对优化系统有很大的帮助。
vmstat 2 2参数说明:
procs -----------memory---------- ---swap-- -----io---- --system-- -----cpu------
 r  b   swpd   free   buff  cache   si   so    bi    bo   in   cs us sy id wa st
 0  0      0 362212 131608 314792    0    0     4    16  468   63  0  0 99  0  0
 0  0      0 362212 131608 314792    0    0     0     0  999   45  0  0 100  0  0
 0  0      0 362212 131608 314792    0    0     0     0 1007   65  0  0 100  0  0
procs:
r 正在运行或等待CPU的进程数
b 等待IO/内存等资源的进程数
memory:
swpd 虚拟内存的使用量
free 空闲的内存量
buff 块设备读写缓存
cache 文件系统读写缓存
SWAP:
si 从磁盘交换到内存的交换页数量,单位KB。
so 从内存交换到磁盘的交换页数量,单位KB。
IO:
bi 读取块设备的数量,单位块。
bo 写入块设备的数量,单位块。
System:
in 每秒的中断数,包括时钟中断。
cs 每秒的环境上下文切换次数。
CPU:
us 用户进程占用时间
sy 系统占用时间
id 闲置时间
wa IO等待时间
总结:
如果r大于3或4,且id小于%50,则CPU是瓶颈。
wa经常不等于0,b中的队列较大,则IO是瓶颈。
如bi bo长期不等于0,则内存较小。发布时间:May 4, 2012 // 分类:系统调优 // No Comments
iostat使用语法:
iostat [ -c | -d] [ -k ] [ -t ] [ -x [device] ] [ <interval> [ <count> ] ]使用参数:
-c 显示CPU的使用情况
-d 显示磁盘的使用情况
-k 以K为单位输出
-m 以M为单位输出
-t 显示执行时间
-x 更为详细的输出
interval 指定间隔时间
count 指定统计次数
iostat应用示例:
iostat -x 2 2 #统计2次,间隔2秒
avg-cpu:  %user   %nice %system %iowait  %steal   %idle
           1.04    0.00    1.55    0.00    0.00   97.41

Device:         rrqm/s   wrqm/s   r/s   w/s   rsec/s   wsec/s avgrq-sz avgqu-sz   await  svctm  %util
sda               0.00    36.79  0.00  7.25     0.00   352.33    48.57     0.00    0.50   0.50   0.36
sda1              0.00     0.00  0.00  0.00     0.00     0.00     0.00     0.00    0.00   0.00   0.00
sda2              0.00    36.79  0.00  7.25     0.00   352.33    48.57     0.00    0.50   0.50   0.36
dm-0              0.00     0.00  0.00 44.04     0.00   352.33     8.00     0.04    0.86   0.08   0.36
dm-1              0.00     0.00  0.00  0.00     0.00     0.00     0.00     0.00    0.00   0.00   0.00
hdc               0.00     0.00  0.00  0.00     0.00     0.00     0.00     0.00    0.00   0.00   0.00
iostat参数说明:
Blk_read/s:每秒钟块设备写入块的数量,每块一般是4096字节
Blk_wrtn/s :每秒钟块设备读取块的数量
tps:每秒磁盘连续读次数和连续写次数之和
rrqm/s:每秒进行合并的读操作数目
wrqm/s:每秒进行合并的写操作数目
r/s:每秒完成读IO的次数
w/s:每秒完成写IO的次数
rsec/s:每秒读扇区数,每扇区512字节
wsec/s:每秒写扇区数,每扇区512字节
rkB/s:每秒读千字节数
wkB/s:每秒写千字节数
avgrq-sz:平均每次IO操作的数据大小(扇区),即(rsec/s+wsec/s)/(r/s+w/s)。
avgqu-sz:平均IO队列的长度
await:平均每次IO操作的等待时间,单位毫秒
svctm:平均每次IO操作的服务时间,单位毫秒
%util:一秒中有百分之多少的时间用于IO操作,即(r/s+w/s)*(svctm/1000)。
总结:
如果%util较大代表IO请求太多,硬盘可能存在瓶颈。
如果avctm比较接近await,说明IO几乎没等待时间。
如果await远大于avctm,说明IO队列太长,应用响应时间也变长。
avgqu-sz队列长度也可衡量IO负荷的指标,avgqu-sz是单位时间内的平均值。
其它还可参考vmstat结果b参数(等待资源的进程数)和wa参数(IO等待所占用CPU时间百分比)。