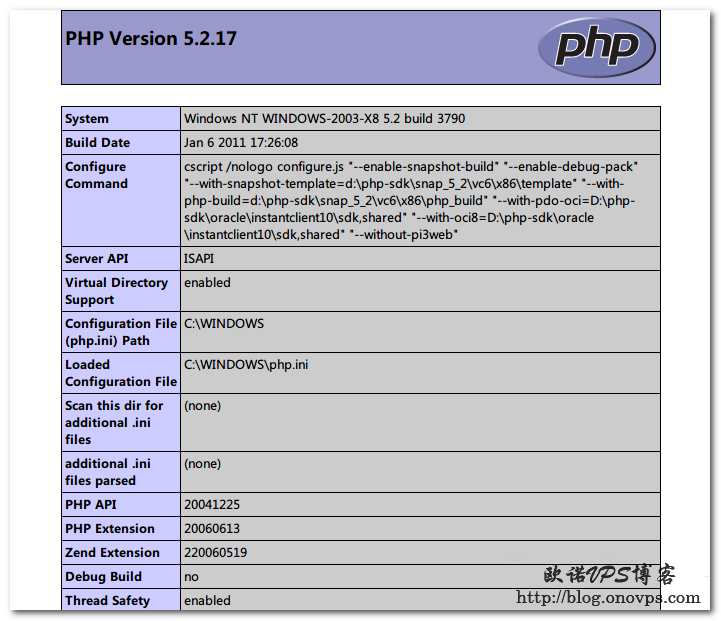
海运的博客

Linux/Centos服务器编译安装LNMP环境

发布时间:May 23, 2012 // 分类:Nginx // No Comments

安装编译环境及组件:

yum -y install gcc gcc-c++ make autoconf libjpeg libjpeg-devel libpng libpng-devel freetype freetype-devel \
libxml2 libxml2-devel zlib zlib-devel glibc glibc-devel glib2 glib2-devel bzip2 bzip2-devel ncurses ncurses-devel \
curl curl-devel e2fsprogs e2fsprogs-devel krb5 krb5-devel libidn libidn-devel openssl openssl-devel patch unzip vim-enhanced
wget http://sourceforge.net/projects/mcrypt/files/Libmcrypt/2.5.8/libmcrypt-2.5.8.tar.gz
tar zxvf libmcrypt-2.5.8.tar.gz
cd libmcrypt-2.5.8
./configure
make
make install
cd ../
wget http://ftp.gnu.org/pub/gnu/libiconv/libiconv-1.14.tar.gz
tar zxvf libiconv-1.14.tar.gz
cd libiconv-1.14
./configure
make
make install
cd ..
wget http://nchc.dl.sourceforge.net/project/mhash/mhash/0.9.9.9/mhash-0.9.9.9.tar.gz
tar zxvf mhash-0.9.9.9.tar.gz
cd mhash-0.9.9.9
./configure
make
make install
cd ..
ldconfig
wget http://nchc.dl.sourceforge.net/project/mcrypt/MCrypt/2.6.8/mcrypt-2.6.8.tar.gz
tar zxvf mcrypt-2.6.8.tar.gz
cd mcrypt-2.6.8
./configure
make
make install
cd ../

Mysql安装:

wget http://ftp.jaist.ac.jp/pub/mysql/Downloads/MySQL-5.1/mysql-5.1.63.tar.gz
tar zxvf mysql-5.1.63.tar.gz
cd mysql-5.1.63
./configure --prefix=/usr/local/mysql \
--without-debug \
--with-unix-socket-path=/tmp/mysql.sock \
--with-mysqld-ldflags=-all-static \
--with-charset=utf8 \
--with-extra-charsets=gbk,gb2312 \
--with-big-tables \
--with-readline \
--enable-local-infile \
--enable-assembler \
--enable-thread-safe-client 
make
make install
cp support-files/my-medium.cnf /etc/my.cnf
cp support-files/mysql.server /etc/init.d/mysqld
chmod 755 /etc/init.d/mysqld
chkconfig --level 3 mysqld on
useradd -s /sbin/nologin -M mysql
/usr/local/mysql/bin/mysql_install_db --user=mysql
ln -s /usr/local/mysql/bin/mysql /usr/bin/mysql
ln -s /usr/local/mysql/bin/mysqldump /usr/bin/mysqldump
ln -s /usr/local/mysql/bin/myisamchk /usr/bin/myisamchk
/etc/init.d/mysqld start
/usr/local/mysql/bin/mysqladmin -u root password "password"
cd ../

PHP安装:

wget http://cn.php.net/distributions/php-5.2.17.tar.gz
wget http://php-fpm.org/downloads/php-5.2.17-fpm-0.5.14.diff.gz
tar zxvf php-5.2.17.tar.gz
gzip -cd php-5.2.17-fpm-0.5.14.diff.gz | patch -d php-5.2.17 -p1
cd php-5.2.17/            
wget --no-check-certificate https://raw.github.com/laruence/laruence.github.com/master/php-5.2-max-input-vars/php-5.2.17-max-input-vars.patch
patch -p1 < php-5.2.17-max-input-vars.patch
./configure --prefix=/usr/local/php  \
--with-mysql=/usr/local/mysql \
--with-mysqli=/usr/local/mysql/bin/mysql_config \
--enable-inline-optimization \
--disable-debug \
--enable-fastcgi \
--enable-fpm \
--enable-xml \
--enable-sockets \
--enable-zip \
--enable-mbstring \
--enable-gd-native-ttf \
--with-iconv-dir \
--with-freetype-dir \
--with-jpeg-dir \
--with-png-dir \
--with-zlib \
--with-libxml-dir \
--with-mcrypt \
--with-gd \
--with-openssl \
--with-mhash \
--with-xmlrpc \
--with-curl 
make ZEND_EXTRA_LIBS='-liconv'
make install
cp php.ini-recommended /usr/local/php/etc/php.ini
cp /usr/local/php/sbin/php-fpm /etc/init.d/
chmod 755 /etc/init.d/php-fpm
sed -i '1a # chkconfig: 345 85 15' /etc/init.d/php-fpm
chkconfig --level 3 php-fpm on
/etc/init.d/php-fpm start
ln -s /usr/local/php/bin/php /usr/bin/php
ln -s /usr/local/php/bin/phpize /usr/bin/phpize
ln -s /usr/local/php/sbin/php-fpm /usr/bin/php-fpm
cd ../

Nginx安装:

wget http://sourceforge.net/projects/pcre/files/pcre/8.30/pcre-8.30.tar.gz
tar zxvf pcre-8.30.tar.gz 
cd pcre-8.30
./configure 
make
make install
ln -s /usr/local/lib/libpcre.so.1 /lib/libpcre.so.1
ln -s /usr/local/lib/libpcre.so.1.0.0 /lib/libpcre.so.1.0.0
cd ../
useradd -s /sbin/nologin -M www
wget http://nginx.org/download/nginx-1.0.15.tar.gz
tar zxvf nginx-1.0.15.tar.gz
cd nginx-1.0.15
./configure --user=www --group=www --prefix=/usr/local/nginx --with-http_stub_status_module --with-http_ssl_module
make 
make install

Apache动态编译添加模块

发布时间:May 22, 2012 // 分类:Apache // No Comments

Apache基于模块化设计,编译完成后还可动态编译添加其它模块,此功能Apache编译时需添加--enable-so参数,1.x版本--enable-module=so。
查看已加载的模块:

#https://www.haiyun.me
/usr/local/httpd/bin/httpd -M

以编译添加expires模块为例:

cd /src/httpd/modules/metadata/ #进入源码模块目录
/usr/local/httpd/bin/apxs -c -i -a mod_expires.c #编译、安装、启用expires模块
/etc/init.d/httpd restart #重新启动httpd加载

Linux/Centos服务器编译安装LAMP环境

发布时间:May 22, 2012 // 分类:Apache // No Comments

安装编译环境及组件:

#https://www.haiyun.me
yum -y install gcc gcc-c++ make autoconf libjpeg libjpeg-devel libpng libpng-devel freetype freetype-devel \
libxml2 libxml2-devel zlib zlib-devel glibc glibc-devel glib2 glib2-devel bzip2 bzip2-devel ncurses ncurses-devel \
curl curl-devel e2fsprogs e2fsprogs-devel krb5 krb5-devel libidn libidn-devel openssl openssl-devel patch unzip vim-enhanced libtool-ltdl-devel libtool
wget http://sourceforge.net/projects/mcrypt/files/Libmcrypt/2.5.8/libmcrypt-2.5.8.tar.gz
tar zxvf libmcrypt-2.5.8.tar.gz
cd libmcrypt-2.5.8
./configure
make
make install
cd ../
wget http://ftp.gnu.org/pub/gnu/libiconv/libiconv-1.14.tar.gz
tar zxvf libiconv-1.14.tar.gz
cd libiconv-1.14
./configure
make
make install
cd ../
wget http://nchc.dl.sourceforge.net/project/mhash/mhash/0.9.9.9/mhash-0.9.9.9.tar.gz
tar zxvf mhash-0.9.9.9.tar.gz
cd mhash-0.9.9.9
./configure
make
make install
cd ../
ldconfig
wget http://nchc.dl.sourceforge.net/project/mcrypt/MCrypt/2.6.8/mcrypt-2.6.8.tar.gz
tar zxvf mcrypt-2.6.8.tar.gz
cd mcrypt-2.6.8
./configure
make
make install
cd ../

安装Apache2.22:

wget http://labs.renren.com/apache-mirror/httpd/httpd-2.2.22.tar.gz
tar zxvf httpd-2.2.22.tar.gz
cd httpd-2.2.22
#./configure --prefix=/usr/local/httpd --enable-so --enable-mods-shared=most
#动态编译大部分常用模块
./configure --prefix=/usr/local/httpd \
--sysconfdir=/etc/httpd \
--enable-so \
--enable-ssl  \
--enable-rewrite \
--enable-expires \
--enable-headers \
--enable-deflate \
--with-mpm=worker
make
make install
cp /usr/local/httpd/bin/apachectl /etc/init.d/httpd
chmod 755 /etc/init.d/httpd
sed -i '1a # chkconfig: 345 85 15' /etc/init.d/httpd
/etc/init.d/httpd start
chkconfig --level 3 httpd on
cd ../

安装Mysql5.1.63:

wget http://ftp.jaist.ac.jp/pub/mysql/Downloads/MySQL-5.1/mysql-5.1.63.tar.gz
tar zxvf mysql-5.1.63.tar.gz
cd mysql-5.1.63
./configure --prefix=/usr/local/mysql \
--without-debug \
--with-unix-socket-path=/tmp/mysql.sock \
--with-mysqld-ldflags=-all-static \
--with-charset=utf8 \
--with-extra-charsets=gbk,gb2312 \
--with-big-tables \
--with-readline \
--enable-local-infile \
--enable-assembler \
--enable-thread-safe-client 
make
make install
cp support-files/my-medium.cnf /etc/my.cnf
cp support-files/mysql.server /etc/init.d/mysqld
chmod 755 /etc/init.d/mysqld
chkconfig --level 3 mysqld on
useradd -s /sbin/nologin -M mysql
/usr/local/mysql/bin/mysql_install_db --user=mysql
ln -s /usr/local/mysql/bin/mysql /usr/bin/mysql
ln -s /usr/local/mysql/bin/mysqldump /usr/bin/mysqldump
ln -s /usr/local/mysql/bin/myisamchk /usr/bin/myisamchk
/etc/init.d/mysqld start
/usr/local/mysql/bin/mysqladmin -u root password "password"
cd ../

安装PHP5.3.13:

wget http://cn.php.net/distributions/php-5.3.13.tar.gz
tar zxvf php-5.3.13.tar.gz
cd php-5.3.13
./configure --prefix=/usr/local/php  \
--with-apxs2=/usr/local/httpd/bin/apxs \
--with-mysql=/usr/local/mysql \
--with-mysqli=/usr/local/mysql/bin/mysql_config \
--disable-debug \
--with-iconv-dir \
--with-freetype-dir \
--with-jpeg-dir \
--with-png-dir \
--with-zlib \
--with-libxml-dir \
--with-mcrypt \
--with-gd \
--with-openssl \
--with-mhash \
--with-xmlrpc \
--with-curl \
--enable-inline-optimization \
--enable-xml \
--enable-mbstring \
--enable-gd-native-ttf \
--enable-sockets \
--enable-zip 
make ZEND_EXTRA_LIBS='-liconv'
make install
cp php.ini-production /usr/local/php/etc/php.ini
ln -s /usr/local/php/bin/php /usr/bin/php
ln -s /usr/local/php/bin/phpize /usr/bin/phpize
cd ../

配置Apache支持PHP程序:

cat >>/etc/httpd/httpd.conf <<EOF
AddType application/x-httpd-php .php
AddType application/x-httpd-source-php .phps
EOF
sed -i 's/index.html/index.html index.php/g' /etc/httpd/httpd.conf
/etc/init.d/httpd restart

测试PHP:

cat >> /usr/local/httpd/htdocs/phpinfo.php <<EOF
<?php  
phpinfo();  
?> 
EOF

Apache运行模式选择prefork和worker

发布时间:May 22, 2012 // 分类:Apache // No Comments

prefork是Unix平台上默认的MPM,编译时可使用参数./configure –with-mpm=worker自定义。
查看当前MPM:

#https://www.haiyun.me
httpd -V|grep mpm
 -D APACHE_MPM_DIR="server/mpm/prefork"

prefork采用预派生子进程方式,用单独的子进程来处理不同的请求,每个进程时间内只能维持一个连接,进程之间彼此独立。
prefork配置:

<IfModule prefork.c>
ServerLimit      256 #服务器端连接数限制,最大2000
StartServers       8 #初始启动8个进程
MinSpareServers    5 #最小空闲进程数
MaxSpareServers   20 #最大空闲进程数,超过限制父进程将杀死多余的子进程。
MaxClients       256 #最大连接、进程数,一般和ServerLimit相同,超过此限制的请求进入等候队列。
MaxRequestsPerChild  4000 #每个进程生存期间可处理请求次数,超过终结此进程。
</IfModule>

worker支持多线程和多进程混合模型的MPM,使用多线程来处理,可以处理相对大量的请求,而系统资源的开销要小于基于prefork的服务器。
worker配置:

<IfModule worker.c>
StartServers         10 #默认启动子进程数
MaxClients         150 #同一时间最大连接数
MinSpareThreads     25 #最小空闲线程数
MaxSpareThreads     75 #最大空闲线程数
ThreadsPerChild     25 #每个进程建立的常驻线程数
MaxRequestsPerChild  40000 #每个进程生存期间可处理请求次数,超过终结此进程。
</IfModule>

Linux下清除登录记录及历史命令

发布时间:May 22, 2012 // 分类:Linux基础 // No Comments

查看历史登录记录:

last
utmpdump /var/log/btmp

清除历史登录记录:

echo > /var/log/wtmp

查看失败登录记录:

lastb
utmpdump /var/log/btmp

清除失败登录记录:

echo > /var/log/btmp

清除历史命令:

history -c
echo > ~/.bash_history 
分类
最新文章
最近回复
  • opnfense: 谢谢博主!!!解决问题了!!!我之前一直以为内置的odhcp6就是唯一管理ipv6的方式
  • liyk: 这个方法获取的IPv6大概20分钟之后就会失效,默认路由先消失,然后Global IPV6再消失
  • 海运: 不好意思,没有。
  • zongboa: 您好,請問一下有immortalwrt設定guest Wi-Fi的GUI教學嗎?感謝您。
  • 海运: 恩山有很多。
  • swsend: 大佬可以分享一下固件吗,谢谢。
  • Jimmy: 方法一 nghtp3步骤需要改成如下才能编译成功: git clone https://git...
  • 海运: 地址格式和udpxy一样,udpxy和msd_lite能用这个就能用。
  • 1: 怎么用 编译后的程序在家里路由器内任意一台设备上运行就可以吗?比如笔记本电脑 m参数是笔记本的...
  • 孤狼: ups_status_set: seems that UPS [BK650M2-CH] is ...
归档