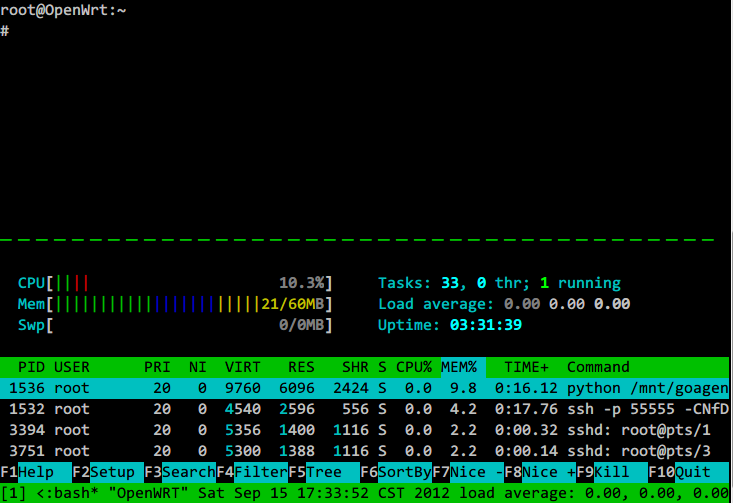
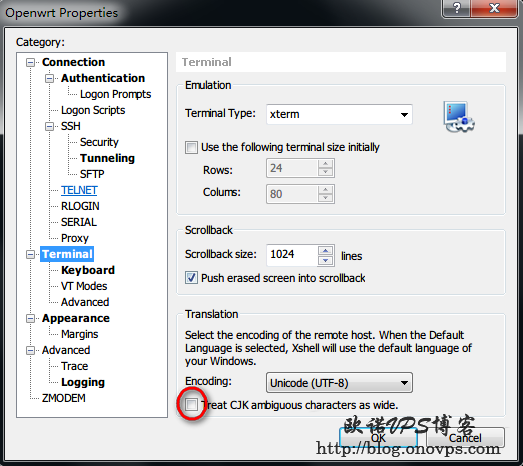
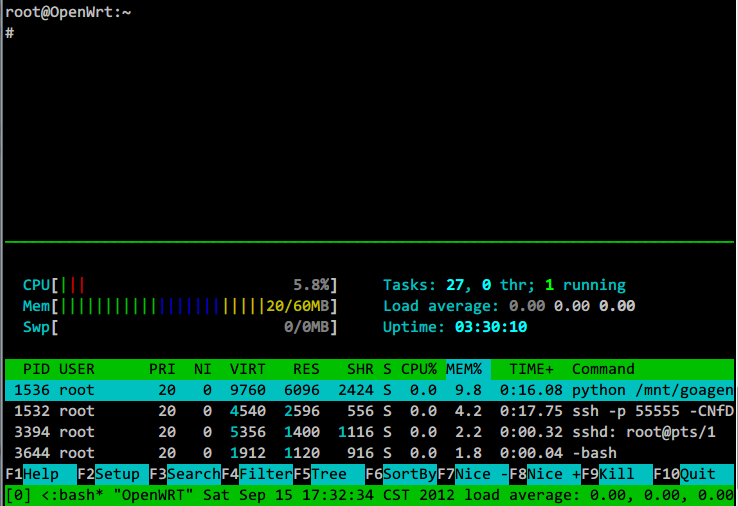
Tmux多窗口分隔线显示虚线不正常解决
发布时间:September 15, 2012 // 分类:Tmux // No Comments
OpenWRT编译安装Iptables IPID模块
发布时间:September 15, 2012 // 分类:OpenWrt // 4 Comments
之前有介绍Openwrt下IPID模块的使用及自己编译的Openwrt IPID固件下载,本次记录下编译过程。
Openwrt源码根目录下编辑:
include/netfilter.mk在ipopt软件包下添加:
$(eval $(call nf_add,IPT_IPOPT,CONFIG_NETFILTER_XT_TARGET_IPID, $(P_XT)xt_IPID))编辑:
package/iptables/Makefile在HL下添加:
- IPID编辑:
package/kernel/modules/netfilter.mk在TTL下添加:
- IPID 下载dev.openwrt.org.cn提供的IPID源码patch:
#https://www.haiyun.me
wget -P package/iptables/patches/ https://dev.openwrt.org.cn/export/553/trunk/package/iptables/patches/006-iptable-ipid.patch
wget -P target/linux/generic-2.6/patches-2.6.32/ https://dev.openwrt.org.cn/export/553/trunk/target/linux/generic/patches-2.6.32/995-netfilter_linux-ipid.patch
修改iptable-ipid.patch第二行为:
+++ b/extensions/libxt_IPID.c然后编译Openwrt固件,选择IPOPT软件包即可。
发个自己编译的OpenWRT官方稳定版加IPID/TTL固件下载
发布时间:September 14, 2012 // 分类:OpenWrt // 4 Comments
使用Openwrt官方源最新稳定版编译,添加IPID/TTL模块,适用于RG100AA和DB120。
linux内核版本:
Linux OpenWrt 2.6.32.27 #2 Fri Sep 14 17:12:10 CST 2012 mips GNU/Linux编译安装的软件如下:
opkg list-installed
base-files - 43.35-r33081
bash - 4.2-2
busybox - 1.15.3-3.4
crda - 1.1.1-1
ddns-scripts - 1.0.0-18
dnsmasq - 2.55-6.1
dropbear - 0.53.1-6
gpioctl - 1.0-1
hotplug2 - 1.0-beta-3
ip - 2.6.29-1-2
iptables - 1.4.6-3.1
iptables-mod-conntrack - 1.4.6-3.1
iptables-mod-conntrack-extra - 1.4.6-3.1
iptables-mod-extra - 1.4.6-3.1
iptables-mod-filter - 1.4.6-3.1
iptables-mod-hashlimit - 1.4.6-3.1
iptables-mod-imq - 1.4.6-3.1
iptables-mod-ipopt - 1.4.6-3.1
iptables-mod-ipsec - 1.4.6-3.1
iptables-mod-nat - 1.4.6-3.1
iptables-mod-nat-extra - 1.4.6-3.1
iw - 0.9.22-2
kernel - 2.6.32.27-1
kmod-b43 - 2.6.32.27+2011-12-01-1
kmod-cfg80211 - 2.6.32.27+2011-12-01-1
kmod-crc-ccitt - 2.6.32.27-1
kmod-crypto-aes - 2.6.32.27-1
kmod-crypto-arc4 - 2.6.32.27-1
kmod-crypto-core - 2.6.32.27-1
kmod-fs-ext3 - 2.6.32.27-1
kmod-fs-ntfs - 2.6.32.27-1
kmod-fs-vfat - 2.6.32.27-1
kmod-ipt-conntrack - 2.6.32.27-1
kmod-ipt-conntrack-extra - 2.6.32.27-1
kmod-ipt-core - 2.6.32.27-1
kmod-ipt-extra - 2.6.32.27-1
kmod-ipt-filter - 2.6.32.27-1
kmod-ipt-hashlimit - 2.6.32.27-1
kmod-ipt-imq - 2.6.32.27-1
kmod-ipt-ipopt - 2.6.32.27-1
kmod-ipt-ipsec - 2.6.32.27-1
kmod-ipt-nat - 2.6.32.27-1
kmod-ipt-nat-extra - 2.6.32.27-1
kmod-mac80211 - 2.6.32.27+2011-12-01-1
kmod-macvlan - 2.6.32.27-1
kmod-nls-base - 2.6.32.27-1
kmod-nls-cp437 - 2.6.32.27-1
kmod-nls-iso8859-1 - 2.6.32.27-1
kmod-nls-utf8 - 2.6.32.27-1
kmod-ppp - 2.6.32.27-1
kmod-pppoe - 2.6.32.27-1
kmod-sched - 2.6.32.27-1
kmod-scsi-core - 2.6.32.27-1
kmod-switch - 2.6.32.27-4
kmod-textsearch - 2.6.32.27-1
kmod-usb-core - 2.6.32.27-1
kmod-usb-ohci - 2.6.32.27-1
kmod-usb-storage - 2.6.32.27-1
kmod-usb2 - 2.6.32.27-1
l7-protocols - 2009-05-28-1
libc - 0.9.30.1-43.35
libevent2 - 2.0.16-1
libgcc - 4.3.3+cs-43.35
libip4tc - 1.4.6-3.1
libiwinfo - 18.2
libiwinfo-lua - 18.2
liblua - 5.1.4-7
libncurses - 5.7-2
libnl-tiny - 0.1-2.1
libopenssl - 0.9.8x-1
libpcap - 1.0.0-2
libpthread - 0.9.30.1-43.35
librt - 0.9.30.1-43.35
libuci - 12012009.7-4
libuci-lua - 12012009.7-4
libxtables - 1.4.6-3.1
lrzsz - 0.12.20-2
lua - 5.1.4-7
luci-app-ddns - 0.10+svn9273-1
luci-i18n-chinese - 0.10+svn9273-1
luci-i18n-english - 0.10+svn9273-1
luci-lib-core - 0.10+svn9273-1
luci-lib-ipkg - 0.10+svn9273-1
luci-lib-lmo - 0.10+svn9273-1
luci-lib-nixio - 0.10+svn9273-1
luci-lib-sys - 0.10+svn9273-1
luci-lib-web - 0.10+svn9273-1
luci-mod-admin-core - 0.10+svn9273-1
luci-mod-admin-full - 0.10+svn9273-1
luci-proto-core - 0.10+svn9273-1
luci-proto-ppp - 0.10+svn9273-1
luci-sgi-cgi - 0.10+svn9273-1
luci-sgi-uhttpd - 0.10+svn9273-1
luci-theme-base - 0.10+svn9273-1
luci-theme-openwrt - 0.10+svn9273-1
mtd - 13
openssh-client - 5.9p1-4
opkg - 576-2
ppp - 2.4.4-16.1
ppp-mod-pppoe - 2.4.4-16.1
tc - 2.6.29-1-2
tcpdump - 4.1.1-2
tmux - 1.6-2
uci - 12012009.7-4
udevtrigger - 106-1
uhttpd - 28.1
uhttpd-mod-lua - 28.1
wireless-tools - 29-4
wpad-mini - 20111103-3
zlib - 1.2.3-5IPID及TTL使用参数参考:Openwrt/Linux使用IPID和TTL模块防网络尖兵。
Openwrt更改shell为bash使用bash-completion命令补全
发布时间:September 11, 2012 // 分类:OpenWrt // 1 Comment
OpenWRT安装bash及bash-completion:
#https://www.haiyun.me
opkg update
opkg install bash-completion
更改用户shell为bash:
cat /etc/passwd
root:AABBBDDDdDDDDDDDDDD42fmHU/:0:0:root:/root:/bin/bash
配置bash-completion命令参数补全:
echo '. /etc/bash_completion' >> /etc/bashrc在使用命令补全时如出现以下错误:
-bash: /dev/fd/60: No such file or directory创建/dev/fd链接:
ln -s /proc/self/fd /dev/fd分类
- Apache (13)
- Nginx (45)
- PHP (86)
- IIS (8)
- Mail (17)
- DNS (16)
- Cacti (14)
- Squid (5)
- Nagios (4)
- Puppet (7)
- CentOS (13)
- Iptables (23)
- RADIUS (3)
- OpenWrt (41)
- DD-WRT (1)
- VMware (9)
- 网站程序 (2)
- 备份存储 (11)
- 常用软件 (20)
- 日记分析 (10)
- Linux基础 (18)
- 欧诺代理 (0)
- Linux服务 (18)
- 系统监控 (4)
- 流量监控 (7)
- 虚拟化 (28)
- 伪静态 (2)
- LVM (3)
- Shell (18)
- 高可用 (2)
- 数据库 (16)
- FreeBSD (3)
- 网络安全 (25)
- Windows (35)
- 网络工具 (22)
- 控制面板 (3)
- 系统调优 (10)
- Cisco (3)
- VPN (6)
- ROS (20)
- Vim (14)
- KMS (4)
- PXE (2)
- Mac (1)
- Git (1)
- PE (1)
- LNS (2)
- Xshell (7)
- Firefox (13)
- Cygwin (4)
- OpenSSL (9)
- Sandboxie (3)
- StrokesPlus (1)
- AutoHotKey (4)
- Total Commander (3)
- WordPress (3)
- iMacros (6)
- Typecho (2)
- Ollydbg (1)
- Photoshop (1)
- 正则 (3)
- Debian (3)
- Python (8)
- NoSQL (6)
- 消息队列 (4)
- JS (7)
- Tmux (3)
- GO (7)
- HHVM (2)
- 算法 (1)
- Docker (2)
- PT (15)
- N1 (16)
- K2P (6)
- LUKS (4)
最新文章
- 更新nextcloud及插件
- debian 12开机关机systemd-journald日志不连续解决
- debian12下initramfs-tools使用udhcpc配置dhcp ip
- dns压力测试工具queryperf使用
- sandboxie plus运行firefox 140播放视频全屏不能覆盖任务栏
- TEWA-1100G光猫使用
- 烽火光猫HG5382A3使用
- 记联通更换移动XG-040G-MD光猫
- smokeping slave同步错误illegal attempt to update using time解决
- 使用valgrind定位解决smartdns内存泄露
最近回复
- 海运: 可能版本问题
- 海运: 如果运营商限制型号
- 海运: 没有
- Mruru: 烽火猫切换rootfs的方法有么大佬?
- nono: 修改光猫型号是做啥子用的
- 960: root账号默认密码hg2x0 不对哇
- rer: 感谢分享!~
- opnfense: 谢谢博主!!!解决问题了!!!我之前一直以为内置的odhcp6就是唯一管理ipv6的方式
- liyk: 这个方法获取的IPv6大概20分钟之后就会失效,默认路由先消失,然后Global IPV6再消失
- 海运: 不好意思,没有。
归档
- June 2026
- November 2025
- October 2025
- August 2025
- March 2025
- February 2025
- August 2024
- May 2024
- February 2024
- January 2024
- December 2023
- November 2023
- October 2023
- September 2023
- August 2023
- May 2023
- April 2023
- February 2023
- January 2023
- December 2022
- September 2022
- July 2022
- April 2022
- March 2022
- February 2022
- January 2022
- December 2021
- November 2021
- April 2021
- March 2021
- February 2021
- January 2021
- December 2020
- November 2020
- October 2020
- September 2020
- July 2020
- May 2020
- April 2020
- March 2020
- February 2020
- January 2020
- December 2019
- November 2019
- July 2019
- April 2019
- March 2019
- February 2019
- January 2019
- December 2018
- November 2018
- October 2018
- September 2018
- August 2018
- July 2018
- June 2018
- April 2018
- March 2018
- February 2018
- January 2018
- December 2017
- October 2017
- September 2017
- August 2017
- July 2017
- April 2017
- March 2017
- February 2017
- January 2017
- December 2016
- November 2016
- July 2016
- June 2016
- November 2015
- October 2015
- September 2015
- August 2015
- July 2015
- June 2015
- May 2015
- April 2015
- March 2015
- February 2015
- January 2015
- December 2014
- November 2014
- October 2014
- September 2014
- August 2014
- July 2014
- June 2014
- May 2014
- April 2014
- March 2014
- February 2014
- January 2014
- December 2013
- November 2013
- October 2013
- August 2013
- July 2013
- June 2013
- May 2013
- April 2013
- March 2013
- February 2013
- January 2013
- December 2012
- November 2012
- October 2012
- September 2012
- August 2012
- July 2012
- June 2012
- May 2012
- April 2012
- March 2012
- February 2012
- October 2011
- September 2011
- August 2011
- July 2011