Linux服务器TCP连接状态查看及详细说明
发布时间:September 30, 2012 // 分类:网络工具 // No Comments
Linux下统计当前TCP连接状态:
netstat -ant | awk '{print $NF}' | grep -v '[a-z]' | sort | uniq -c
33 ESTABLISHED
3 FIN_WAIT2
7 LISTEN
221 TIME_WAIT
TCP连接状态说明:
#https://www.haiyun.me
LISTEN:服务器正在监听的端口
SYN_SENT:客户发出新连线请求后,还未收到服务器回应;
SYN_RECV:服务器接收到新连线请求;
ESTABLISED:已建立数据连接;
FIN_WAIT1:客户端主动断开请求,等待服务端ack确认
FIN_WAIT2:收到服务器端断开ack确认,等待服务端FIN;
TIME_WAIT:主动断开方发送最后ack后等待2MSL时间。
TCP的状态变迁图: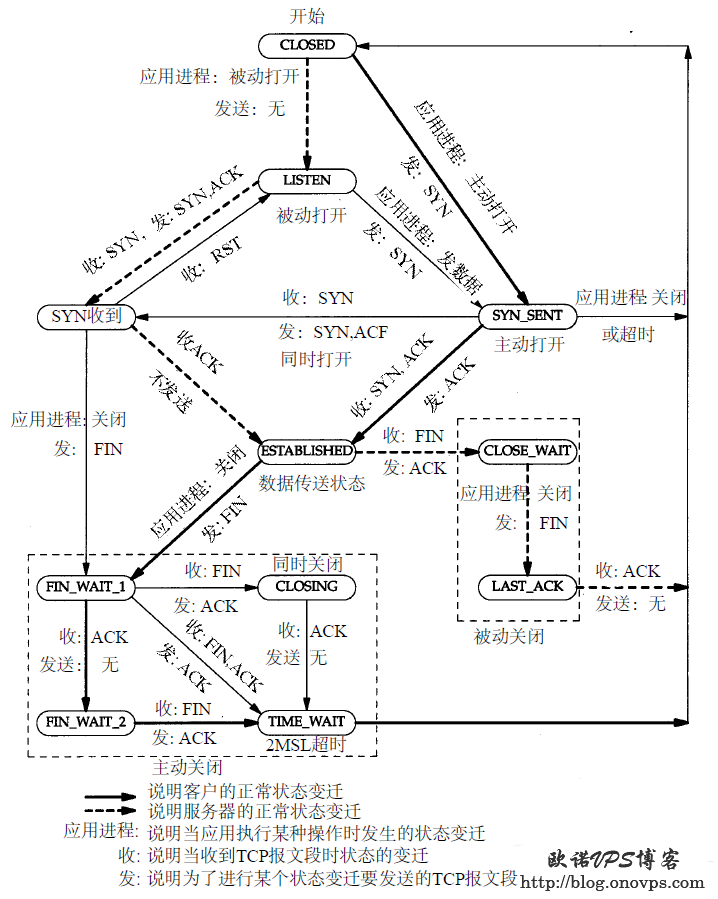
TCP连接建立和终止所对应的状态图: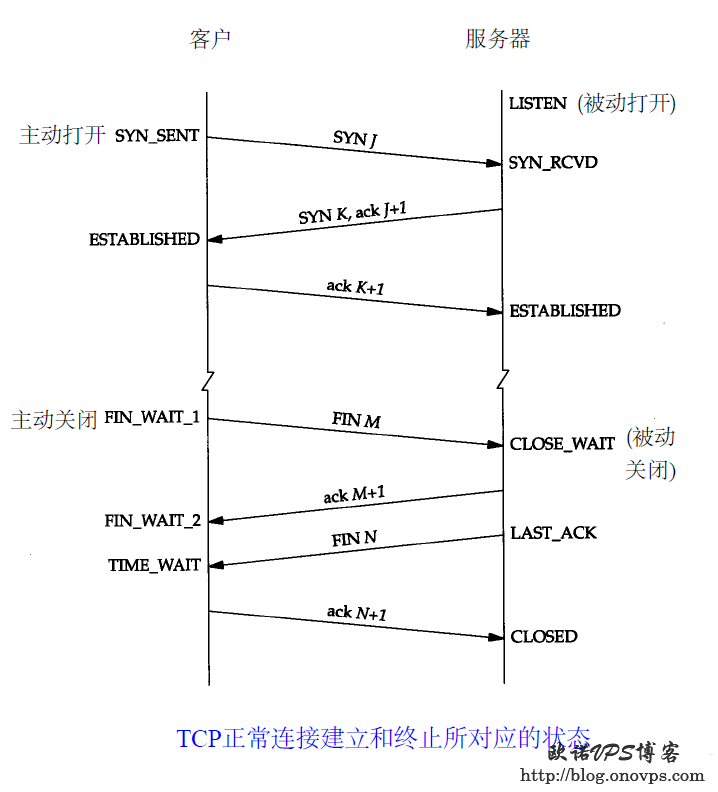
Centos5.8安装使用多功能网络工具hping3
发布时间:August 9, 2012 // 分类:网络工具 // No Comments
Hping3可以自定义发送多种类型的数据包,可以用来测试网络及服务器的安全。
Centos下安装:
yum install libpcap-devel tc-devel
ln -s /usr/include/pcap-bpf.h /usr/include/net/bpf.h
wget http://www.hping.org/hping3-20051105.tar.gz
tar zxvf hping3-20051105.tar.gz
cd hping3-20051105
./configure
make
make install
使用参数:
usage: hping host [options]
  -c  --count     包数量
  -i  --interval  包间隔,默认单位秒
      --fast      u10000,每秒10个,u单位微秒
      --faster    u1000,每秒100个
      --flood      疯狂模式,尽最大能力发包,不显示回应。
  -n  --numeric   不进行域名解析
  -q  --quiet     安静模式,不输出详细信息
  -I  --interface 指定网卡界面,默认为路由网卡
  -V  --verbose   输出详细信息
Mode
  default mode     TCP
  -0  --rawip      RAW IP mode
  -1  --icmp       ICMP mode
  -2  --udp        UDP mode
  -8  --scan       SCAN mode.
  -9  --listen     listen mode
IP
  -a  --spoof      源地址欺骗
  --rand-dest      随机目标地址
  --rand-source    随机源地址
  -t  --ttl        TTL数值,默认64
  -N  --id         设定ID,默认随机
ICMP
  -C  --icmptype   ICMP类型,默认请求
  -K  --icmpcode   ICMP代码,如0请求,8回显请求
      --force-icmp 强制ICMP
      --icmp-gw    ICMP重定向
UDP/TCP
  -s  --baseport   源端口,默认随机
  -p  --destport   目标端口,默认0
  -k  --keep       保持源端口
  -M  --setseq     set TCP sequence number
  -L  --setack     set TCP ack
  -F  --fin        set FIN flag
  -S  --syn        set SYN flag
  -R  --rst        set RST flag
  -P  --push       set PUSH flag
  -A  --ack        set ACK flag
  -U  --urg        set URG flag
Common
  -d  --data       数据大小,默认0
  -E  --file       从文件中发送
应用示例:
端口扫描:
hping3 --scan 1-100 -S 192.168.1.1
Scanning 192.168.1.1 (192.168.1.1), port 1-100
100 ports to scan, use -V to see all the replies
+----+-----------+---------+---+-----+-----+-----+
|port| serv name |  flags  |ttl| id  | win | len |
+----+-----------+---------+---+-----+-----+-----+
   21 ftp        : .S..A...  64     0  5840    46
   22 ssh        : .S..A...  64     0  5840    46
   53 domain     : .S..A...  64     0  5840    46
   80 www        : .S..A...  64     0  5840    46
All replies received. Done.
SYN Flooding
hping -S -i u1000 192.168.1.1 -a 8.8.8.8ICMP Flooding
hping -1 -i u1000 192.168.1.1 -a 8.8.8.8HTTP性能测试工具httping
发布时间:August 2, 2012 // 分类:网络工具 // No Comments
Httping是一款类似于ping的http响应测试工具,可用于HTTP测试及监控。
安装:
wget http://www.vanheusden.com/httping/httping-1.5.3.tgz
tar zxvf httping-1.5.3.tgz
cd httping-1.5.3
make install
使用参数:
-g url         url (e.g. -g http://localhost/)
-h hostname    hostname (e.g. localhost)
-p portnr      portnumber (e.g. 80)
-x host:port   hostname+portnumber of proxyserver
-c count       how many times to connect
-i interval    delay between each connect, can be only smaller than 1 if user is root
-t timeout     timeout (default: 30s)
-Z             ask any proxies on the way not to cache the requests
-Q             use a persistent connection. adds a 'C' to the output if httping had to reconnect
-6             use IPv6
-s             show statuscodes
-S             split time in connect-time and processing time
-G             do a GET request instead of HEAD (read the
               contents of the page as well)
-b             show transfer speed in KB/s (use with -G)
-B             like -b but use compression if available
-L x           limit the amount of data transferred (for -b)
               to 'x' (in bytes)
-X             show the number of KB transferred (for -b)
-l             connect using SSL
-z             show fingerprint (SSL)
-f             flood connect (no delays)
-a             audible ping
-m             give machine parseable output (see
               also -o and -e)
-o rc,rc,...   what http results codes indicate 'ok'
               coma seperated WITHOUT spaces inbetween
               default is 200, use with -e
-e str         string to display when http result code
               doesn't match
-I str         use 'str' for the UserAgent header
-R str         use 'str' for the Referer header
-r             resolve hostname only once (usefull when
               pinging roundrobin DNS: also takes the first
               DNS lookup out of the loop so that the first
               measurement is also correct)
-n warn,crit   Nagios-mode: return 1 when avg. response time
               >= warn, 2 if >= crit, otherwhise return 0
-N x           Nagios mode 2: return 0 when all fine, 'x'
               when anything failes
-y ip[:port]   bind to ip-address (and thus interface) [/port]
-q             quiet, only returncode
-A             Activate Basic authentication
-U Username    needed for authentication
-P Password    needed for authentication
-C cookie=value Add a cookie to the request
-V             show the version
应用示例:
httping -S -G -s -b -c 5 www.qq.com
PING www.qq.com:80 (www.qq.com):
connected to 125.39.127.25:80 (285 bytes), seq=0 time=38.88+723.79=762.67 ms 200 OK 381KB/s
connected to 125.39.207.172:80 (285 bytes), seq=1 time=35.89+729.76=765.64 ms 200 OK 378KB/s
connected to 111.161.48.38:80 (285 bytes), seq=2 time=34.50+1231.31=1265.82 ms 200 OK 219KB/s
connected to 111.161.48.39:80 (285 bytes), seq=3 time=39.15+779.30=818.45 ms 200 OK 355KB/s
connected to 111.161.48.52:80 (285 bytes), seq=4 time=42.51+763.95=806.46 ms 200 OK 364KB/s
--- www.qq.com ping statistics ---
5 connects, 5 ok, 0.00% failed
round-trip min/avg/max = 762.7/883.8/1265.8 ms
Transfer speed: min/avg/max = 219/340/381 KB
Linux网络工具之tcpdump使用
发布时间:May 3, 2012 // 分类:网络工具 // No Comments
Tcpdump使用语法:
tcpdump [ -adeflnNOpqStvx ] [ -c count ] [ -F file ][ -i interface ] [ -r file ] [ -w file ]参数:
-c 指定监听的封包数,默认持续监听。
-e 显示链路层报头
-nn 以数字方式显示IP及端口
-i 指定监听的网卡
-F 读取文件内的过滤参数
-q 快速输出模式
-l 使标准输出变为行缓冲形式,用于重定向分析
-w 数据包保存为文件
-r 读取保存的数据包
-A 以ASCII编码显示数据包
-x 以十六进制显示
-s 指定抓包显示一行的宽度,-s0表示显示完整的包
应用举例:
1.监听单个IP的所有TCP通信
#https://www.haiyun.me
tcpdump tcp -nn -v host 192.168.1.16
2.监听指定IP间的ARP通信
tcpdump arp -nn -v host 192.168.1.16 and 192.168.1.13.监听DNS查询数据包
tcpdump udp port 534.监听目标端口80的数据包
tcpdump -A -v dst port 80 5.监听指定IP目标80端口的数据包
tcpdump -A -v -s 0 host 192.168.1.235 and dst port 806.监听特定TCP标志的数据包
tcpdump tcp[tcpflags]=tcp-syn
#syn ack
tcpdump 'tcp[13] = 18'
7.监听HTTP HEAD:
#GET
tcpdump -s 0 -A 'tcp[((tcp[12:1] & 0xf0) >> 2):4] = 0x47455420'
#POST
tcpdump -s 0 -A 'tcp dst port 80 and (tcp[((tcp[12:1] & 0xf0) >> 2):4] = 0x504f5354)'
#所有HEAD
tcpdump -A -s 0 'tcp port 80 and (((ip[2:2] - ((ip[0]&0xf)<<2)) - ((tcp[12]&0xf0)>>2)) != 0)'分类
- Apache (13)
- Nginx (45)
- PHP (86)
- IIS (8)
- Mail (17)
- DNS (16)
- Cacti (14)
- Squid (5)
- Nagios (4)
- Puppet (7)
- CentOS (13)
- Iptables (23)
- RADIUS (3)
- OpenWrt (41)
- DD-WRT (1)
- VMware (9)
- 网站程序 (2)
- 备份存储 (11)
- 常用软件 (20)
- 日记分析 (10)
- Linux基础 (18)
- 欧诺代理 (0)
- Linux服务 (18)
- 系统监控 (4)
- 流量监控 (7)
- 虚拟化 (28)
- 伪静态 (2)
- LVM (3)
- Shell (18)
- 高可用 (2)
- 数据库 (16)
- FreeBSD (3)
- 网络安全 (25)
- Windows (35)
- 网络工具 (22)
- 控制面板 (3)
- 系统调优 (10)
- Cisco (3)
- VPN (6)
- ROS (20)
- Vim (14)
- KMS (4)
- PXE (2)
- Mac (1)
- Git (1)
- PE (1)
- LNS (2)
- Xshell (7)
- Firefox (13)
- Cygwin (4)
- OpenSSL (9)
- Sandboxie (3)
- StrokesPlus (1)
- AutoHotKey (4)
- Total Commander (3)
- WordPress (3)
- iMacros (6)
- Typecho (2)
- Ollydbg (1)
- Photoshop (1)
- 正则 (3)
- Debian (3)
- Python (8)
- NoSQL (6)
- 消息队列 (4)
- JS (7)
- Tmux (3)
- GO (7)
- HHVM (2)
- 算法 (1)
- Docker (2)
- PT (15)
- N1 (16)
- K2P (6)
- LUKS (4)
最新文章
- debian 12开机关机systemd-journald日志不连续解决
- debian12下initramfs-tools使用udhcpc配置dhcp ip
- dns压力测试工具queryperf使用
- sandboxie plus运行firefox 140播放视频全屏不能覆盖任务栏
- TEWA-1100G光猫使用
- 烽火光猫HG5382A3使用
- 记联通更换移动XG-040G-MD光猫
- smokeping slave同步错误illegal attempt to update using time解决
- 使用valgrind定位解决smartdns内存泄露
- 此内容被密码保护