海运的博客

使用mitmproxy透明代理监听/修改HTTP/HTTPS请求

发布时间:September 7, 2015 // 分类:网络安全,网络工具 // No Comments

安装:

yum install python-devel libxml2-devel libxslt-devel libffi-devel libjpeg-devel openssl-devel python-pip
pip install mitmproxy 

启动透明代理模式:

mitmproxy -T --host

端口重定向:

iptables -t nat -A PREROUTING -i eno16777736 -p tcp --dport 80 -j REDIRECT --to-port 8080
iptables -t nat -A PREROUTING -i eno16777736 -p tcp --dport 443 -j REDIRECT --to-port 8080

数据转发:

echo 1 > /proc/sys/net/ipv4/ip_forward

导入CA证书:

ls ~/.mitmproxy/
mitmproxy-ca-cert.cer  linux下
mitmproxy-ca-cert.p12  windows下
mitmproxy-ca-cert.pem  android下
mitmproxy-ca.pem  
mitmproxy-dhparam.pem

非本机将网关设置为本机IP,开始。
参考:http://liuxiang.logdown.com/posts/192057-use-mitmproxy-to-monitor-http-requests

Nginx下多网站单独php-fpm进程目录权限防跨站

发布时间:March 6, 2013 // 分类:Nginx,PHP,网络安全 // No Comments

Nginx下开多个虚拟机网站防跨站是首要的任务,PHP5.3之前的版本不支持open_basedir,只能通过控制PHP-cgi进程及目录用户权限进行限制,防止跨站访问。

先了解一下网站正常运行所用到的用户、目录权限:
Nginx进程运行用户:接收用户请求,处理静态文件,如果是PHP则转给PHP-CGI处理,网站目录拥有读权限。
PHP-cgi进程用户:处理PHP文件,网站目录拥有读权限,个别目录需要写入权限。

让每个网站使用单独的PHP-CGI进程,创建PHP-FPM配置文件,修改以下:

<value name="pid_file">/usr/local/php/logs/php-fpm.pid</value>
<value name="error_log">/usr/local/php/logs/php-fpm.log</value>
<value name="listen_address">/tmp/www.haiyun.me.sock</value>
<value name="user">www.onovp.com</value>  #PHP-CGI运行用户组
<value name="group">www.haiyun.me</value>

启动PHP-CGI进程:

/usr/local/php/bin/php-cgi --fpm --fpm-config /usr/local/php/etc/www.haiyun.me.conf

设置网站目录权限,设Nginx运行用户为www:

chown -R www.haiyun.me:www /home/wwwroot/www.haiyun.me
chmod -R 550 /home/wwwroot/www.haiyun.me
chmod 701 /home/wwwroot/

再修改Nginx网站配置文件,解析PHP所使用的PHP-CGI进程:

location ~ .*\.(php|php5)?$
{
fastcgi_pass  unix:/tmp/www.haiyun.me.sock;
fastcgi_index index.php;
include fcgi.conf;
}

php-cgi进程简单管理脚本:

#! /bin/sh
# chkconfig: 2345 55 25
#https://www.haiyun.me
cgi=/usr/local/php/bin/php-cgi
case "$1" in
    start)
        for conf in `ls /usr/local/php/etc/*.conf`
        do
            $cgi --fpm --fpm-config $conf
        done
    ;;

    stop)
        for pid in `ls /usr/local/php/logs/*.pid`
        do
                kill -TERM `cat $pid`
        done
    ;;

    restart)
        $0 stop
        $0 start
    ;;


    *)
        echo "Usage: $0 {start|stop|restart}"
        exit 1
    ;;

esac

Windows 2003服务器安全设置

发布时间:November 10, 2012 // 分类:网络安全,Windows // No Comments

1.计算机安全策略设置(gpedit.msc)
Windows设置——>安全设置——>账户策略——>账户锁定策略:

账户锁定阀值:3次无效登录
账户锁定时间:30分钟
复位账户锁定计时器:30分钟之后

本地策略——>安全选项:

交互式登陆:不显示上次的用户名          启用
帐户:重命名来宾帐户            重命名
帐户:重命名系统管理员帐户         重命名

本地策略——>审核策略:

审核策略更改   成功 失败  
审核登录事件   成功 失败
审核对象访问      失败
审核过程跟踪   无审核
审核目录服务访问    失败
审核特权使用      失败
审核系统事件   成功 失败
审核账户登录事件 成功 失败
审核账户管理   成功 失败

本地策略——>用户权限分配:

从网络访问此计算机:保留Guest组、IIS-WPG组。
关闭系统:只有Administrators组、其它全部删除。
通过终端服务拒绝登陆:加入Guests、User组
通过终端服务允许登陆:只加入Administrators组,其他全部删除

2.禁用不必要的服务:

#https://www.haiyun.me
Computer Browser
DHCP Client
Error reporting service
PrintSpooler
Remote Registry
Remote Desktop Help Session Manager
TCP/IP NetBIOS Helper
Help and Support
Windows Audio
Server
Workstation

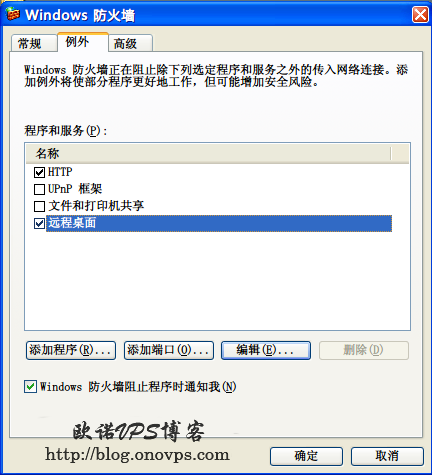
3.开启防火墙或TCP/IP筛选:
windows2003安全设置TCP-IP筛选.png
windows2003安全防火墙设置.png
4.修改3389远程桌面端口:

REG ADD "HKLM\SYSTEM\CurrentControlSet\Control\Terminal Server\Wds\rdpwd\Tds\tcp" /v PortNumber /t 
REG_DWORD /d $newport /f
REG ADD "HKLM\SYSTEM\CurrentControlSet\Control\Terminal Server\WinStations\RDP-Tcp" /v PortNumber /t 
REG_DWORD /d $newport /f
#然后关闭并重新启动远程桌面,远程连接操作请重新启动系统生效。
REG ADD "HKLM\SYSTEM\CurrentControlSet\Control\Terminal Server" /v fDenyTSConnections /t 
REG_DWORD /d 1 /f
REG ADD "HKLM\SYSTEM\CurrentControlSet\Control\Terminal Server" /v fDenyTSConnections /t 
REG_DWORD /d 0 /f

5.IIS新建网站时尽量新建不同的用户,并权限最小化:

网站匿名访问用户属于Guest群组
应用程序池标记用户属于IIS_WPG群组
网站目录仅保留系统管理员网站用户权限

6.系统目录权限:

C:\administrators/system全部权限,继承到下级目录。
C:\Program Files\Common Files 开放Everyone,默认的读取及运行,列出文件目录,读取三个权限。
C:\Windows\ 开放USERS默认的读取及运行,列出文件目录,读取三个权限。
C:\Windows\Temp 开放Everyone 修改,读取及运行,列出文件目录,读取,写入权限。

7.禁用不安全的组件、调整ASP.NET安全级别防WebShell木马
8.使用UrlScan应用防火墙过滤链接
9.SQL2000数据库服务器安全设置

Centos服务器安全配置SSH使用Google Authenticator二次验证

发布时间:August 30, 2012 // 分类:网络安全 // 2 Comments

CentOS安装所需组件:

yum -y install mercurial pam-devel

安装Google Authenticator:

#https://www.haiyun.me
wget --no-check-certificate https://google-authenticator.googlecode.com/files/libpam-google-authenticator-1.0-source.tar.bz2
tar jxvf libpam-google-authenticator-1.0-source.tar.bz2 
cd libpam-google-authenticator-1.0
make
make install

SSH登录时调用google-authenticator模块,编辑:

/etc/pam.d/sshd

第一行添加:

auth       required     pam_google_authenticator.so

修改SSH配置文件:

vim /etc/ssh/sshd_config

添加或修改以下内容:

ChallengeResponseAuthentication yes
UsePAM yes

重启SSH:

/etc/init.d/sshd restart

生成google-authenticator配置,运行:

google-authenticator 
Do you want authentication tokens to be time-based (y/n) y
https://www.google.com/chart?chs=200x200&chld=M|0&cht=qr&chl=otpauth://totp/root@node1.www.haiyun.me%3Fsecret%3DABEXG5K6CVB56BXY
#此网址为生成的二维码,客户端扫描
Your new secret key is: www.haiyun.me
Your verification code is 582849
Your emergency scratch codes are:
  30776626
  14200155
  80795568
  23936997
  21919909
#上面几行数字为应急码
Do you want me to update your "/root/.google_authenticator" file (y/n) y
#更新配置文件
Do you want to disallow multiple uses of the same authentication
token? This restricts you to one login about every 30s, but it increases
your chances to notice or even prevent man-in-the-middle attacks (y/n) y
#禁止一个口令多用
By default, tokens are good for 30 seconds and in order to compensate for
possible time-skew between the client and the server, we allow an extra
token before and after the current time. If you experience problems with poor
time synchronization, you can increase the window from its default
size of 1:30min to about 4min. Do you want to do so (y/n) n
#客户端与服务器时间误差
If the computer that you are logging into isn't hardened against brute-force
login attempts, you can enable rate-limiting for the authentication module.
By default, this limits attackers to no more than 3 login attempts every 30s.
Do you want to enable rate-limiting (y/n) y
#次数限制

Android安装google-authenticator客户端,扫描添加上方网址的二维码,以后在登录服务器时输入账号密码的同时还需输入google-authenticator即时生成的验证码才能登录。

ssh www.haiyun.me
Verification code: 
Password: 

Linux防止ARP欺骗攻击

发布时间:August 6, 2012 // 分类:网络安全 // No Comments

之前有介绍ARP攻击测试查找ARP攻击源,本次记录下如何防止ARP攻击。
1.ARP网关欺骗攻击解决,静态绑定网关MAC与IP

arp -s 192.168.1.1 00:1f:a3:65:55:8d

2.客户端MAC被恶意冒充,安装arpoison持续向网关发送正确的本机MAC地址,以毒攻毒。
Centos下arpoison安装:

yum install libnet libnet-devel
wget http://www.arpoison.net/arpoison-0.6.tar.gz
tar zxvf arpoison-0.6.tar.gz 
cd arpoison
gcc arpoison.c /usr/lib/libnet.so -o arpoison
mv arpoison /usr/bin/

使用参数:

arpoison -d 192.168.1.1 -s 192.168.1.229 -t 00:1F:A3:65:55:8D -r 00:0C:29:E7:CC:3B -w 10
-d #目标IP
-s #源IP
-t #目标MAC
-r #源MAC
-w #发送间隔
-n #发送次数

使用tcpdump监听下看看效果:

 tcpdump arp -n
tcpdump: verbose output suppressed, use -v or -vv for full protocol decode
listening on eth0, link-type EN10MB (Ethernet), capture size 65535 bytes
17:07:34.358289 ARP, Reply 192.168.1.229 is-at 00:0c:29:e7:cc:3b, length 46
17:07:35.359869 ARP, Reply 192.168.1.229 is-at 00:0c:29:e7:cc:3b, length 46
17:07:36.360472 ARP, Reply 192.168.1.229 is-at 00:0c:29:e7:cc:3b, length 46
17:07:37.361108 ARP, Reply 192.168.1.229 is-at 00:0c:29:e7:cc:3b, length 46

使用arping也可实现此功能,不过不能指定目标MAC。

arping -U -I eth0 -s 192.168.1.229 192.168.1.1
分类
最新文章
最近回复
  • opnfense: 谢谢博主!!!解决问题了!!!我之前一直以为内置的odhcp6就是唯一管理ipv6的方式
  • liyk: 这个方法获取的IPv6大概20分钟之后就会失效,默认路由先消失,然后Global IPV6再消失
  • 海运: 不好意思,没有。
  • zongboa: 您好,請問一下有immortalwrt設定guest Wi-Fi的GUI教學嗎?感謝您。
  • 海运: 恩山有很多。
  • swsend: 大佬可以分享一下固件吗,谢谢。
  • Jimmy: 方法一 nghtp3步骤需要改成如下才能编译成功: git clone https://git...
  • 海运: 地址格式和udpxy一样,udpxy和msd_lite能用这个就能用。
  • 1: 怎么用 编译后的程序在家里路由器内任意一台设备上运行就可以吗?比如笔记本电脑 m参数是笔记本的...
  • 孤狼: ups_status_set: seems that UPS [BK650M2-CH] is ...