海运的博客

linux下修复硬盘扇区错误及扫描坏道并修复

发布时间:December 30, 2020 // 分类: // No Comments

查看syslog日志发现有硬盘提示扇区错误:

Dec 30 07:08:27 ubuntu-20 kernel: [34767.158065] blk_update_request: critical medium error, 
dev sda, sector 1729898440 op 0x0:(READ) flags 0x0 phys_seg 1 prio class 0

badblocks查看出错的扇区数量,-b指定每次扫描的区块大小,设置为和扇区大小一致,1729898440为日志提示出错的扇区位置,1729898499指定扫描扇区的终止位置,扫描后可以看到共有8个扇区出错。

badblocks -b 512 /dev/sda 1729898499 1729898440
1729898440
1729898441
1729898442
1729898443
1729898444
1729898445
1729898446
1729898447

写入修复坏掉的扇区,注意会丢失之前的数据,如果有坏道硬盘会自动重映射坏掉的扇区。

badblocks -b 512 -w /dev/sda 1729898447 1729898440

扫描整盘,-b指定每次扫描的块大小,如果用于扇区写入为512,文件系统隔离为4096,-s显示进度,-v详细输出。

badblocks -b 512 -s -v -o badblocks.log /dev/sdf

读取生成的坏块列表使用badblocks写测试能否修复或重映射扇区。

<?php
$list = file('badblocks.log');
$arr = array();
$i = 0;
$last = 0;
foreach ($list as $v) {
  $v = trim($v);
  if (!$v) {
    continue;
  }
  if (!$last) {
    $arr[$i][] = $v;
    $last = $v;
    continue;
  }
  if (($v - $last) == 1) {
    $arr[$i][] = $v;
  } else {
    $i++;
    $arr[$i][] = $v;
  }
  $last = $v;
}
foreach ($arr as $vv) {
  if (count($vv) > 1) {
    $start = reset($vv);
    $end = end($vv);
  } else {
    $start = reset($vv);
    $end = reset($vv);
  }
  echo '/usr/sbin/badblocks -w -s -v /dev/sdf '."$end $start".PHP_EOL;
  shell_exec('/usr/sbin/badblocks -w -s -v /dev/sdf '."$end $start");
}

也可使用hdparm和dd写扇区:

hdparm --write-sector 77610960 --yes-i-know-what-i-am-doing /dev/sdf
dd if=/dev/zero of=/dev/sdf bs=512 seek=77610960 count=1

或重写整个硬盘:

dd iflag=fullblock oflag=direct conv=noerror,notrunc if=/dev/zero of=/dev/sdf bs=1M

对于不能修复的坏块让文件系统隔离,未经验证。

e2fsck -l badblocks.log /dev/sdf
mkfs -l badblocks.log /dev/sdf

参考:
https://zhuanlan.zhihu.com/p/31899347
https://www.linuxcool.com/badblocks
https://lug.ustc.edu.cn/wiki/linux_digest/badblocks/
https://tomjamescn.github.io/post/2019-06-16-repair-hard-disk-with-bad-sectors/
https://unix.stackexchange.com/questions/229354/how-to-ignore-write-errors-while-zeroing-a-disk/229362
https://superuser.com/questions/1322780/fix-or-reallocate-a-bad-sector
https://askubuntu.com/questions/751134/problems-restoring-damaged-sectors-on-hdd
ACME.sh使用ZeroSSL和Buypass根证书CA签发免费ssl证书

发布时间:December 25, 2020 // 分类: // No Comments

Let's Encrypt使用的DST Root CA X3根证书即将过期,而新根证书ISRG Root X1签发于2015年较新不被老设备信任,acme.sh最新版本支持zerossl和buypass签发证书,zerossl和buypass的根证书签发于2010年,相对支持的设备更多,申请方法:
安装acme.sh,先升级acme.sh到最新版本:

acme.sh --upgrade

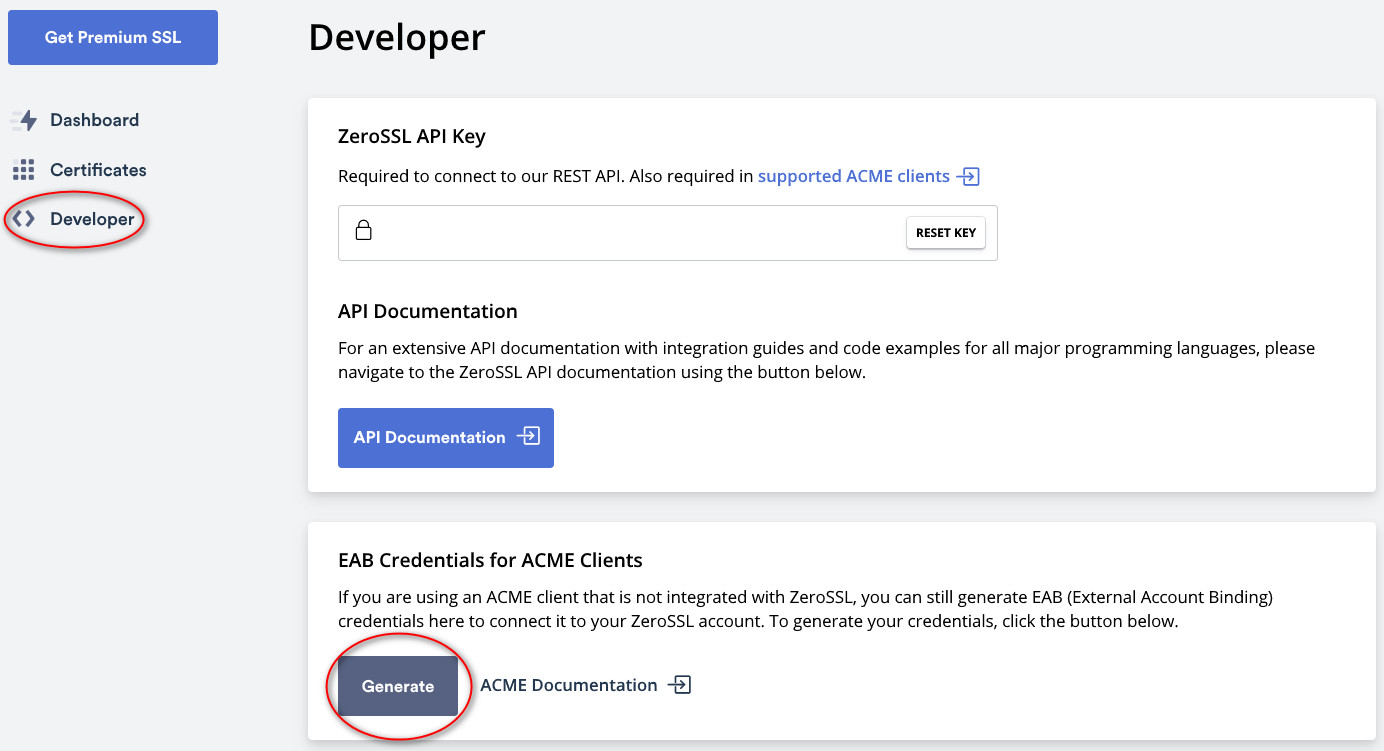
通过acme.sh申请zerossl免费证书,首先在zerossl官网注册账号并生成eab-kid和eab-hmac-key:
2020-12-25_083036.jpg

acme.sh注册zerossl:

acme.sh --register-account --server zerossl --eab-kid xxxxxxx --eab-hmac-key xxxxx  

指定server为zerossl申请ssl证书:

acme.sh --server zerossl --issue --dns dns_dp -d haiyun.me -d *.haiyun.me -k ec-256 --renew-hook "systemctl restart nginx" 

或设置默认CA为zerossl:

acme.sh --set-default-ca  --server zerossl                                                                                                                                                                                                          
acme.sh --issue --dns dns_dp -d haiyun.me -d *.haiyun.me -k ec-256 --renew-hook "systemctl restart nginx"    

acme.sh申请buypass免费ssl证书:

acme.sh --server https://api.buypass.com/acme/directory --register-account  --accountemail su@haiyun.me
acme.sh --server https://api.buypass.com/acme/directory --issue --dns dns_dp -d haiyun.me -d www.haiyun.me --renew-hook "systemctl restart nginx"    

参考:
https://ffis.me/archives/2110.html
https://luotianyi.vc/4839.html

linux/windows下检测mtu大小是否合适

发布时间:December 23, 2020 // 分类: // No Comments

指定ping数据大小,实际测试mtu为数据大小+IP头部20字节+icmp头部8字节,强制不分片如果大于实际mtu则返回错误。
linux下,pppoe mtu为1492,发送mtu 1500则返回错误并显示实际mtu:

 ping -s 1472 -M do 114.114.114.114
PING 114.114.114.114 (114.114.114.114) 1472(1500) bytes of data.
From 192.168.168.1 icmp_seq=1 Frag needed and DF set (mtu = 1492)
ping: local error: message too long, mtu=1492

windows下返回错误:

>ping -l 1472 -f 114.114.114.114

正在 Ping 114.114.114.114 具有 1472 字节的数据:
来自 192.168.1.1 的回复: 需要拆分数据包但是设置 DF。
需要拆分数据包但是设置 DF。

typecho配置nginx使用fastcgi cache缓存加速

发布时间:December 16, 2020 // 分类:Nginx // No Comments

安装nginx依赖扩展,当typecho更新时调用http-cache-purge删除缓存,当命中缓存时调用lua清除set-cookie head,防止缓存的设置cookie header发送给所有人。

apt install libnginx-mod-http-cache-purge libnginx-mod-http-lua

http内添加:

    fastcgi_cache_path /dev/shm/fastcgi_cache_dir levels=1:2 keys_zone=phpcache:100m inactive=30d max_size=200M;
    fastcgi_temp_path /dev/shm/fastcgi_cache_dir/temp;
    fastcgi_cache_use_stale error timeout invalid_header http_500;
    fastcgi_ignore_headers Cache-Control Expires Set-Cookie;

修改server段:

  set $skip_cache 0;
  #跳过缓存,post请求
  if ($request_method = POST) {
    set $skip_cache 1;
  }
  #url包含参数
  if ($query_string != "") {
    set $skip_cache 1;
  }
  #指定url
  if ($request_uri ~* ^(/admin/|/action/|/search/|/feed/)) {
    set $skip_cache 1;
  }
  #登录用户
  if ($http_cookie ~* "typecho_authCode") {
    set $skip_cache 1;
  }
  #$uri经过重写后会改变,通过lua提前复制到$permalink
  set_by_lua_block $permalink {
    return ngx.var.uri
  }
  location ~ .*\.php$
  {
    try_files $uri =404;
    astcgi_pass  127.0.0.1:9000;
    fastcgi_index index.php;
    include fastcgi.conf;

    fastcgi_cache_key $scheme$request_method$host$permalink;
    add_header Cache-State $upstream_cache_status;
    fastcgi_cache_bypass $skip_cache;
    fastcgi_no_cache $skip_cache;
    fastcgi_cache phpcache;
    fastcgi_cache_valid 200 301 302 30d;

    log_by_lua_file "/etc/nginx/ngx_lua_reqstatus/hook.lua";
    header_filter_by_lua_block {
      --if ngx.status == ngx.HTTP_OK then
        --ngx.header['Cache-State'] = ngx.var.upstream_cache_status
      --end
      if ngx.var.upstream_cache_status == "HIT" then
        ngx.header['Set-Cookie'] = nil
      end
    }
  }

  location ~ /xxx/_clean_cache(/.*) {
      fastcgi_cache_purge phpcache "$scheme$request_method$host$1";
  }

typecho清除缓存插件:
https://github.com/typecho-fans/plugins/tree/master/Ncache
typecho默认在用户评论后会在cookie内设置用户名和邮箱信息,并在服务端读取cookie在html内写入相关信息,这样用户信息被缓存所有人都可以看到,可参考下面方法修改模板用js读取cookie内用户信息。
https://cuojue.org/read/typecho_comments_author_javascript.html

ubuntu 20.04下nginx不支持tls1.0/tls1.1解决

发布时间:December 16, 2020 // 分类:Nginx // No Comments

在ubuntu 20.04下配置nginx ssl时怎么不支持tls1.0/1.1,确认配置文件无误怀疑是openssl的问题,原来是ubuntu 20.04/openssl 1.1.1默认禁用了不安全的tls协议,可以修改openssl配置文件开启。
patch:

--- openssl.cnf 2020-12-26 10:54:59.000000000 +0800
+++ /etc/ssl/openssl.cnf        2020-12-26 11:28:20.406439168 +0800
@@ -11,6 +11,8 @@
 # defined.
 HOME                   = .
 
+openssl_conf = default_conf
+
 # Extra OBJECT IDENTIFIER info:
 #oid_file              = $ENV::HOME/.oid
 oid_section            = new_oids
@@ -348,3 +350,13 @@
                                # (optional, default: no)
 ess_cert_id_alg                = sha1  # algorithm to compute certificate
                                # identifier (optional, default: sha1)
+
+[default_conf]
+ssl_conf = ssl_sect
+
+[ssl_sect]
+system_default = system_default_sect
+
+[system_default_sect]
+MinProtocol = TLSv1
+CipherString = DEFAULT:@SECLEVEL=1

或直接修改配置文件,openssl.cnf首部添加:

sed -i '1i openssl_conf = default_conf' /etc/ssl/openssl.cnf

尾部添加:

cat >> /etc/ssl/openssl.cnf << EOF
[default_conf]
ssl_conf = ssl_sect

[ssl_sect]
system_default = system_default_sect

[system_default_sect]
MinProtocol = TLSv1
CipherString = DEFAULT:@SECLEVEL=1
EOF

使用openssl测试是否支持tls1.0和1.1:

openssl s_client -connect www.haiyun.me:443 -tls1_1
openssl s_client -connect www.haiyun.me:443 -tls1

参考:
https://askubuntu.com/questions/1233186/ubuntu-20-04-how-to-set-lower-ssl-security-level

分类
最新文章
最近回复
  • opnfense: 谢谢博主!!!解决问题了!!!我之前一直以为内置的odhcp6就是唯一管理ipv6的方式
  • liyk: 这个方法获取的IPv6大概20分钟之后就会失效,默认路由先消失,然后Global IPV6再消失
  • 海运: 不好意思,没有。
  • zongboa: 您好,請問一下有immortalwrt設定guest Wi-Fi的GUI教學嗎?感謝您。
  • 海运: 恩山有很多。
  • swsend: 大佬可以分享一下固件吗,谢谢。
  • Jimmy: 方法一 nghtp3步骤需要改成如下才能编译成功: git clone https://git...
  • 海运: 地址格式和udpxy一样,udpxy和msd_lite能用这个就能用。
  • 1: 怎么用 编译后的程序在家里路由器内任意一台设备上运行就可以吗?比如笔记本电脑 m参数是笔记本的...
  • 孤狼: ups_status_set: seems that UPS [BK650M2-CH] is ...