海运的博客

Openwrt路由宽带多拨叠加及多线路wan负载均衡

发布时间:September 8, 2012 // 分类:OpenWrt // 2 Comments

OpenWRT使用macvlan虚拟多wan:

opkg update
opkg install kmod-macvlan
#https://www.haiyun.me
#eth1.1为wan接口
ip link add link eth1.1 eth1.2 type macvlan
ip link set eth1.2 address 00:1f:a3:65:55:2d
ip link set eth1.2 up
ip link add link eth1.1 eth1.3 type macvlan
ip link set eth1.3 address 00:1f:a3:65:55:3d
ip link set eth1.3 up    

拨号时写入脚本同时多拨,也可使用morfast修改的pppd提高多拨成功率,PPPD拨号参数:

/usr/sbin/pppd plugin rp-pppoe.so mtu 1492 mru 1492 nic-eth1.1 persist usepeerdns nodefaultroute \
user <user> password <passwd> ipparam wan ifname pppoe-wan1 &

多拨成功后配置多路由负载均衡:

ip route add default scope global nexthop via ip1 dev pppoe-wan1 weight 1 nexthop via ip2 dev \
pppoe-wan2 weight 1 nexthop via ip3 dev pppoe-wan3 weight 1

iptables添加SNAT:

iptables -t nat -A POSTROUTING -s 192.168.1.0/24 -o pppoe-wan1 -j MASQUERADE
iptables -t nat -A POSTROUTING -s 192.168.1.0/24 -o pppoe-wan2 -j MASQUERADE
iptables -t nat -A POSTROUTING -s 192.168.1.0/24 -o pppoe-wan3 -j MASQUERADE

一段时间后查看负载均衡效果:

iptables -t nat -L POSTROUTING -nv
Chain POSTROUTING (policy ACCEPT 1206 packets, 81303 bytes)
 pkts bytes target     prot opt in     out     source               destination         
 1948  158K MASQUERADE  all  --  *      pppoe-wan1  192.168.1.0/24       0.0.0.0/0           
 1943  159K MASQUERADE  all  --  *      pppoe-wan2  192.168.1.0/24       0.0.0.0/0           
 1912  559K MASQUERADE  all  --  *      pppoe-wan3  192.168.1.0/24       0.0.0.0/0

为公平分配可禁用路由缓存:

echo -1 > /proc/sys/net/ipv4/rt_cache_rebuild_count
另外可参考使用iptables nth标记策略路由实现负载均衡

Linux/Openwrt策略路由配置使用

发布时间:September 8, 2012 // 分类:OpenWrt // No Comments

Linux多可支持255个路由表,查看当前路由表:

ip rule ls
0:    from all lookup local 
32766:    from all lookup main 
32767:    from all lookup default 

根据源IP或目标IP选择路由表:

#新建路由表ID与名称映射
echo '252 haiyun' >> /etc/iproute2/rt_tables 
#设置源ip走特定路由表
ip rule add from 192.168.1.5 table haiyun pref 32764
#路由表默认路由
ip route add default via 192.168.1.2 dev pppoe-wan2 table haiyun
#刷新路由缓存
ip route flush cache

基于iptables标记选择路由表:

#iptables标记数据包
iptables -t mangle -APREROUTING -p udp --dport 53 -j MARK --set-mark 20
#iptables标记的数据包走特定路由表
ip rule add fwmark 20 table haiyun pref 32763
#路由表默认路由
ip route add default via 192.168.1.2 dev pppoe-wan2 table haiyun

查看当前路由表规则:

ip rule ls
0:    from all lookup local 
32764:    from 192.168.1.5 lookup haiyun
32765:    from all lookup main 
32766:    from all lookup main 
32767:    from all lookup default 

查看路由表haiyun下路由项:

ip route ls table haiyun
default via 192.168.1.2 dev eth1 

Linux/Openwrt路由安装配置UPNP服务提高迅雷下载速度

发布时间:September 7, 2012 // 分类:OpenWrt // 1 Comment

路由器下电脑为实现互联网端到端的连接需要配置DNAT(端口映射),UPNP就相当于自动化DNAT的实现,路由和客户端软件都需支持UPNP。
Openwrt路由下安装UPNP服务:

#https://www.haiyun.me
opkg update
opkg install miniupnpd

配置Iptables UPNP链,用于发现UPNP后在此链自动添加端口映射。

#允许特定转发
iptables -N MINIUPNPD
iptables -I FORWARD -i pppoe-wan -o br-lan -j MINIUPNPD
#DNAT端口映射
iptables -t nat -N MINIUPNPD
iptables -t nat -I PREROUTING -i pppoe-wan -j MINIUPNPD

UPNP配置文件:

cat /var/etc/miniupnpd.conf 
#https://www.haiyun.me
ext_ifname=pppoe-wan
listening_ip=192.168.1.1
port=5000
enable_natpmp=yes
enable_upnp=yes
secure_mode=yes
system_uptime=yes
bitrate_down=28672000
bitrate_up=2867200
uuid=a107991c-8b19-4ce4-a525-36bd2c814165
allow 1024-65535 0.0.0.0/0 1024-65535
deny 0-65535 0.0.0.0/0 0-65535

开启UPNP服务:

/etc/init.d/miniupnpd enable
/etc/init.d/miniupnpd start

使用迅雷开启UPNP测试,查看日志UPNP服务已为迅雷添加端口映射:

Sep  7 19:06:01 OpenWrt daemon.info miniupnpd[7232]: HTTP connection from 192.168.1.16:45067
Sep  7 19:06:01 OpenWrt daemon.info miniupnpd[7232]: HTTP REQUEST : POST /ctl/IPConn (HTTP/1.1)
Sep  7 19:06:01 OpenWrt daemon.info miniupnpd[7232]: SOAPAction: urn:schemas-upnp-org:service:WANIPConnection:1#AddPortMapping
Sep  7 19:06:01 OpenWrt daemon.info miniupnpd[7232]: AddPortMapping: ext port 65379 to 192.168.1.16:65379 protocol TCP for: Thunder5
Sep  7 19:06:01 OpenWrt daemon.debug miniupnpd[7232]: UPnP permission rule 0 matched : port mapping accepted
Sep  7 19:06:01 OpenWrt daemon.info miniupnpd[7232]: redirecting port 65379 to 192.168.1.16:65379 protocol TCP for: Thunder5
Sep  7 19:06:01 OpenWrt daemon.info miniupnpd[7232]: HTTP connection from 192.168.1.16:45068
Sep  7 19:06:01 OpenWrt daemon.info miniupnpd[7232]: HTTP REQUEST : POST /ctl/IPConn (HTTP/1.1)
Sep  7 19:06:01 OpenWrt daemon.info miniupnpd[7232]: SOAPAction: urn:schemas-upnp-org:service:WANIPConnection:1#AddPortMapping
Sep  7 19:06:01 OpenWrt daemon.info miniupnpd[7232]: AddPortMapping: ext port 65379 to 192.168.1.16:15301 protocol UDP for: Thunder5
Sep  7 19:06:01 OpenWrt daemon.debug miniupnpd[7232]: UPnP permission rule 0 matched : port mapping accepted
Sep  7 19:06:01 OpenWrt daemon.info miniupnpd[7232]: redirecting port 65379 to 192.168.1.16:15301 protocol UDP for: Thunder5

查看Iptables链UPNP添加的规则:

iptables -L MINIUPNPD -nv
Chain MINIUPNPD (1 references)
 pkts bytes target     prot opt in     out     source               destination         
26245   18M ACCEPT     tcp  --  *      *       0.0.0.0/0            192.168.1.16        tcp dpt:65379 
18182 4423K ACCEPT     udp  --  *      *       0.0.0.0/0            192.168.1.16        udp dpt:15301 
iptables -t nat -L MINIUPNPD -nv
Chain MINIUPNPD (1 references)
 pkts bytes target     prot opt in     out     source               destination         
  676 61598 DNAT       tcp  --  *      *       0.0.0.0/0            0.0.0.0/0           tcp dpt:65379 to:192.168.1.16:65379 
  316 22320 DNAT       udp  --  *      *       0.0.0.0/0            0.0.0.0/0           udp dpt:65379 to:192.168.1.16:15301 

VMware虚拟机安装DD-wrt x86

发布时间:September 6, 2012 // 分类:DD-WRT,VMware // 1 Comment

在已存在虚拟机内新建硬盘,接口一定要为IDE,不然安装后DD-wrt一直重启。虚拟机使用Winodws和Linux都可,用于将DD-wrt镜像写入到硬盘中,然后新建VMware虚拟机以此硬盘启动DD-wrt。
下载DD-wrt x86镜像,选择dd-wrt_public_vga.image
Linux下使用dd命令写入DD-wrt镜像:

#https://www.haiyun.me
dd if=./dd-wrt_public_vga.image of=/dev/sdb
记录了22528+0 的读入
记录了22528+0 的写出
11534336字节(12 MB)已复制,0.610544 秒,18.9 MB/秒

Windows下使用physdiskwrite工具写入:

physdiskwrite c:\dd-wrt_public_vga.image
#如果硬盘大于2G加-u参数
physdiskwrite v0.5.2 by Manuel Kasper <mk@neon1.net>

Searching for physical drives...

Information for \\.\PhysicalDrive0:
   Windows:       cyl: 5221
                  tpc: 255
                  spt: 63
   C/H/S:         16383/15/63
   Model:         VMware Virtual IDE Hard Drive
   Serial number: 00000000000000000001
   Firmware rev.: 00000001

Information for \\.\PhysicalDrive1:
   Windows:       cyl: 130
                  tpc: 255
                  spt: 63
   C/H/S:         2080/16/63
   Model:         VMware Virtual IDE Hard Drive
   Serial number: 01000000000000000001
   Firmware rev.: 00000001

Which disk do you want to write? (0..1) 1
11534336/11534336 bytes written in total

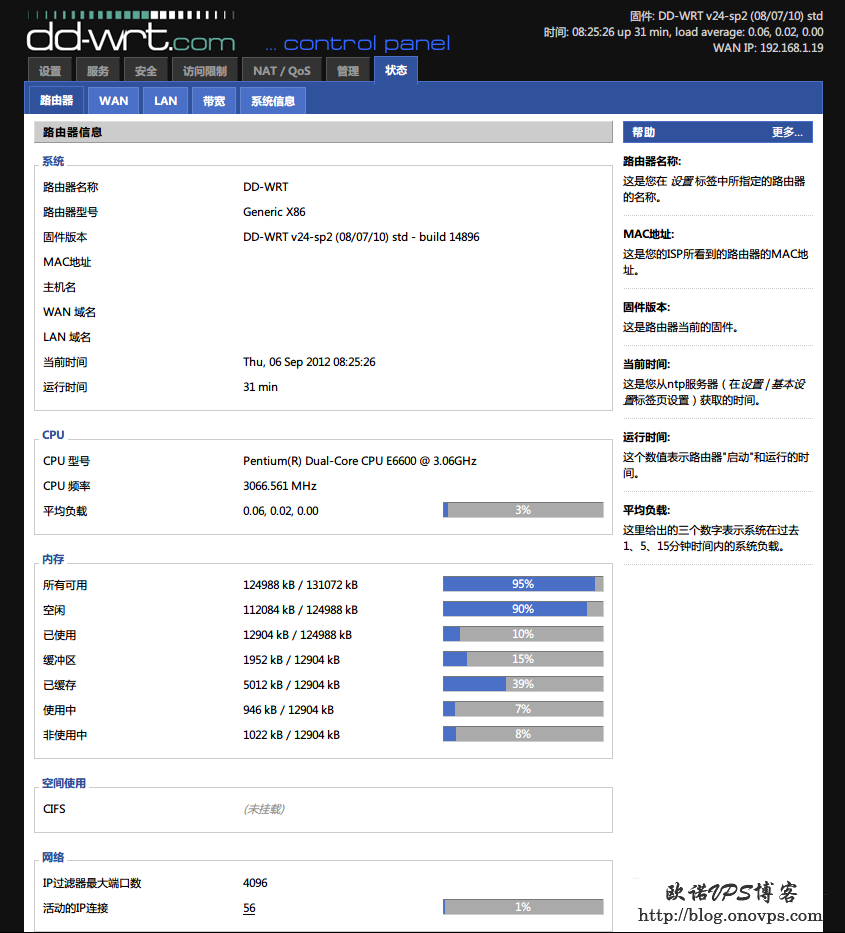
新建VMware虚拟机使用刚刚写入DD-wrt镜像的硬盘启动系统,默认账号root,密码:admin。
DD-wrt管理界面.png

Openssl配合tar加密解密文件

发布时间:September 5, 2012 // 分类:OpenSSL // No Comments

单独使用openssll加密解密文件:

#列出支持的加密算法
openssl enc -list
#加密文件
openssl enc -e -aes-256-cfb -pbkdf2 -salt -iter 10000 -md sha256 -k 123456 -in file -out file.aes
#解密文件
openssl enc -d -aes-256-cfb -pbkdf2 -salt -iter 10000 -md sha256 -k 123456 -in file.aes -out file
#使用pbkdf2算法通过密码、随机salt、iter次数、sha256生成aes加密key和iv
#-salt默认启用
#-md默认sha256
#-iter默认10000

使用tar压缩加密解密文件:

#tar打包加密文件
tar -zcf - directory | openssl enc -e -aes-256-cfb -pbkdf2 -k 123456 -out directory.tar.gz.aes 
#tar打包解密文件
openssl enc -d -aes-256-cfb -pbkdf2 -k 123456 -in directory.tar.gz.aes | tar -xz -f - 

也可使用gpg加密解密文件

https://www.openssl.org/docs/man1.1.1/man1/enc.html
https://imil.net/blog/posts/2020/openssl-pbkdf2-default-iterations/

分类
最新文章
最近回复
  • opnfense: 谢谢博主!!!解决问题了!!!我之前一直以为内置的odhcp6就是唯一管理ipv6的方式
  • liyk: 这个方法获取的IPv6大概20分钟之后就会失效,默认路由先消失,然后Global IPV6再消失
  • 海运: 不好意思,没有。
  • zongboa: 您好,請問一下有immortalwrt設定guest Wi-Fi的GUI教學嗎?感謝您。
  • 海运: 恩山有很多。
  • swsend: 大佬可以分享一下固件吗,谢谢。
  • Jimmy: 方法一 nghtp3步骤需要改成如下才能编译成功: git clone https://git...
  • 海运: 地址格式和udpxy一样,udpxy和msd_lite能用这个就能用。
  • 1: 怎么用 编译后的程序在家里路由器内任意一台设备上运行就可以吗?比如笔记本电脑 m参数是笔记本的...
  • 孤狼: ups_status_set: seems that UPS [BK650M2-CH] is ...