海运的博客

ROS配置PPPOE服务器使用Freeradius+Raidusmanager验证管理

发布时间:July 26, 2012 // 分类:RADIUS,ROS // No Comments

1.ROSPPPOE服务器配置

ip pool add name=pppoe ranges=192.168.2.2-192.168.2.254 
#新建PPPOE客户端IP池              
ppp profile set default local-address=pppoe remote-address=pppoe dns-server=8.8.8.8,4.4.4.4 
#新建PPPOE模板
interface pppoe-server server add service-name=pppoe interface=ether2 authentication=pap \
default-profile=default one-session-per-host=yes keepalive-timeout=10 disabled=no
#开启并设置PPPOE服务器
ppp secret add name=user password=passwd service=pppoe 
#使用本地pap验证,新建PPPOE用户

2.ROS端配置使用RADIUS验证:

ppp aaa set use-radius=yes 
#允许使用RADIUS认证     
radius add address=192.168.1.22 secret=root service=ppp authentication-port=1812 \
accounting-port=1813 disabled=no 
#设置RADIUS服务器地址,验证端口,验证服务
radius incoming set accept=yes port=1700 
#允许RADIUS端断开用户PPP连接

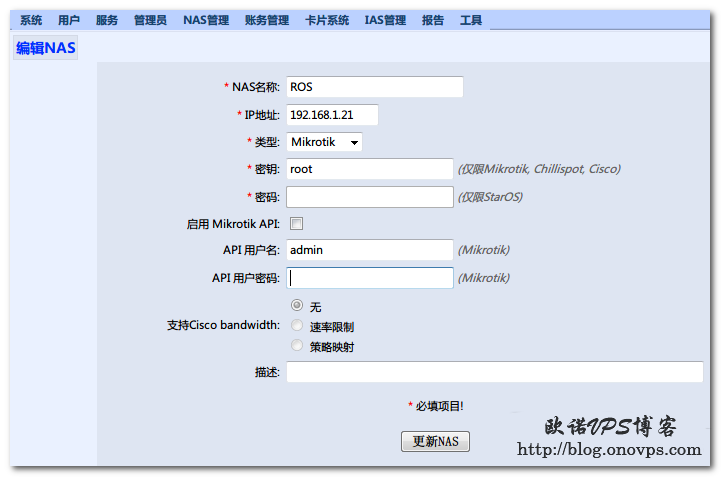
3.Radiusmanager端配置,新建NAS,即ROS客户端:
Radiusmanager添加NAS.png
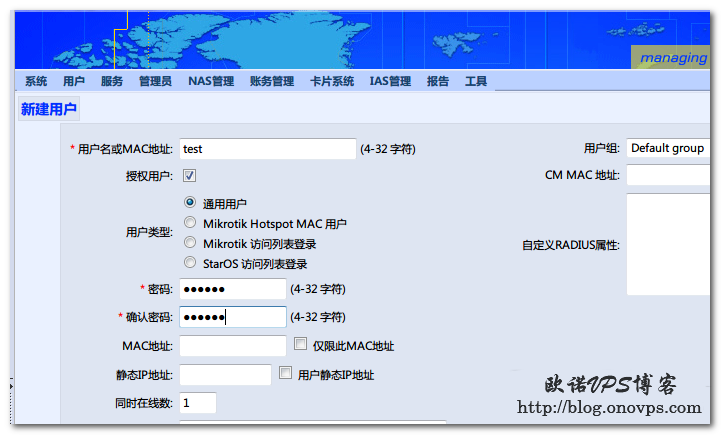
新建用户,即PPPOE客户:
Radiusmanager新建用户.png
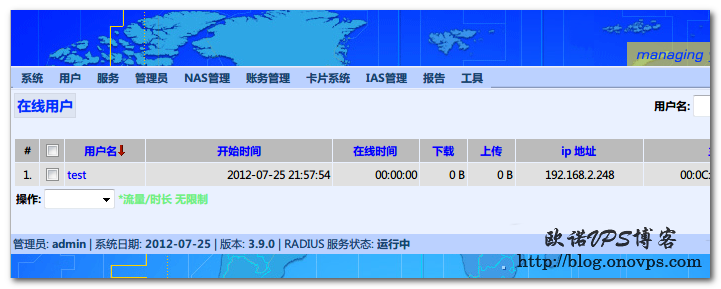
测试PPPOE登录:
radiusmanager在线用户.png
Radiusmanager免费开源替代产品Daloradius请参考ROS使用Daloradius+Freeradius验证

Centos安装配置Radiusmanager3.9

发布时间:July 25, 2012 // 分类:RADIUS // No Comments

关闭SElinux:

cat /etc/sysconfig/selinux 
SELINUX=disabled
reboot #重启生效

安装httpd和mysql:

yum install -y httpd mod_ssl php php-common php-gd php-pear php-pecl-memcache php-mhash php-xml gcc gcc-c++
yum install -y mysql-devel curl php-mysql php-mcrypt compat-libstdc++-33 libtool-ltdl-devel
/etc/init.d/mysqld start
/etc/init.d/httpd start
chkconfig httpd on
chkconfig mysqld on
/usr/bin/mysqladmin -u root password 'newpassowrd' #设置Mysql root密码
#下面脚本用于新建radiusmanger数据库和用户,可自行修改。
cat >> mysql-temp.sql << END
CREATE DATABASE radius;
CREATE DATABASE conntrack;
CREATE USER 'radius'@'localhost' IDENTIFIED BY 'radius123';
CREATE USER 'conntrack'@'localhost' IDENTIFIED BY 'conn123';
GRANT ALL ON radius.* TO radius@localhost;
GRANT ALL ON conntrack.* TO conntrack@localhost;
END
mysql -u root -p < mysql-temp.sql

安装inocube:

wget http://www.dmasoftlab.com/cont/download/ioncube_loaders_lin_x86.tar.gz
tar zxvf ioncube_loaders_lin_x86.tar.gz 
cp -r ioncube /usr/local/

配置PHP加载inocube:

php -v #查看php版本,加载inocube对应版本。
cat >>/etc/php.ini << END
zend_extension=/usr/local/ioncube/ioncube_loader_lin_5.1.so
END
/etc/init.d/httpd restart
php -m|grep ioncube #查看是否成功加载ioncube模块

安装freeradius:

wget http://www.dmasoftlab.com/cont/download/freeradius-server-2.1.8-dmamod-1.tar.gz
tar zxvf freeradius-server-2.1.8-dmamod-1.tar.gz 
cd freeradius-server-2.1.8
./configure
make
make install
chmod 644 /usr/local/etc/raddb/dictionary
chown apache /usr/local/etc/raddb
chown apache /usr/local/etc/raddb/clients.conf
radiusd -X 

修改网卡MAC用于通过验证:

cat >> /etc/sysconfig/network-scripts/ifcfg-eth0 <<EOF
MACADDR=00:D0:09:B8:B7:34
END
/sbin/ifconfig eth0 down
/sbin/ifconfig eth0 hw ether 00:D0:09:B8:B7:34
/sbin/ifconfig eth0 up

安装radiusmanager:

wget http://deluxsola.googlecode.com/files/radiusmanager-3.9.0.tar.gz
tar zxvf radiusmanager-3.9.0.tar.gz 
cd radiusmanager-3.9.0
./install.sh

GNS3使用VPCS虚拟PC测试网络

发布时间:July 25, 2012 // 分类:Cisco // No Comments

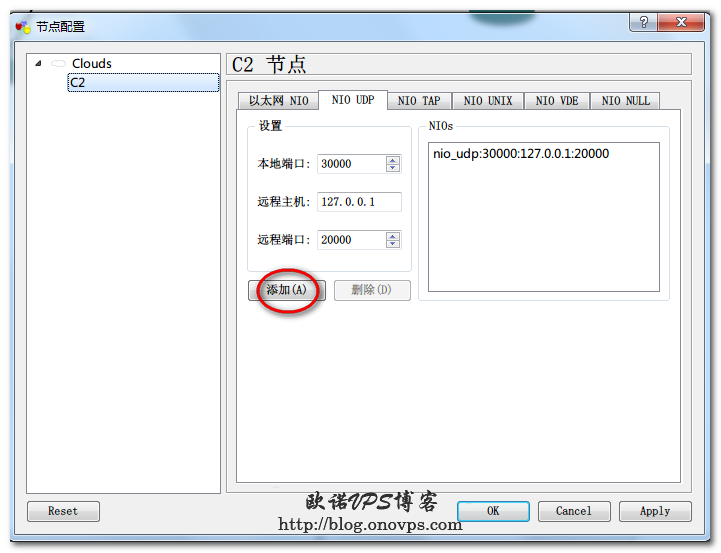
右键Host拖入工作区,右键配置——NIO UDP,添加相应端口后面配置VPCS会用到,用做VPCS和路由连接。
GNS2下VPCS配置.png
连接路由和Host设备。
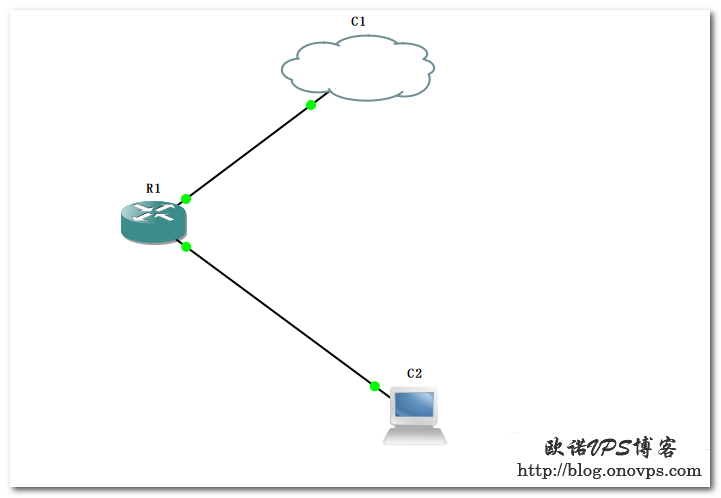
GNS3连接虚拟VPCS.png
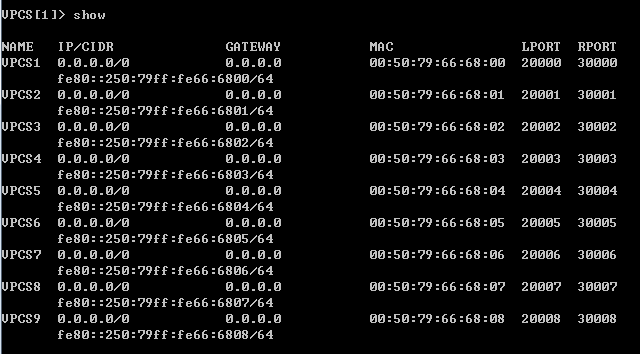
查看VPCS配置:
VPSC查看当前配置.png
配置VPCS IP:

1 #进入与之前UDP PIO相对应的虚拟界面,本地端口20000
ip 192.168.30.2 192.168.30.1 24

在VSCS虚拟电脑内ping测试:
VPCS虚拟电脑内ping测试.png

GNS3和VMware构建网络实验环境

发布时间:July 24, 2012 // 分类:VMware,Cisco // No Comments

实验环境如下:
VMware新建ROS虚拟机,Wan端以桥接方式连接,IP:192.168.1.21,
Lan端以Host-only连接,IP:192.168.40.2
GNS3运行Cisco路由连接ROS Lan端,FastEthernet0/0 IP:192.168.40.3
FastEthernet0/1 IP:192.168.30.1
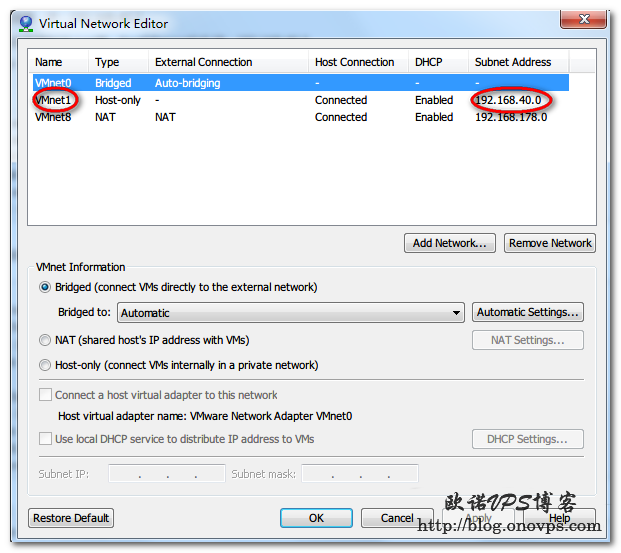
VMware网络查看:
VMware网络管理.png
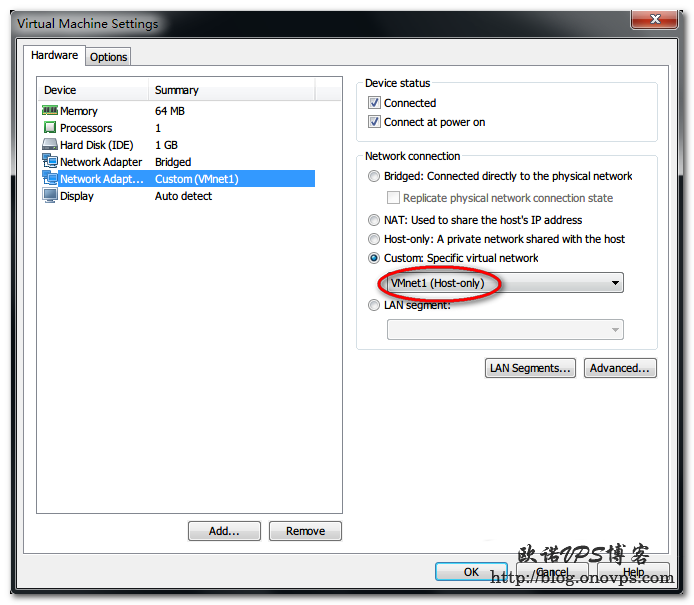
配置ROS网卡为host-only:
VMware网卡host-only.png
ROS内配置:

#https://www.haiyun.me
ip address add address=192.168.1.21/24 interface=ether1 
ip address add address=192.168.40.2/24 interface=ether2 
ip route add gateway=192.168.1.1
ip route add dst-address=192.168.30.0/24 gateway=192.168.40.3
ip dns set servers=192.168.1.1
ip firewall nat add chain=srcnat src-address=192.168.40.0/24 action=masquerade 

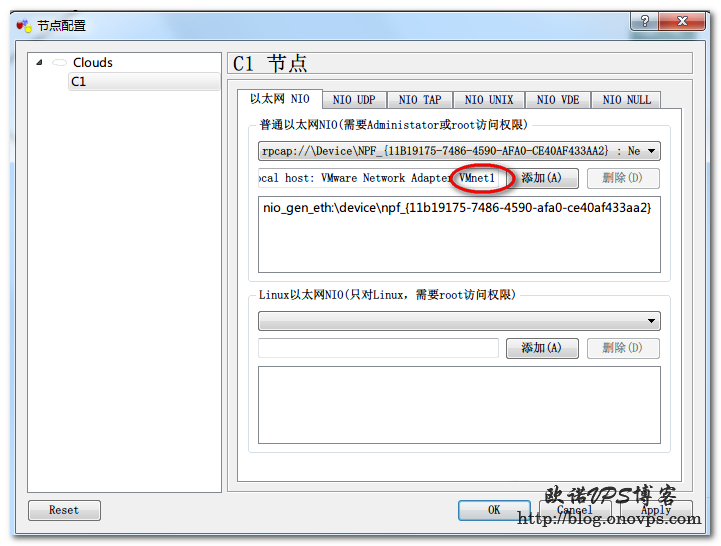
GNS3工作区,Cloud添加vmnet1(Host-only),并用连接线连接到Router FastEthernet0/0。
GNS3添加VMnet1.png
Router配置:

enable
configure terminal 
interface fastEthernet 0/0
ip address 192.168.40.3 255.255.255.0
no shutdown
exit
interface fastEthernet 0/1
ip address 192.168.30.1 255.255.255.0
no shutdown
ip route 0.0.0.0 0.0.0.0 192.168.40.2
ip name-server 192.168.1.1

Router内Ping测试:

Router#ping 192.168.40.2

Type escape sequence to abort.
Sending 5, 100-byte ICMP Echos to 192.168.40.2, timeout is 2 seconds:
!!!!!
Success rate is 100 percent (5/5), round-trip min/avg/max = 8/24/56 ms
Router#ping 192.168.1.1 

Type escape sequence to abort.
Sending 5, 100-byte ICMP Echos to 192.168.1.1, timeout is 2 seconds:
!!!!!
Success rate is 100 percent (5/5), round-trip min/avg/max = 8/11/12 ms
Router#ping www.haiyun.me 
Translating "www.haiyun.me"...domain server (192.168.1.1) [OK]

Type escape sequence to abort.
Sending 5, 100-byte ICMP Echos to 184.164.141.188, timeout is 2 seconds:
!!!!!
Success rate is 100 percent (5/5), round-trip min/avg/max = 348/354/360 ms

后续也可使用VCPS虚拟PC配合GNS3进行测试。

GNS3使用Xshell管理Cisco终端

发布时间:July 24, 2012 // 分类:Cisco,Xshell // 2 Comments

Windows 32位下:

c:\Program Files\NetSarang\Xshell 3\xshell.exe -url telnet://%h:%p

Windows 64位下:

c:\Program Files (x86)\NetSarang\Xshell 3\xshell.exe -url telnet://%h:%p
分类
最新文章
最近回复
  • opnfense: 谢谢博主!!!解决问题了!!!我之前一直以为内置的odhcp6就是唯一管理ipv6的方式
  • liyk: 这个方法获取的IPv6大概20分钟之后就会失效,默认路由先消失,然后Global IPV6再消失
  • 海运: 不好意思,没有。
  • zongboa: 您好,請問一下有immortalwrt設定guest Wi-Fi的GUI教學嗎?感謝您。
  • 海运: 恩山有很多。
  • swsend: 大佬可以分享一下固件吗,谢谢。
  • Jimmy: 方法一 nghtp3步骤需要改成如下才能编译成功: git clone https://git...
  • 海运: 地址格式和udpxy一样,udpxy和msd_lite能用这个就能用。
  • 1: 怎么用 编译后的程序在家里路由器内任意一台设备上运行就可以吗?比如笔记本电脑 m参数是笔记本的...
  • 孤狼: ups_status_set: seems that UPS [BK650M2-CH] is ...