存储库 (SR)
XenServer 定义了一个名为存储库 (SR) 的容器来描述存储虚拟磁盘映像 (VDI) 的特定存储目标。SR 具有对本地连接的 IDE、SATA、SCSI 和 SAS驱动器和远程连接的 iSCSI、NFS、SAS 和光纤通道的内置支持,因而非常灵活。
物理块设备 (PBD)
物理块设备代表物理服务器和连接的 SR 之间的接口。
虚拟磁盘映像 (VDI)
虚拟磁盘映像是显示给 VM 的存储抽象,VDI 是 XenServer 中的虚拟化存储的基本单元。
虚拟块设备 (VBD)
虚拟块设备是连接器对象(与上述的 PBD 类似),可用于在 VDI 和 VM 之间进行映射。VBD 还可用于微调给定 VDI 的 QoS(服务质量)、统计数据和可引导性等相关参数。
它们之间的联系可以可以用下图说明: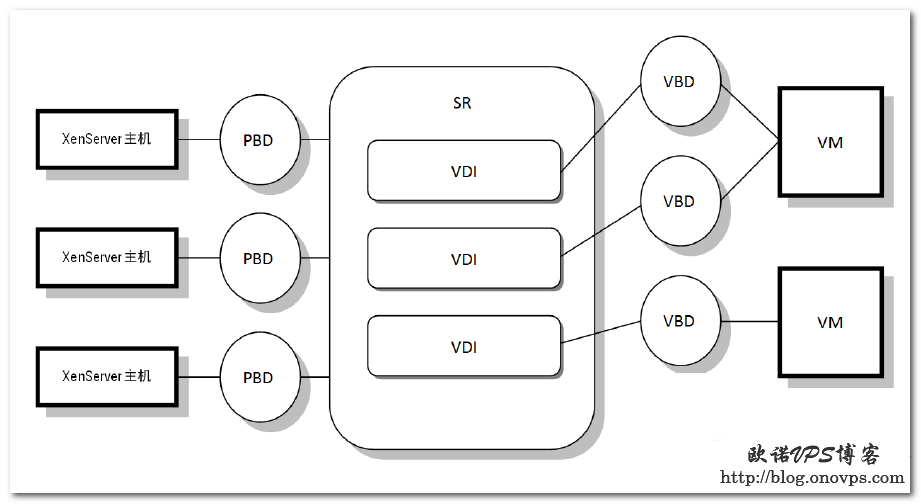
XenServer存储概述
发布时间:April 22, 2012 // 分类:虚拟化 // No Comments
Centos/Linux下安装配置Cacti中文版
发布时间:April 21, 2012 // 分类:Cacti // 4 Comments
先来张Cacti监控效果图: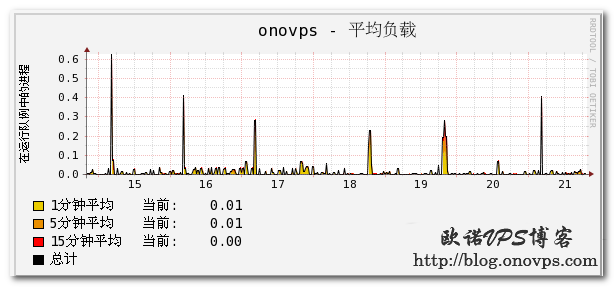
安装Cacti前请先安装LAMP或LNMP环境。
1.首先安装相关软件,由于官方源无rrdtool,可先安装EPEL源。
yum -y install net-snmp net-snmp-libs net-snmp-utils net-snmp-devel rrdtool2.下载Cacti中文版,解压缩移至网站目录。
wget http://blogimg.chinaunix.net/blog/upfile2/090815172648.gz
tar zxvf 090815172648.gz
mv cacti-0.8.7e-cn-utf8/ /home/wwwroot/cacti
cd /home/wwwroot/cacti
3.新建Cacti数据库和数据库用户,为安全以一般用户运行。
mysql -u root -p
create database cacti default character set utf8;
grant all privileges on cacti.* to cacti@localhost identified by 'password' ;
#新建数据库用户cacti并授予cacti数据库权限
flush privileges;
#刷新权限表
exit
4.导入Cacti数据库。
mysql -u cacti -p cacti <cacti.sql5.修改cacti配置文件
include/config.php
$database_type = "mysql";
$database_default = "cacti"; #数据库名称
$database_hostname = "localhost";
$database_username = "cactiuser"; #数据库用户名
$database_password = "cactipasswd"; #数据库密码
$database_port = "3306";
6.添加计划任务。
crontab -e
*/5 * * * * php /home/wwwroot/cacti/poller.php >/dev/null &2>1
7.不出意外就可以安装cacti程序了,访问www.haiyun.me/cacti会出现安装界面。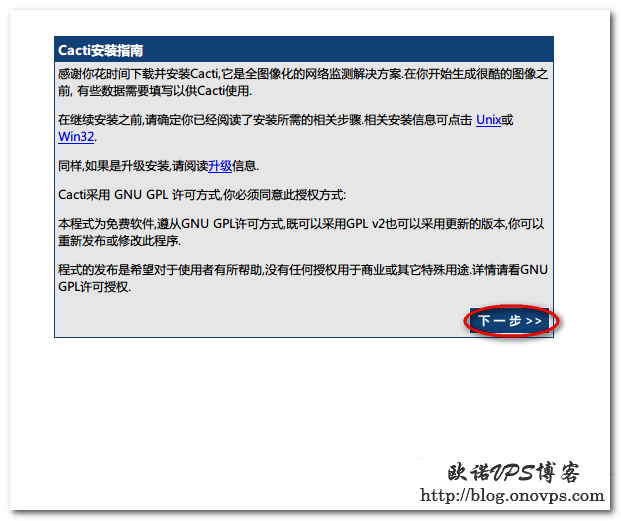
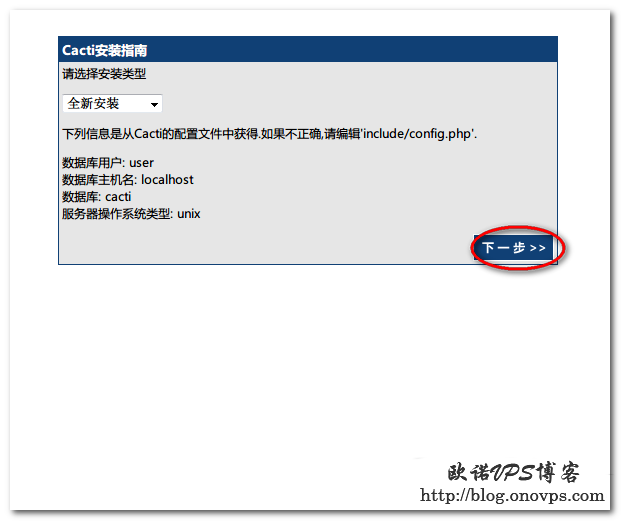
RRDTool请选择1.3版本,低版本图像中文可能会乱码。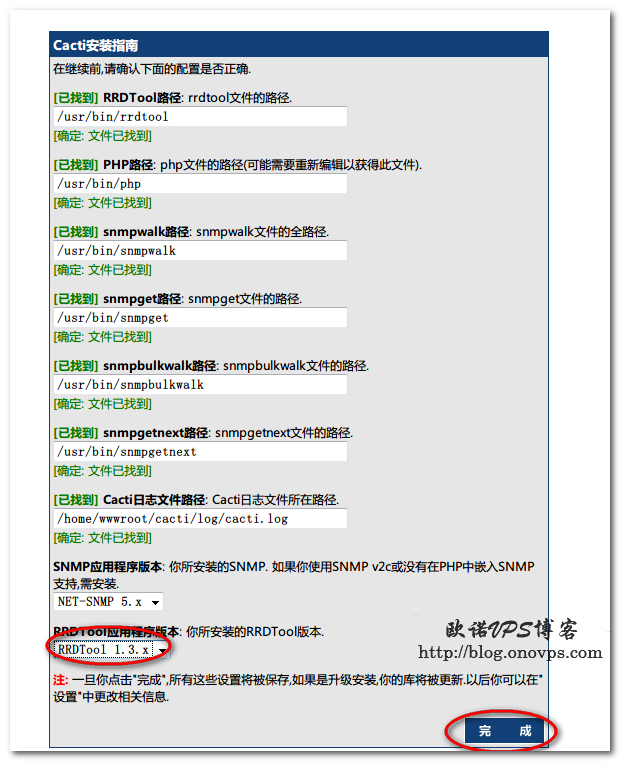
8.RRA目录用于存入图表数据文件服务器用户要拥有写入权限。
到此就算安装完成了,默认账号、密码:admin admin,首次登入强制更改密码,后续会介绍添加服务器监控及配置方法。
Openwrt/Linux安装squid做透明代理缓存服务器
发布时间:April 21, 2012 // 分类:Squid,OpenWrt,Linux服务 // 3 Comments
安装Squid:
opkg update
opkg install squid
cd /etc/squid
mv squid.conf squid.conf.back
vim squid.conf
配置文件:
visible_hostname proxy.www.haiyun.me #主机名
cache_mgr onovps@www.haiyun.me #管理员邮箱
http_port 3128 transparent #监听端口3128,透明代理
icp_port 0 #单机模式
dns_nameservers 192.168.1.1 #DNS
#cache_effective_user squid #运行用户
#cache_effective_group squid #运行用户组
pid_filename /tmp/squid.pid #pid文件
error_directory /usr/share/squid/errors/Simplify_Chinese #错误提示文件
emulate_httpd_log on #开启httpd日记格式
#logformat log %>a %ui %un [%tl] "%rm %ru HTTP/%rv" %Hs %<st "%{Referer}>h" "%{User-Agent}>h" %Ss:%Sh #自定义日记模式
cache_access_log /mnt/log/access.log #日记路径
cache_log none #无cache日记
cache_store_log none #无store日记
cache_dir ufs /mnt/cache/ 2048 16 256 #硬盘缓存2G,一级目录16,二级目录256
cache_mem 16 MB #内存缓存16M
cache_swap_low 90
cache_swap_high 95
minimum_object_size 0 KB #最小缓存不限制
maximum_object_size 4096 KB #最大缓存4M
cache_vary on #开启vary缓存
connect_timeout 1 minute #连接超时1分
request_timeout 1 minutes #请求超时1分

acl QUERY urlpath_regex -i cgi-bin \?
cache deny QUERY #不缓存cgin-bin

acl bt url_regex -i ^http://.*\.torrent$
http_access deny bt    #禁止下载torrent
acl files urlpath_regex -i "/etc/squid/files.txt" #过滤下载文件后缀
acl sites dstdom_regex "/etc/squid/sites.txt"   #过滤特定网址
acl keys url_regex -i "/etc/squid/keys.txt"  #过滤特定关键词
acl nocache_sites dstdom_regex "/etc/squid/nocache_sites.txt" #指定不缓存网址
acl nocache_files urlpath_regex -i "/etc/squid/nocache_files.txt" #指定不缓存文件后缀
http_access deny files
http_access deny sites
http_access deny keys
cache deny nocache_sites
cache deny nocache_files

acl all src 0.0.0.0/0.0.0.0
acl manager proto cache_object
acl localhost src 127.0.0.1/255.255.255.255
acl localnet src 192.168.1.0/255.255.255.0
acl SSL_ports port 443 563 10000
acl Safe_ports port 80 21 443 56370 210 1025-65535 280 488 591

http_access allow manager localhost
http_access deny manager
http_access allow localnet
http_access deny all

#acl apache rep_header Server ^Apache
broken_vary_encoding allow all #开启压缩
header_access X-Forwarded-For deny all #禁止 X-Forwarded头
header_access HTTP_VIA deny all   #禁止HTTP_VIA
header_access Via deny all #禁止Via头
refresh_pattern -i \.css$ 1440 50% 129600 reload-into-ims
refresh_pattern -i \.xml$ 1440 50% 129600 reload-into-ims
refresh_pattern -i \.htm$ 1440 90% 129600 reload-into-ims
refresh_pattern -i \.html$ 1440 90% 129600 reload-into-ims
refresh_pattern -i \.shtml$ 1440 90% 129600 reload-into-ims
refresh_pattern -i \.png$ 1440 90% 129600 reload-into-ims
refresh_pattern -i \.jpg$ 1440 90% 129600 reload-into-ims
refresh_pattern -i \.jpeg$ 1440 90% 129600 reload-into-ims
refresh_pattern -i \.gif$ 1440 90% 129600 reload-into-ims
refresh_pattern -i \.bmp$ 1440 90% 129600 reload-into-ims
refresh_pattern -i \.js$ 1440 90% 129600 reload-into-ims

refresh_pattern -i \.mp3$ 1440 50% 2880 ignore-reload
refresh_pattern -i \.wmv$ 1440 50% 2880 ignore-reload
refresh_pattern -i \.rm$ 1440 50% 2880 ignore-reload
refresh_pattern -i \.swf$ 1440 50% 2880 ignore-reload
refresh_pattern -i \.mpeg$ 1440 50% 2880 ignore-reload
refresh_pattern -i \.wma$ 1440 50% 2880 ignore-reload

refresh_pattern -i \.exe$ 1440 50% 2880 ignore-reload
refresh_pattern -i \.rar$ 1440 50% 2880 ignore-reload
refresh_pattern -i \.zip$ 1440 50% 2880 ignore-reload
refresh_pattern -i \.gz$ 1440 50% 2880 ignore-reload
refresh_pattern -i \.bz2$ 1440 50% 2880 ignore-reload
refresh_pattern -i \.7z$ 1440 50% 2880 ignore-reload
squid相关指令:
squid -k reconfigure #重置
squid -k parse  #检测配置文件
squid -k shutdown #关闭
squid -k rotate  #分割日记
Openwrt下安装squid后无init脚本,管理不方便,自己简单写了个。
#/bin/bash
#Create by www.haiyun.me
case $1 in
stop)
  squid -k shutdown
  ;;
start)
  squid
  ;;
restart)
  squid -k reconfigure
  ;;
check)
  squid -k parse
  ;;
*)
  echo "Please use restart|start|stop|check"
  ;;
esac
iptables配置:
opkg install iptables-utils iptables-mod-nat-extra
iptables -t nat -A PREROUTING -i br-lan -p tcp  --dport 80 -j REDIRECT --to-ports 3128
Openwrt安装USB驱动挂载U盘
发布时间:April 21, 2012 // 分类:OpenWrt // 2 Comments
opkg update
opkg install kmod-usb-core
opkg install kmod-usb-ohci #安装usb ohci控制器驱动
#opkg install kmod-usb-uhci  #UHCI USB控制器
opkg install kmod-usb2 #安装usb2.0
opkg install kmod-usb-storage #安装usb存储设备驱动
opkg install usbutils #安装了这个后可以用 lsusb
opkg install kmod-fs-ext2 #安装ext2分区支持
opkg install kmod-fs-ext3 #安装ext3分区格式支持组件
opkg install kmod-fs-ntfs #ntfs内核驱动
opkg install mount.ntfs-3g #挂载ntfs助手
opkg install mount-utils #挂载卸载工具
opkg install ntfs-3g #挂载NTFS
opkg install kmod-fs-vfat #挂载FAT
opkg install fdisk #硬盘分区管理工具
挂载分区:
mount -t ext2 /dev/sda1 /mnt/开机自动挂载:
echo "/dev/sda1 /mnt/ ext2 rw,async,noatime,nodiratime 0 0 ">> /etc/fstab分类
- Apache (13)
- Nginx (45)
- PHP (86)
- IIS (8)
- Mail (17)
- DNS (16)
- Cacti (14)
- Squid (5)
- Nagios (4)
- Puppet (7)
- CentOS (13)
- Iptables (23)
- RADIUS (3)
- OpenWrt (41)
- DD-WRT (1)
- VMware (9)
- 网站程序 (2)
- 备份存储 (11)
- 常用软件 (20)
- 日记分析 (10)
- Linux基础 (18)
- 欧诺代理 (0)
- Linux服务 (18)
- 系统监控 (4)
- 流量监控 (7)
- 虚拟化 (28)
- 伪静态 (2)
- LVM (3)
- Shell (18)
- 高可用 (2)
- 数据库 (16)
- FreeBSD (3)
- 网络安全 (25)
- Windows (35)
- 网络工具 (22)
- 控制面板 (3)
- 系统调优 (10)
- Cisco (3)
- VPN (6)
- ROS (20)
- Vim (14)
- KMS (4)
- PXE (2)
- Mac (1)
- Git (1)
- PE (1)
- LNS (2)
- Xshell (7)
- Firefox (13)
- Cygwin (4)
- OpenSSL (9)
- Sandboxie (3)
- StrokesPlus (1)
- AutoHotKey (4)
- Total Commander (3)
- WordPress (3)
- iMacros (6)
- Typecho (2)
- Ollydbg (1)
- Photoshop (1)
- 正则 (3)
- Debian (3)
- Python (8)
- NoSQL (6)
- 消息队列 (4)
- JS (7)
- Tmux (3)
- GO (7)
- HHVM (2)
- 算法 (1)
- Docker (2)
- PT (15)
- N1 (16)
- K2P (6)
- LUKS (4)
最新文章
- debian 12开机关机systemd-journald日志不连续解决
- debian12下initramfs-tools使用udhcpc配置dhcp ip
- dns压力测试工具queryperf使用
- sandboxie plus运行firefox 140播放视频全屏不能覆盖任务栏
- TEWA-1100G光猫使用
- 烽火光猫HG5382A3使用
- 记联通更换移动XG-040G-MD光猫
- smokeping slave同步错误illegal attempt to update using time解决
- 使用valgrind定位解决smartdns内存泄露
- 此内容被密码保护